
Introduction:
Oracle Integration Cloud Service ( ICS)
ICS is simple but powerful integration service that helps maximize the value of your investments in both saas and on-premise applications . it is an easy to use integration platform that helps develop deploy , execute , manage and monitor integrations Oracle has a very clear cloud offering in the different recognized flavors: PaaS, SaaS and IaaS.
Key Features
Simplified: Web based, Point & Click integration experience
-
Auto-Associate – Pre-loaded with your existing Oracle SaaS subscriptions.
-
Version Aware – No need to continually update for new versions of Oracle applications
-
Built-in Security – Leverage existing built-in Oracle security
-
Monitor Dashboards – Intuitive visibility into your business out-of-the-box
Highly Visible: Rich monitoring & error management. Detect errors early and follow with intuitive corrective action
Lifecycle : Support both on-premise, cloud lifecycle tools
Managed: Backs Up, Patches, Upgrades are all taken managed by Oracle.
Benefits
Pre-integrated SaaS, PaaS Auto-Association
Integration Pre-builts: Customize, Activate
Rich Connectivity with Cloud & On-premise Connectors
Rapid and fully automated provisioning
Prerequisites for this tutorial :
Install SOAPUI client from below location . Any of the version will be fine .
https://www.soapui.org/downloads/latest-release.html
SoapUI is the world’s leading Open Source Functional Testing Tool, mainly it is used for API Testing .
SoapUI supports multiple protocols such as SOAP, REST, HTTP, JMS, AMF and JDBC.
SoapUI enables you to create advanced Performance Tests very quickly and run Automated Functional Tests.
Objective:
This tutorial guides you through the process of creating your first cloud integration.Integrations use the connections you created to your applications, and define how information is shared between those applications. You can create new integrations, import integrations, modify or delete integrations, create integrations to publish messages, create integrations to subscribe to messages, and add and remove request and response enrichment triggers. It introduces you to the ICS user interface and shows you how to:
-
Create a simple integration flow
When integrating services with Oracle’s Integration Cloud Service, there are two main steps you need to complete. First, you create connections, then you integrate those connections. For each connection you add a contact, configure the connectivity by specifying a WSDL URL, and then secure the connection by adding credentials. To create the integration, you configure the source and the target, then you map the business objects to each other.
-
Integrate with simple SOAP-based web services
Connections define information about the instances of each predefined configuration you are integrating. Oracle Integration Cloud Service includes a set of predefined adapters, which are the types of applications on which you can base your connections, such as Oracle Sales Cloud, Oracle Eloqua Cloud, Oracle RightNow Cloud, and others. A connection is based on an adapter. A connection includes the additional information required by the adapter to communicate with a specific instance of an application (this can be referred to as metadata or as connection details). For example, to create a connection to a specific RightNow Cloud application instance, you must select the Oracle RightNow adapter and then specify the WSDL URL, security policy, and security credentials to connect to it.
The SOAP Adapter enables you to connect to any SOAP web service.
The SOAP Adapter enables you to expose an Integration Cloud Service integration as a SOAP web service and to invoke an external SOAP web service. When creating a connection with the SOAP Adapter, you can either upload the WSDL file (using the Upload button) or provide a URL to the WSDL file. When you invoke the wizard to create a connection, the contents of the specified WSDL file are read and the port type, operation, and service to use are displayed. If your WSDL includes only a single service, port type, and operation, they are automatically selected. If the WSDL includes multiple services, port types, and operations, you can select the ones to use in your integration.
-
Map elements between trigger/source and invoke/target elements
-
Activate and test the integration
The flow you build follows a simple request/response pattern. A trigger/source application issues a request to retrieve data from a invoke/target application via ICS and instantaneously receives a response.
Creating Hello World Integration Flow:
1. Click the Designer link at the top right corner of the ICS console UI:
2. Click the Connections link
3. Click “Create New Connection” button and select “SOAP” Adapter
4. Enter the following information into the New Integration Information dialog box:
|
Field |
Action |
|
Connection Name |
Give a proper Connection name. In may case I am giving Greetings_A2f_96_138 |
|
Identifier |
Nothing to enter. Automatically generated from the connection name: |
|
Connection Role |
Trigger and Invoke |
|
Description |
Leave it blank |
5. Specify the email address you want : This email address is being protected from spambots. You need JavaScript enabled to view it.
6. In the “Connection Properties” section click on “Configure Connectivity” button and specify the following wsdl url
and click “OK”.
https://jcssaasextensitrial4091-usoracleptssatrial25938.java.us2.oraclecloudapps.com/Greeting/GreetingPort?wsdl
Your configuration section should look something like below:

7. In the “Security” section click on “Configure Security” button. Select the Security Policy as “No Security Policy” and
Click OK.
8. Click on “Test” at the top right corner. If the connection is tested successfully you will observe the connection
completion shows up as 100%. Also you will observe a message “The connection test was successful”.
9. Click “Save” and “Exit Connection”
10. Click the Designer link at the top right corner of the ICS console UI:
11. Click the Integrations link.
12. Click the Create New Integration button and select “Map My Data” option on the following window.
13. Enter the following information into the New Integration Information dialog box:
|
Field |
Action |
|
Integration Name |
Give a proper Integration name. In may case I am giving Hello_World_A2f_96_138 |
|
Identifier |
Nothing to enter. Automatically generated from the connection name: |
|
Version |
Nothing to enter. Use the default value of 01.00.0000. |
|
Package Name |
Leave it blank |
|
Description |
Leave it blank |
14. Click on the Create button.
15. Drag the “Greetings_A2f_96_138” SOAP connection icon over the trigger/source area.
16. Fill in the Configure SOAP Endpoint wizard page with the following information:
|
Field |
Enter |
|
What do you want to call your connection? |
Greetings |
17. Click “Next”. Since there is only one “Port Type” and “Operation” there are shown automatically in this step.
18. Click “Next”. The Summary page shows the information configured till now in the wizard.
19. After reviewing the information click “Done”. Save your work by clicking on save icon. Exit , to do next steps.
What you just modeled serves as the web service interface for the integration flow so that external applications can invoke this integration flow over HTTP. Save and exit the integration flow.
20. Click the Designer link at the top right corner of the ICS console UI:
21. Click the Connections link
22. Click “Create New Connection” button and select “SOAP” Adapter
23. Enter the following information into the New Integration Information dialog box:
Field Entry
|
Field |
Entry |
|
Connection Name |
SayHello_A2f_49_138 |
|
Identifier |
Will be automatically generated based on connection name |
24. Specify the email address you want eg. This email address is being protected from spambots. You need JavaScript enabled to view it.
25. In the “Connection Properties” section click on “Configure Connectivity” button and specify the following wsdl url and click “OK”.
Your configuration section should look something like below:

26. In the “Security” section click on “Configure Security” button. Select the Security Policy as “No Security Policy” and
Click OK.
27. Click on “Test” at the top right corner. If the connection is tested successfully you will observe the connection
completion shows up as 100%. Also you will observe a message “The connection test was successful”.
Click “Save” and “Click Exit Connection ”
28. Now click on Integrations, click on “Hello_World_A2f_96_138” integration flow.
29. Now search for “SayHello_A2f_49_138” connection in the Connections palette. Drag and drop the “SayHello_A2f_49_138”
connection on to the invoke/target side of the integration flow.
30. Provide value for “What do you want to call your endpoint?” as “SayHelloApps2Fusion”.
31. Click on Next. Select the “SayHello” operation
32. Click on Next. The summary page shows.
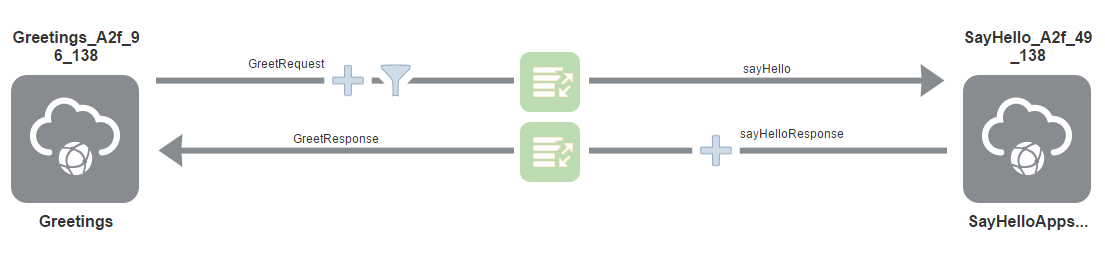
33. Click on Done. After Configuring SOAP connections on trigger/source and Invoke/Target side your Integration Flow
This invoke/target SOAP Service is a web service endpoint – typically you use SOAP Services to connect to SaaS or
on-premises applications with which you want to integrate.
34. Next, map the message received from the trigger/source to a form that the invoke/target web service understands.
This is achieved through data mapping. To model this click on the Request Mapping button to invoke the mapper.
35. Map the following trigger/source field to the corresponding invoke/target field.
|
Trigger/Source Field |
Invoke/Target Field |
|
GreetRequest/FirstName |
sayHello/name |
36. Drag the trigger/source field over the invoke/target field, aligning the text of the trigger/source field with the text of
the invoke/target field. When the mapping is successful:
37. Save the map and exit the mapper.
38. Map the response message. Click on the Response Mapping button to invoke the mapper.
39. Map the following trigger/source field to the invoke/target field.
|
Trigger/Source Field |
Invoke/Target Field |
|
sayHelloResponse/sayHelloReturn |
GreetResponse/Greeting |
40. Drag the trigger/source field over the invoke/target field, aligning the text of the trigger/source field with the text of
the invoke/target field. When the mapping is successful:
41. Save the map and exit the mapper.
42. After configuring the mapping of objects, it should appear as below.
43. Save the Integration
44. Configure the Business Identifier to track your message. Click on Tracking icon.
45. Drag and Drop the FirstName to the Tracking Field column,
46. Give a name for the Tracking field. Click Done.
47. Note that Flow Progress Indicator shows that the integration is 100% complete.
48. Click Save and Exit Integration.
49. Observe that integration status is shown as “Activate”. That means the flow is ready for the activation.
50. Click the Activate button to activate the integration.
51. Select the option “Enable tracing including payload into Activity Stream” for the detail log.
52. Note that the integration status is shown as “Active”.
53. Click on the Info icon to verify that the Generic Web Service inbound SOAP endpoint is up and running. Note that
The endpoint URL you see may be different from what you see below. Please copy this URL to use in testing the ICS
endpoint using SOAP UI.
Steps for SOAP UI Test:
1. Create a SOAPUI project using the above end point URL of the ICS service.
a. Launch SOAP UI tool, create new SOAP project.
b. Provide the project name and the endpoint URL you have copied in the previous step. Click OK, this should
create a SOAP client project.
https://ics21-usoracle72468.integration.us2.oraclecloud.com/integration/flowsvc/soap/HELLO_WORLD_A2F_96_138/v01/?wsdl
c. Expand Greeting>Request1
Update the value for FirstName.
d. Now you should add basic authentication using credentials. Select Auth tab in the Request1 window. Select
Add New Authorization option.
e. Select Basic from the pop-up dialog box. Click OK.
f. Provide ICS authentication credentials respective to UserName and Password.
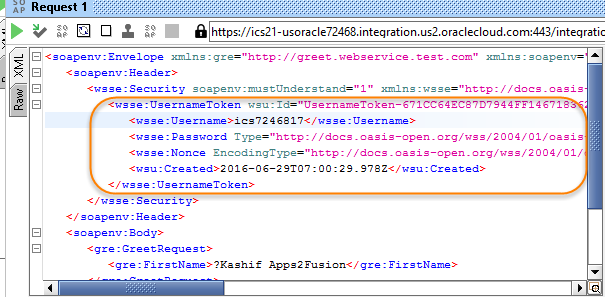
g. Right click on the request payload area and select “Add WSS UserName Token” option. Select “Specify
Password Type” to Password Text.
This should add WSS security header to the soap request, it should appear as below.
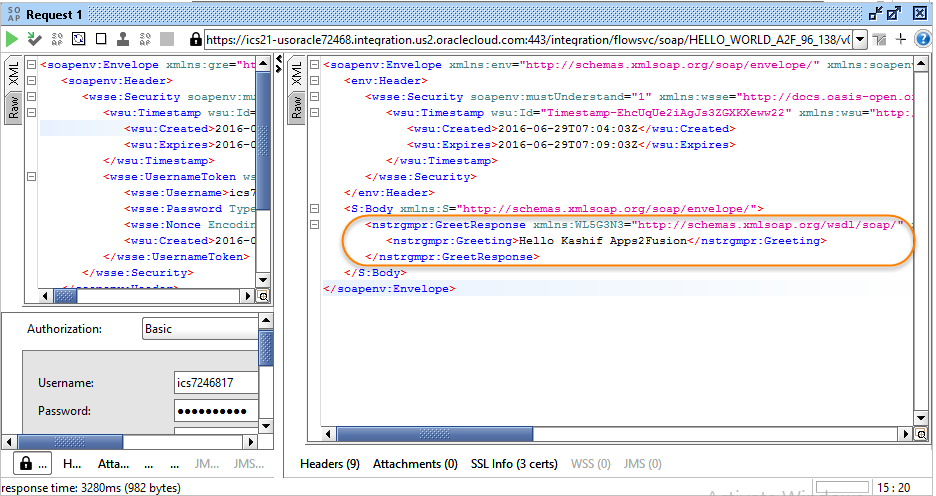
h. Right click on the request payload area and select “Add WS-Timestamp”. Provide a value for e.g. 10000.
i. Test the service. Click on buttonand execute the request. You should see a response as below.
Summary
This lab guided you through the process of creating your first integration. The lab introduced you to the ICS user interface and showed you how to:
Create a simple integration flow
Integrate with simple SOAP-based web services
Map elements between trigger/source and invoke/target elements
Activate and test the integration
Enrich Hello World Integration Flow
Objective
In this tutorial, you will first learn how to create an integration in which you define three generic SOAP web services to pass
messages. You will define WSDL files for each SOAP web service.
A request message
A response message
An enrichment response message
After completing the WSDL configuration for each web service, you will use the mapper to drag and drop fields from the trigger/source structure of one web service to the invoke/target structure of another web service to map data between the two. After that, you will activate your integration and monitor the results of message interaction. You will then create a cloned version of the integration, which you can customize as needed.
Clone an Integration
You are ready to clone the Hello World integration you created above. Cloning an integration flow creates a new copy with identical connections and data mappings. You give the cloned integration a new name and version number, but the remaining configuration is the same. You can customize the cloned integration after you create it.
1. From the menu, select Clone.
The Clone Integration dialog is displayed.
2. Provide a different name and version number from the initial integration, and click Clone.
|
Field |
Enter |
|
Integration Name |
Hello_World_Enrichment_A2f49138 |
|
Identifier |
Automatically generated from the integration name |
|
Version |
Enter, a different version number. For example, if you enter 2, the value is automatically changed. Identifier to 02.00.0000 to follow the required naming convention. |
|
Package Name |
Nothing to enter. |
|
Description |
This test case will demonstrate how to clone a completed integration. |
The dialog looks as follows:

The cloned integration is displayed at the top. Note that it is not activated.
3. Click the integration to begin customizations. For this example, we will add response enrichment to the integration flow.
Add Enrichment to the Cloned Integration
1. If the Technologies palette is not displayed on the far right, click the Show Palette icon.
2. From the Technologies palette, drag the “SayHello_A2f_49_138” SOAP Connection on to the icon response arrow.
The dialog is displayed for creating the enrichment response SOAP web service.
3. Provide the following information and click Next
|
Field |
Enter |
|
What do you want to call your endpoint? |
AddVisitTimeDetails |
Select “visitTimeStampDetails” operation, click Next and Done.
You will get a message “This will delete any impacted mapping(s). Are you sure you want to continue?”.
Select Yes and proceed further
4. Click Save.
Map Data Between
1. Click the Response Enrichment Mapping icon between the trigger/source and invoke/target to invoke the mapper.
2. Map the following source field to the invoke/target field.
|
Trigger/Source |
Field Invoke/Target Field |
|
sayHelloResponse > SayHelloReturn |
visitTimestampReq > reqMsg |
Drag the trigger/source field over the invoke/target field, aligning the text of the trigger/source field with the text of the invoke/target field. If the mapping is successful:
3. Click Save, then click Exit Mapper. The Response Enrichment Mapping icon is displayed in green, indicating that it has been configured.
4. Click the Response Mapping icon and delete the old mapping.(If the mapping was not deleted in previous step)
5. Click the Response Mapping icon to invoke the mapper again. This mapper requires updates because of the enrichment response mapping you performed.
6. Map the following trigger/source field to the invoke/target field.
|
Trigger/Source Field |
Invoke/Target Field |
|
$ResponseEnrichmentApplicationObject >visitTimestampResp > respMsg |
GreetResponse > Greeting |
Drag the trigger/source field over the invoke/target field, aligning the text of the trigger/source field with the text of the invoke/target field. If the mapping is successful,
7. Click Save, then click Exit Mapper. The Response Mapping icon is displayed in green, indicating that it has been
Configured.
8. Click Exit Integration.
9. Click Activate to activate the integration.
10. Click Yes when prompted to confirm AND select the Enable tracing including payload into Activity Stream, as shown in the following dialog.
The status of the integration is changed to Active TRACE ENABLED. This will allow you to have visibility to the message logs in the Monitoring screens as the messages are processed through ICS.
11. Click the information icon to display details about the integration. The endpoint URL listed here is required for testing the integration.
End Point URL : https://ics21-usoracle72468.integration.us2.oraclecloud.com/integration/flowsvc/soap/HELLO_WORLD_ENRICHME_A2F49138/v02/?wsdl
Test Cloned Integration
Please follow the steps that are provided in detail in Lab1. High level steps are given here…
1. Create a SOAPUI project using the above end point URL of the ICS service.
a. Edit the payload by adding value to the FirstName.
b. Add basic authentication using credentials provided to you.
c. Add Timestamp Details
d. Test the service.
Request –Response sample from SOAP UI should look like this…

Monitoring
1. Return to the Oracle Integration Cloud Service user interface.
2. Click Monitoring in the upper right corner. Details about the Hello World Enrichment Use Case integration are
displayed along with any other integrations you have activated:
3. Click the Runtime Health tab to display activity stream details about the message flow.
Summary:
In this tutorial , you learned how to:
Clone an integration
Enrich a message with a SOAP web services
Map data between the data structures of each web service
Activate and monitor the integration


