Introduction
Some of us might be aware of the various different ways to loading data into Oracle HCM Cloud which are:
- HCM Data Loader
- HCM Spreadsheet Data Loader
- Via Web Service Call (Webservice / REST)
- Data Entry from UI
And also “Inbound Interface HCM Extract”.
Inbound Interface HCM Extract which is also sometime referred as Loopback Interface is a process where Data is generated by “HCM Extracts” and after making some modification on the generated data (applying transformation / business logic on eText Template) is loaded back into the application (and all this with mere submission of the “HCM Extracts”).
So far so good but many a times one would like to have data generated via other data source (say BIP , OTBI etc) and still intend to load data into application back. For such scenarios we can use this method which I am going to refer from now on as “Generate and Load Data”.
“Generate and Load Data” sounds similar to “Import and Load Data” and yes it is a little bit and that is why I have try to give such a name, but before proceeding further I would explain what is meant by “Generate and Load Data”.
Generate and Load Data
No, this is not a delivered task/flow in the Oracle HCM Cloud Application (at least not till Release 13 20B) but is being referred to a custom payroll flow pattern which will comprise of the following flow-tasks:
- Generate Data
- Generate HCM Data Loader File
- Initiate HCM Data Loader
Generate Data
Generate Data is a custom payroll task (after renaming “Run BI Publisher Report”). This particular task runs a BIP Report which generates a TXT file and loads the same into Web Center Content (UCM Server) by using Bursting Option.
Generate HCM Data Loader File
This flow task is a sub-task of “Load Data From File” which takes Content ID (yes the file must be available in UCM) , Transformation Formula (Fast Formula of HCM Data Loader Type) and Process Configuration Group (required to submit any process flow) and generates a new File and places the same in the UCM Server
Initiate Data Loader
This flow task is also a sub-task of “Load Data From File” which take the output generated by “Generate HCM Data Loader File” and then initiates the Data Loader process
So this is a brief description about the various tasks which would be used while creating the Custom Payroll Flow Task namely “Generate and Load Data”.
We would need to perform below steps prior to creating “Generate and Load Data”
- Create BIP Report which will generate TXT File and place the same in UCM Server using BIP Bursting
- Create a “HCM Data Loader” type Fast Formula.
So, without further ado let’s get started.
Creating BIP Report
For this example we will create a simple BIP report which will generate the data fields required for PersonAccrualDetail Business Object.
Details about the data fields is as below
|
Attribute Name
|
Attribute Value
|
Meaning
|
|
AccrualType
|
‘ADJOTH’
|
Choose any of the available Accrual Type
|
|
AdjustmentReason
|
‘VACATION_ADJ’
|
Custom Lookup Code defined ANC_ABS_PLAN_OTHER_REASONS Lookup
|
|
PersonNumber
|
PER_ALL_PEOPLE_F.PERSON_NUMBER
|
Person Number
|
|
PlanName
|
ANC_ABSENCE_PLANS_F_TL.NAME
|
Absence Plan Name on which adjustment entry will be added
|
|
Value
|
7
|
Value to be Adjusted (7 for this example)
|
|
WorkTermsNumber
|
PER_ALL_ASSIGNMENTS_M.ASSIGNMENT_NUMBER
|
Assignment Number of the Employment Terms Record from Assignment Table
|
|
ProcdDate
|
SYSDATE
|
Date on which adjustment is to be made. Sysdate for this example
|
|
SourceSystemOwner
|
HRC_LEGACY
|
Custom Lookup Code defined in HRC_SOURCE_SYSTEM_OWNER Lookup
|
|
SourceSystemId
|
PER_ALL_PEOPLE_F.PERSON_NUMBER || '_' || upper(ANC_ABSENCE_PLANS_F_TL.NAME) || '_' || 'VACATION_ADJ' || '_' || TO_CHAR(SYSDATE,'YYYYMMDD')
|
Unique ID required for HDL Load
|
We would need to create a Data Model which will have 2 Data Sets and 1 Bursting Query
FlowTask_ds
This is the master data set (primarily used to associate the BIP Report run with the Payroll Flow task we are going to generate in later part). This data set returns the PAY_REQUEST CALL_ID which is used to allow the BIP report to Burst to a single file. In addition, the CALL_ID is used to uniquely identify the BIP report once it is uploaded to UCM.
|
SQL for FlowTask_ds
|
|
select r.call_id
from pay_flow_task_instances fti,
,pay_flow_tasks_vl ft
,pay_requests r
where ft.flow_task_name = 'Generate Data'
and ft.base_flow_task_id = fti.base_flow_task_id
and fti.flow_task_instance_id = r.flow_task_instance_id
and r.call_type= 'ESS'
and fti.flow_task_instance_id = :TASK_INSTANCE_ID
union
select 1234
from dual
where :TASK_INSTANCE_ID is null
|
GenerateData_ds
This is the data set which would generate the data which will be used for Data Load. For this example it would fetch the Adjustment Details which would be loaded to a specific plan
|
SQL for Generate_ds
|
|
select 'ADJOTH' ACCRUALTYPE,
'VACATION_ADJ' ADJUSTMENTREASON,
papf.person_number PERSONNUMBER,
aapft.name PLANNAME,
7 VALUE,
(select distinct paam1.assignment_number
from per_all_assignments_m paam1
where paam1.assignment_type = 'ET'
and paam1.primary_flag = 'N'
and trunc(ppos.date_start) between paam1.effective_start_date and paam1.effective_end_date
and paam1.period_of_service_id = ppos.period_of_service_id
and paam1.person_id = papf.person_id
and rownum = 1
) WORKTERMSNUMBER,
to_char(SYSDATE,'YYYY/MM/DD') PROCDDATE,
'HRC_LEGACY' SOURCESYSTEMOWNER,
papf.person_number || '_' || upper(aapft.name) || '_' || 'VACATION_ADJ' || '_' || TO_CHAR(SYSDATE,'YYYYMMDD') SOURCESYSTEMID
from per_all_people_f papf,
per_periods_of_service ppos,
anc_absence_plans_f_tl aapft,
per_all_assignments_m paam,
anc_per_plan_enrollment appe
where papf.person_id = paam.person_id
and papf.person_id = ppos.person_id
and ppos.period_of_service_id = paam.period_of_service_id
and appe.prd_of_svc_id = paam.period_of_service_id
and papf.person_id = appe.person_id
AND appe.plan_id = aapft.absence_plan_id
AND paam.primary_flag = 'Y'
AND paam.assignment_type IN ('E', 'C', 'N', 'P')
AND aapft.language = 'US'
and aapft.name = 'Vacation'
and trunc(ppos.date_start) between papf.effective_start_date and papf.effective_end_date
and trunc(ppos.date_start) between paam.effective_start_date and paam.effective_end_date
and trunc(ppos.date_start) between aapft.effective_start_date and aapft.effective_end_date
and not exists
(
select 1
from anc_per_acrl_entry_dtls apaed,
anc_absence_plans_f_tl aapft
where apaed.type = 'ADJOTH'
and apaed.adjustment_reason = 'VACATION_ADJ'
and apaed.pl_id = aapft.absence_plan_id
and aapft.language = 'US'
and aapft.name = 'Vacation'
and apaed.person_id = papf.person_id
)
|
BurstToUCM
The bursting query will result in a file being sent to UCM. The CONTENT_ID of the file will be of the form:
'PersonAccrualDetail'||to_char(CALL_ID) where CALL_ID is unique to the specific instance of the process.
The Title of the file in UCM will be of the form: 'PersonAccrualDetail'||to_char(CALL_ID)
|
SQL Query for BurstToUCM
|
|
select to_char(call_id) as "KEY",
'PersonAccrualDetail' TEMPLATE,
'en-US' LOCALE,
'TEXT' OUTPUT_FORMAT,
'WCC' DEL_CHANNEL,
'FA_UCM_PROVISIONED' PARAMETER1, /* Server Name */
'FAFusionImportExport' PARAMETER2, /* Security Group */
:xdo_user_name PARAMETER3, /* Author of the File */
'PersonAccrualDetail'||to_char(call_id) PARAMETER5, /* Title */
'PersonAccrualDetail.dat' PARAMETER6, /* Output File Name */
:TASK_INSTANCE_ID PARAMETER7, /* Comments (Optional) */
'PersonAccrualDetail'||to_char(call_id) PARAMETER8, /* Content ID (Optional) If you specify the ID, it must be unique. If you don't specify the ID, the system generates a unique one. */
'FALSE' PARAMETER9 /* Custom metadata (true/false). Specify ‘false’. */
from
(
select r.call_id
from pay_flow_task_instances fti
,pay_flow_tasks_vl ft
,pay_requests r
where ft.flow_task_name = 'Generate Data'
and ft.base_flow_task_id = fti.base_flow_task_id
and fti.flow_task_instance_id = r.flow_task_instance_id
and r.call_type= 'ESS'
and fti.flow_task_instance_id = :TASK_INSTANCE_ID
union
select 1234
from dual
where :TASK_INSTANCE_ID is null
)
|
BIP Report EText Template
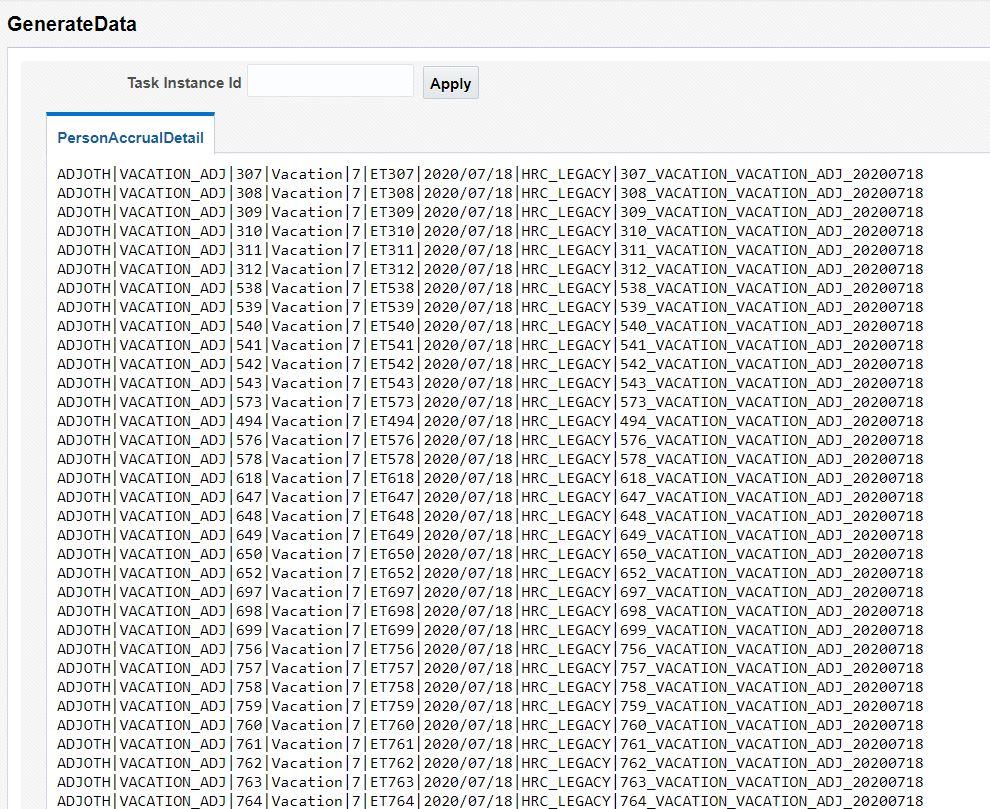
We would need to have a EText Template attached to the Report such that it gives data in pipe delimited way. The EText used in this example looks as below:
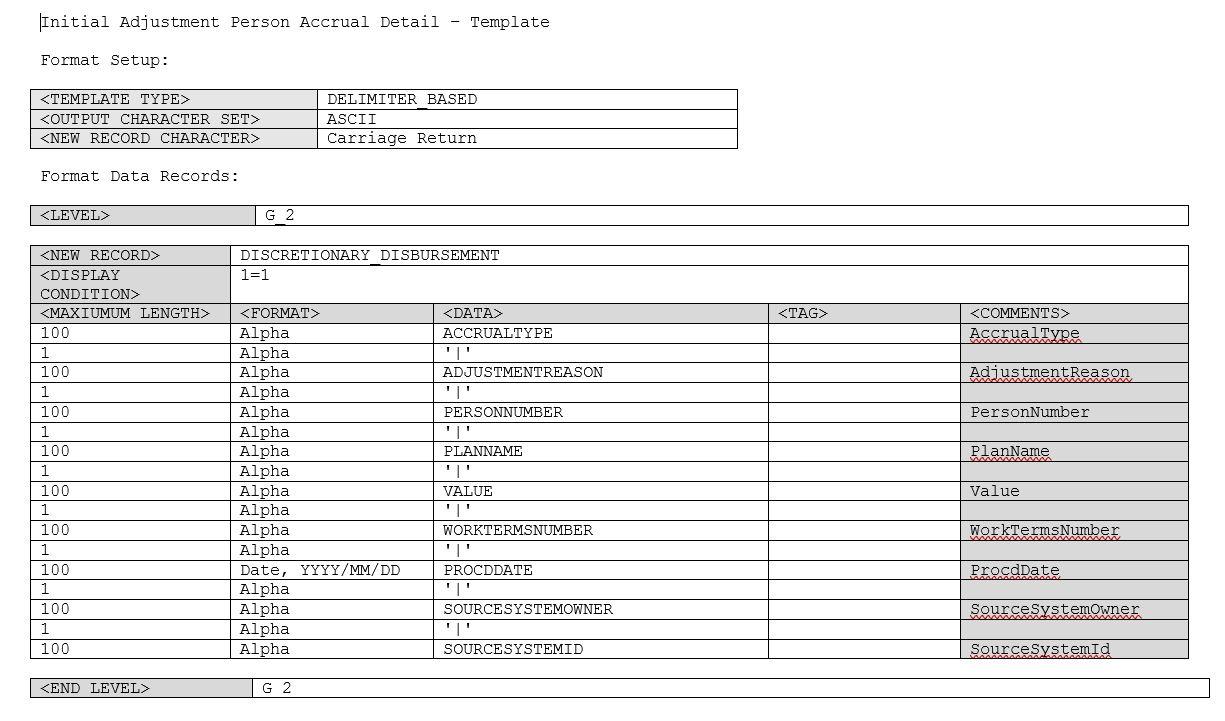
And once we upload the template and try to run the report data should appear as below:
Next, we will need to create a Fast Formula of “HCM Data Loader” Type.
Create Transformation Formula of HCM Data Loader Type
As a next step we would need to create a Fast Formula which will take the above file and convert it in into corresponding HDL File. (GENERATE_PERSONACCRUALENTRY_HDL_FROM_TXT)
|
Fast Formula (GENERATE_PERSONACCRUALENTRY_HDL_FROM_TXT ) Text
|
|
/********************************************************** *
* FORMULA NAME: GENERATE_PERSONACCRUALENTRY_HDL_FROM_TXT
* FORMULA TYPE: HCM Data Loader
* DESCRIPTION: This formula will create PersonAccrualDetail HDL File from TXT File
* CHANGE HISTORY:
*****************************************************************
Version Date Created By Comments
-----------------------------------------------------------------------
1.0 14-Jul-2020 Ashish Harbhajanka Initial Version
******************************************************************/
/* Inputs */
INPUTS ARE OPERATION (text), LINENO (number), LINEREPEATNO (number),POSITION1 (text), POSITION2 (text), POSITION3 (text), POSITION4 (text),
POSITION5 (text), POSITION6 (text), POSITION7 (text), POSITION8 (text), POSITION9 (text)
DEFAULT FOR POSITION1 IS 'NO DATA'
DEFAULT FOR POSITION2 IS 'NO DATA'
DEFAULT FOR POSITION3 IS 'NO DATA'
DEFAULT FOR POSITION4 IS 'NO DATA'
DEFAULT FOR POSITION5 IS 'NO DATA'
DEFAULT FOR POSITION6 IS 'NO DATA'
DEFAULT FOR POSITION7 IS 'NO DATA'
DEFAULT FOR POSITION8 IS 'NO DATA'
DEFAULT FOR POSITION9 IS 'NO DATA'
DEFAULT FOR LINEREPEATNO IS 1
IF OPERATION='FILETYPE' THEN
OUTPUTVALUE='DELIMITED'
ELSE IF OPERATION='DELIMITER' THEN
OUTPUTVALUE='|'
ELSE IF OPERATION='READ' THEN
OUTPUTVALUE='NONE'
ELSE IF OPERATION = 'NUMBEROFBUSINESSOBJECTS' THEN
(
OUTPUTVALUE = '1'
RETURN OUTPUTVALUE
)
ELSE IF OPERATION = 'METADATALINEINFORMATION' THEN
(
METADATA1[1] = 'PersonAccrualDetail' /*FileName*/ /*Reserved*/
METADATA1[2] = 'PersonAccrualDetail' /*FileDiscriminator*/ /*Reserved*/
METADATA1[3] = 'AccrualType'
METADATA1[4] = 'AdjustmentReason'
METADATA1[5] = 'PersonNumber'
METADATA1[6] = 'PlanName'
METADATA1[7] = 'Value'
METADATA1[8] = 'WorkTermsNumber'
METADATA1[9] = 'ProcdDate'
METADATA1[10] = 'SourceSystemOwner'
METADATA1[11] = 'SourceSystemId'
RETURN METADATA1
)
ELSE IF OPERATION='MAP' THEN
/*HDL Related Outputs*/
(
IF LINEREPEATNO = 1 THEN
(
IF POSITION3 <> 'PersonNumber' THEN
(
LINEREPEAT = 'Y'
FileName = 'PersonAccrualDetail'
BusinessOperation = 'MERGE'
FileDiscriminator = 'PersonAccrualDetail'
AccrualType = trim(POSITION1)
AdjustmentReason = trim(POSITION2)
PersonNumber = trim(POSITION3)
PlanName = trim(POSITION4)
Value = trim(POSITION5)
WorkTermsNumber = trim(POSITION6)
ProcdDate = trim(POSITION7)
SourceSystemOwner = trim(POSITION8)
SourceSystemId = trim(POSITION9)
RETURN BusinessOperation,FileName,FileDiscriminator,AccrualType,AdjustmentReason,PersonNumber,PlanName,Value,WorkTermsNumber,ProcdDate,SourceSystemOwner,SourceSystemId,LINEREPEAT,LINEREPEATNO
)
)
)
ELSE
OUTPUTVALUE='NONE'
RETURN OUTPUTVALUE
/* End Formula Text */
|

Now we will start configuring the Custom Payroll Flow Pattern named “Generate and Load Data”
Creating Custom Payroll Flow Pattern “Generate and Load Data”
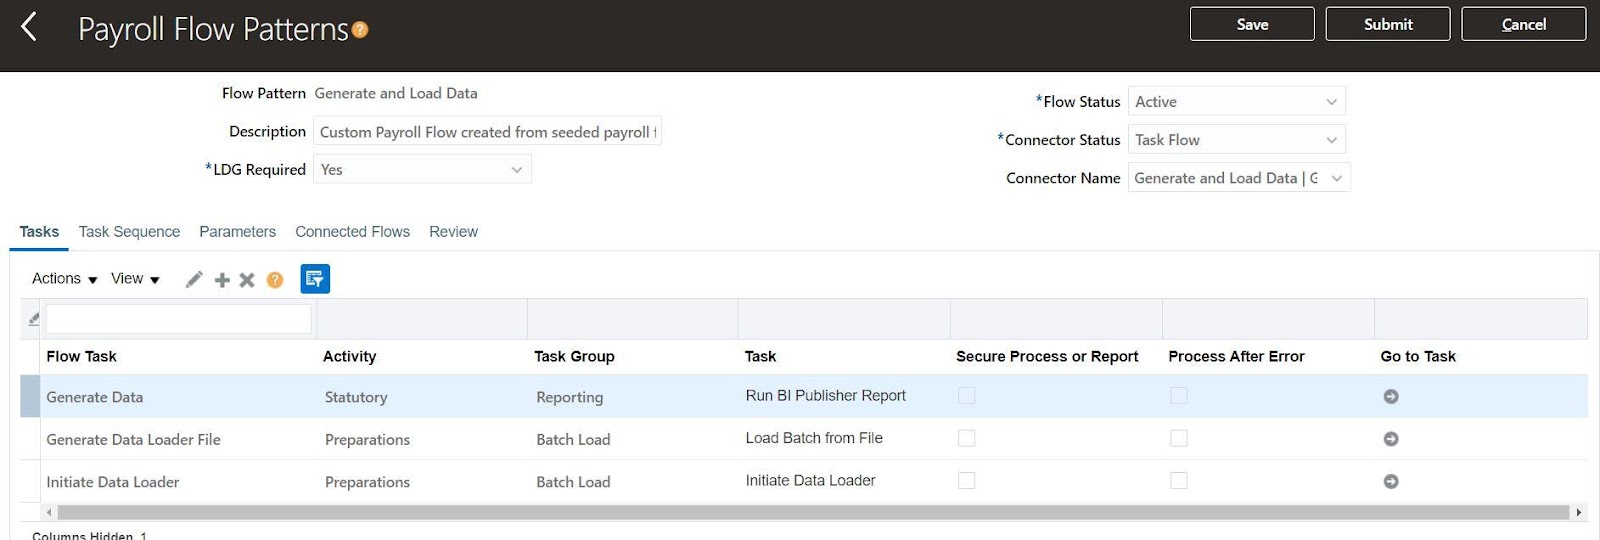
Navigation-> My Client Groups -> Payroll ->(Administration) Payroll Flow Patterns -> Copy (Load Data from File)
Once we copy the flow from “Load Data From File” we should give a new name to the custom flow (“Generate and Load Data”) and once done we should add a new task name “Run BI Publisher Report” and rename to “Generate Data” as shown
We will now need to set/edit the properties of “Generate Data” Task (once you click on the “Go To Task” you would be taken to the parameters page. The details of the parameters are mentioned below
|
Name
|
Parameter Basis
|
Basis Value
|
|
First Argument
|
Context Binding
|
Payroll Task
|
|
Legislative Data Group
|
Context Binding
|
Legislative data group
|
|
Report Name
|
Constant Bind
|
PersonAccrualDetail
|
|
Report Path
|
Constant Bind
|
/Custom/Practice Samples/GenerateData.xdo
|
*Note: Report Name is the name of the Template used in Report

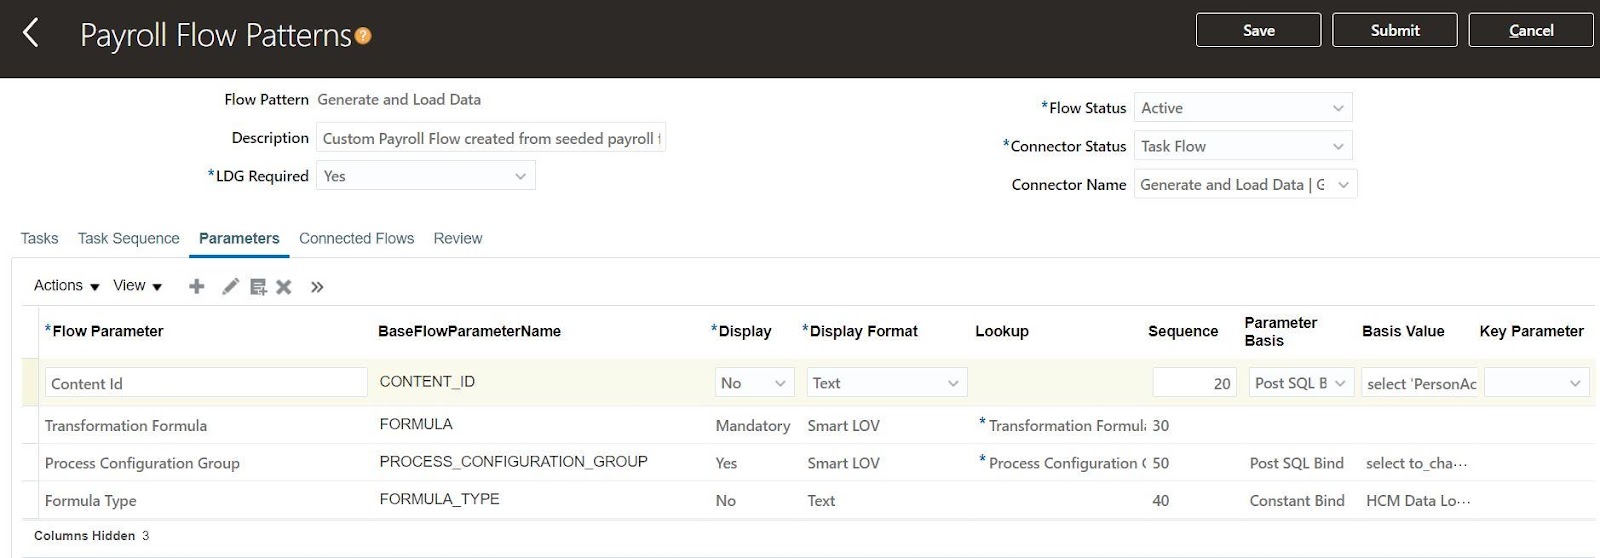
Nest we would be required to change the Parameter properties of “Content ID” parameter of “Generate Data Loader File” Task
|
Old Value
|
|
Name
|
Parameter Basis
|
Value
|
|
Content Id
|
Bind To Flow
|
Content Id
|
|
New Value
|
|
Name
|
Parameter Basis
|
Value
|
|
Content Id
|
Post SQL Bind
|
select 'PersonAccrualDetail'||to_char(CALL_ID) from pay_flow_task_instances fti,pay_flow_tasks_vl ft,pay_requests r where ft.flow_task_name = 'Generate Data' and ft.base_flow_task_id = fti.base_flow_task_id and fti.flow_task_instance_id = r.flow_task_instance_id and r.call_type= 'ESS' and fti.flow_instance_id = :pFlowInstanceId
|

Now, we should arrange the Task Sequence as show in below image:

We will also need to change the properties of “Content Id” parameter of payroll flow
|
Old Value
|
|
*Flow Parameter
|
Display
|
Parameter Basis
|
Basis Value
|
|
Content Id
|
Mandatory
|
|
|
|
New Value
|
|
*Flow Parameter
|
Display
|
Parameter Basis
|
Basis Value
|
|
Content Id
|
No
|
Post SQL Bind
|
select 'PersonAccrualDetail' ||to_char(r.call_id)
from pay_flow_task_instances fti,
pay_flow_tasks_vl ft,
pay_requests r
where ft.flow_task_name = 'Generate Data'
and ft.base_flow_task_id = fti.base_flow_task_id
and fti.flow_task_instance_id = r.flow_task_instance_id
and r.call_type= 'ESS'
and fti.flow_instance_id = :pFlowInstanceId
|
Now as a last part of the setup we should check that the “Enable Bursting” Flag under Report->Properties (of Generate Data Report) is set

As a last step please ensure that the *LDG Required Attribute is set to optional (By default it is set to “Yes”. If it is so then the same should be changed as shown below:

Now, that all setups are done we should try running the payroll flow and verify results
Verification
We will submit the newly created Custom Payroll Flow Pattern.
Navigation: My Client Groups -> Payroll-> (Flow Submission and Results) Submit a Flow -> Generate and Load Data

If we click on the “Generate Data” task we will find some details of the ESS process id associated with the task.
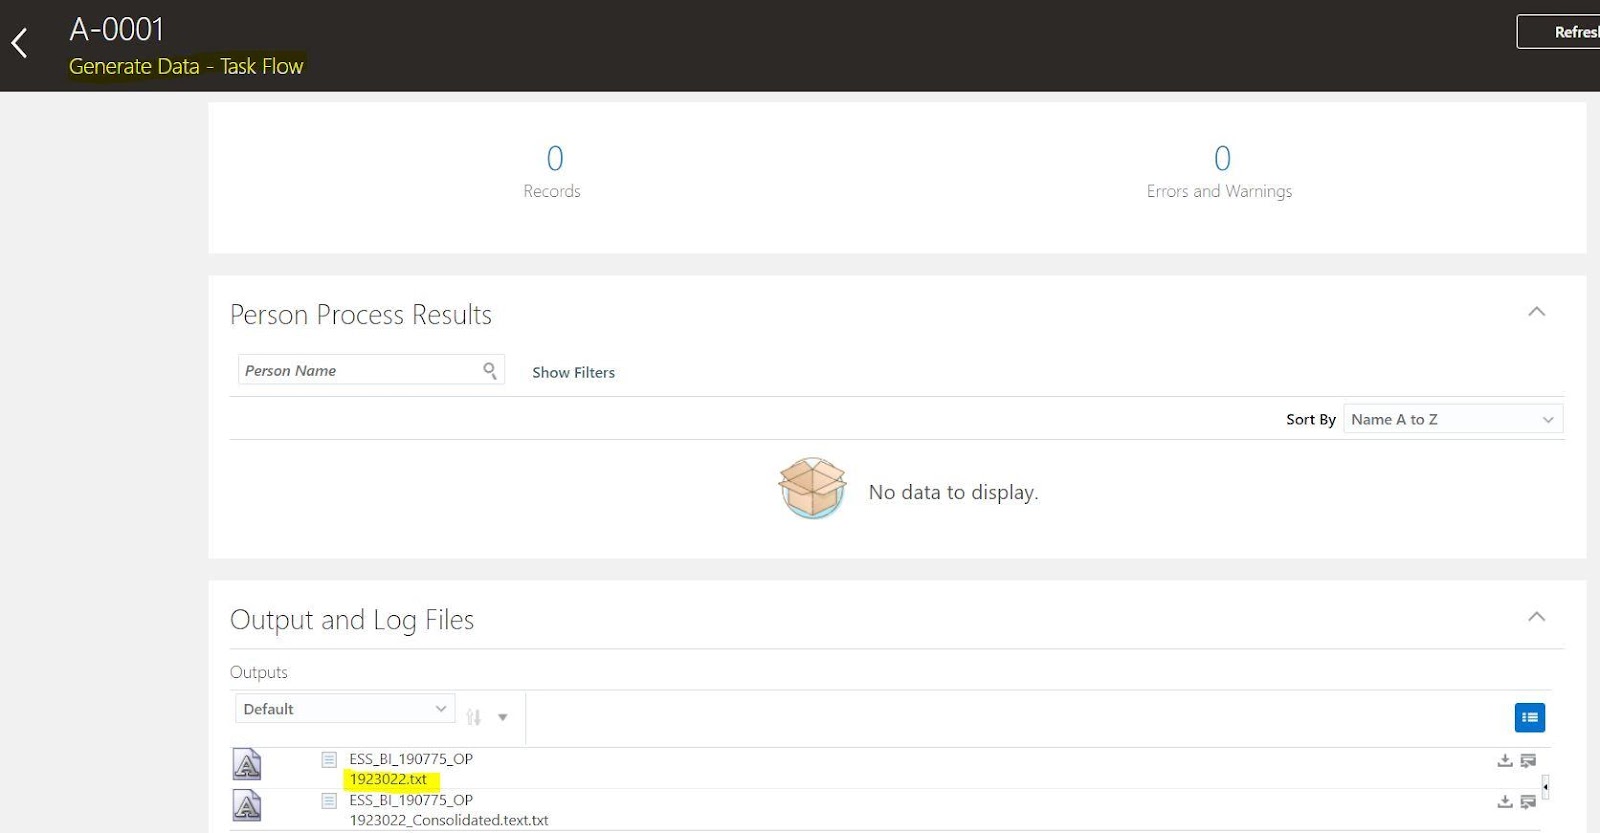
We could clearly see that the process-id is 1923022.
We can search for this ESS request id from BI Report Job history with Job name as 1923022

From the above we can see that the Content ID is PersonAccrualDetail1923022
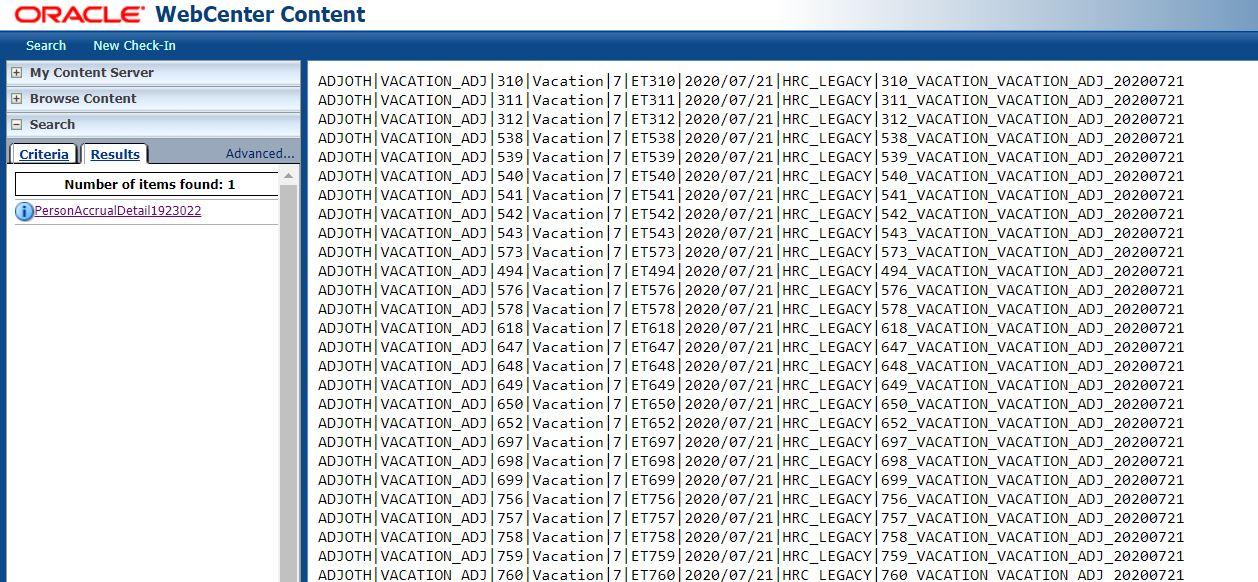
We will search for this content id in Content Server.

And if we click on the file content detail we could see the content of data file
Also we will check the “Import and Load Data” page and we will see that the Data Set name will be same as payroll flow instance name (A-0001 in this example)

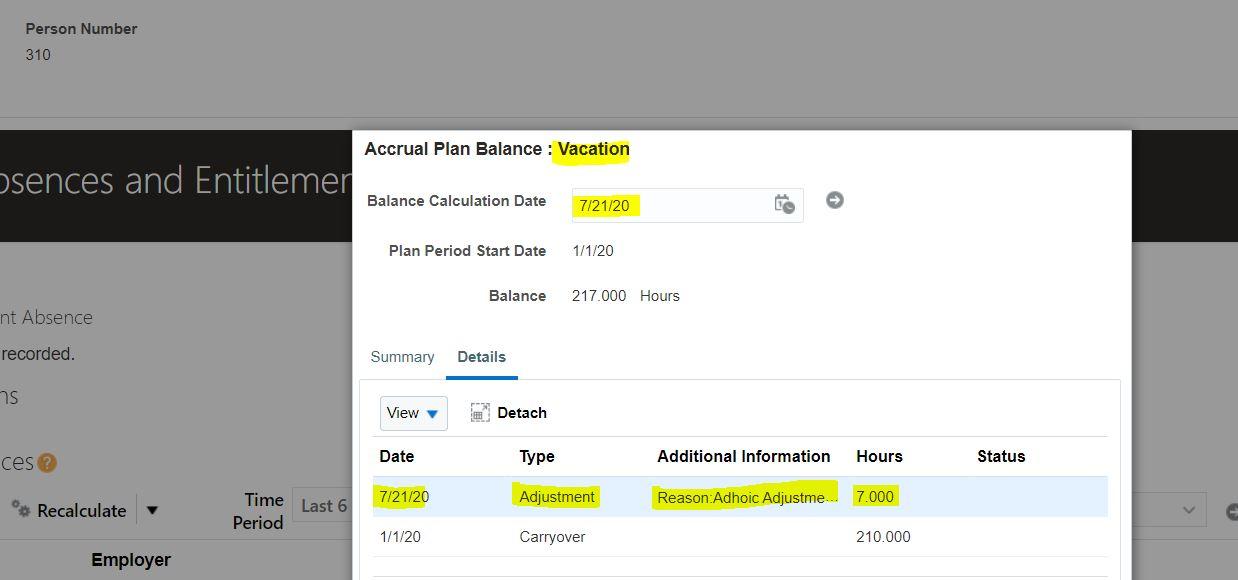
As a last step we will navigate to My Client Groups -> Person Management -> Search for a Person (310 for this example) -> Absence -> Manage Absence Records
And Then check under vacation plan we will see that an adjustment entry with accrual value of 7 has been loaded with effective date as 21/07/2020
Conclusion
So, this is how we can make use of BIP (Bursting Feature) to deliver data to UCM Server which can then be loaded into HCM Application by using of Generate Data Loader Task.
One can make the “Generate and Load Data” task more generic by adding two new flow parameters namely report name and report path and use same flow to load different types of data, and with that we have come top the end of this post.
Hope this was a good read.
Thanks for your time and have a nice day ahead.


