
The objective of this article is to demonstrante how a Billing Specialist would use the billing work area in Oracle Fusion Receivables to perform following activities :
-
Review incomplete transactions
-
Drill into a particular invoice
-
modify the transaction
-
verify the calculated taxes
-
complete the invoice
-
post draft accounting to General Ledger
-
-
Review the invoice that was created
-
Create a credit memo for the full amount using the re-designed interface to quickly and efficiently credit the entire invoice.
Additionally, the Receivables Manager will:
-
Approve an adjustment directly from the work area
The job roles required to perform these steps are Billing Specialist and Receivables Manager
Oracle Fusion Receivables provides an intuitive work area for the Billing Specialist and Manager that pushes billing transactions that are incomplete, adjustments requiring approval and interface errors to the appropriate personnel thereby increasing productivity. Fusion Receivables also provides re-designed user interfaces for the Billing Specialist to easily create, adjust and credit receivable transactions quickly and efficiently. You will also discover that the Tax calculation in Receivables transactions can be fully automated.
|
Typical pain point for users |
Feature of Fusion Receivables |
Benefit to the business credit control team using Fusion |
|
Inability to quickly identify billing transactions that require attention and/or action. |
Billing Work Area |
Fusion Receivables pushes incomplete transactions, adjustments pending approval, and lockbox errors directly to the billing specialist to an intuitive work area in order for the user to take action. No longer must a user understand exactly what transaction they need to take action on and then use cumbersome search pages to find and then navigate to the appropriate action window. This information will be at their fingertips with drill down capabilities for further research or the ability to take immediate action such as clicking on an approval button. |
|
Inability to quickly credit an invoice. |
Re-Designed Credit Memo |
Fusion Receivables provides the ability to quickly enter a credit memo while reviewing an invoice. The new user interface allows a billing specialist to quickly capture important information and with a click of a button credit the entire invoice if appropriate. This will save time in processes such as credit and re-bill. |
This ensures that Fusion provides a central location to review billing transactions that require attention as well as ability to drill into the transaction to take action.
Setup Data Required
-
Define Common Accounts Receivable Configuration
-
Define and Maintain Customer Billing
-
Define a US Sales & Use Tax Regime
-
Define State, County, and City Sales taxes/statuses/jurisdiction/rates
-
Define a US Legal Entity or Business Unit
-
Subscribe Legal Entity or Business Unit to the US Sales & Use Tax Regime
-
Define 1st Party Tax Profile, including Registration
-
Define 3rd Party Tax Profiles, including Registrations
Transaction Data Required
-
Several incomplete billing transactions
-
Several adjustment transactions requiring approval and research
.
Pre-demo Steps
-
Check for unapproved Adjustments
Sign in as Receivables Manager (Sneha.Thomas/Welcome1) > Navigator > Billing.
If there is a list of Adjustments in the Pending My Approval tab, no need to enter any. If you want to enter one or more unapproved adjustments:
Login as Billing Specialist (Aathira.Nair/Welcome1) > Navigator > Billing
Note: Aathira Nair has a USD approval limit range of -600.00 to 600.00. Any adjustment between that amount will not need Tracey Allen’s approval. Below are the Approval Limits that are delivered in Fusion.

Click on Review Customer Account Details in the Task pane
|
Field |
Value |
|
Account Number |
70010 |
Click the Search button.
Highlight an open invoice in the Activities region.
Click the Adjust button.
Click the Create icon
|
Field |
Value |
|
Receivables Activity |
User’s discretion |
|
Adjustment Type |
User’s discretion:
|
|
Adjustment Amount |
Anything outside the -600 to 600 range so that it will go to Tracey Allen for approval (if it’s to be a credit adjustment be sure to use negative number). |
|
Adjustment Reason |
User’s discretion |
|
Comments |
User’s discretion (these display in the Pending Approvals region for the manager to view). |
Click the Submit button > click the OK to message that you cannot approve this adjustment because it is not within your approval limits > click the Done button.
Continue to adjust as many open invoices as you need for the Billing Work Area.
-
Find an invoice to credit
Choose an open invoice and note the transaction number.
Click the Done button.
-
Enter at least one incomplete transaction (if there are not enough Incomplete Transactions in the Billing Work Area to look good for the demo, enter as many as you think should fill out the Work Area).
Click the Create Transaction link in the Task pane.
|
Field |
Value |
|
Business Unit |
USA1 Business Unit |
|
Transaction Source |
Manual Transaction USA1 |
|
Ship-to Name |
Business World (Bill to Information defaults) |
|
Salesperson |
Optional (Tim Watson) |
|
Invoice Line 1 |
|
|
Item |
AS85018 |
|
Quantity |
User’s discretion |
Click the Save and Close button.
Demonstration Flow
Billing Work Area

-
Sign in to Fusion Applications a Billing Specialist (Aathira.Nair/Welcome1)
Click Navigator > Billing to go directly to the Billing Work Area.
You have immediate access to incomplete transactions and any AutoInvoice errors. In this example, click on a Transaction Number (created in the pre-demo steps) in the Incomplete Transactions region to open, review, modify and complete it.
Edit Invoice
-
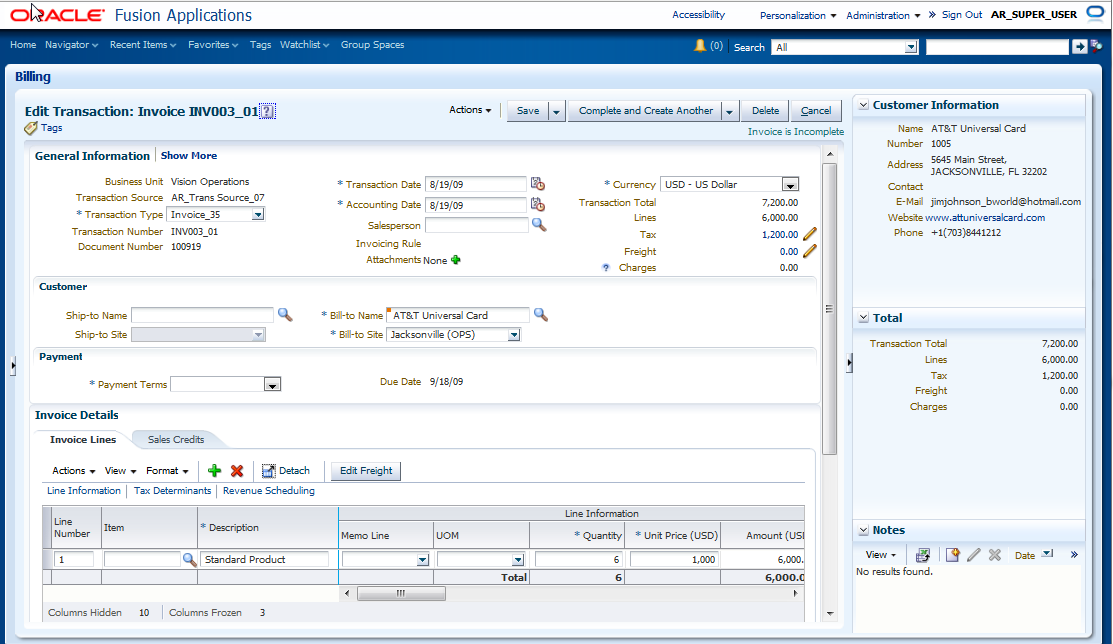
The Edit Transaction page opens. You can enter additional details on the invoice prior to saving and completing it.
In this example, you will change the Quantity and once you tab out of the field, the Totals area in the contextual region (1) will be updated as well as the Totals area (2) at the top of the page.
You will also add freight to a line by clicking on the Edit Freight (3) button (see note below), then update the Ship-To by clicking on line level Actions (4) > Edit Tax Lines.
Edit Freight
NOTE: This portion of the storyboard will not work at the moment. Bug 12964657 has been logged. In the meantime, just point out that freight can be added at any time without actually adding it.
-
Click the Edit Freight button
After selecting the Edit Freight button, you are presented with the Edit Freight pop up where you enter the Freight amount for the entire transaction or selected lines. You may also enter any additional freight attributes if desired.
|
Field |
Value |
|
Carrier |
Optional |
|
Ship Date |
Optional |
|
Amount |
User’s discretion |
Click the Save and Close button.
You are brought back to the Edit Invoice page where you can review the invoice. The Freight and Total amounts are updated based on the freight charges you just added.
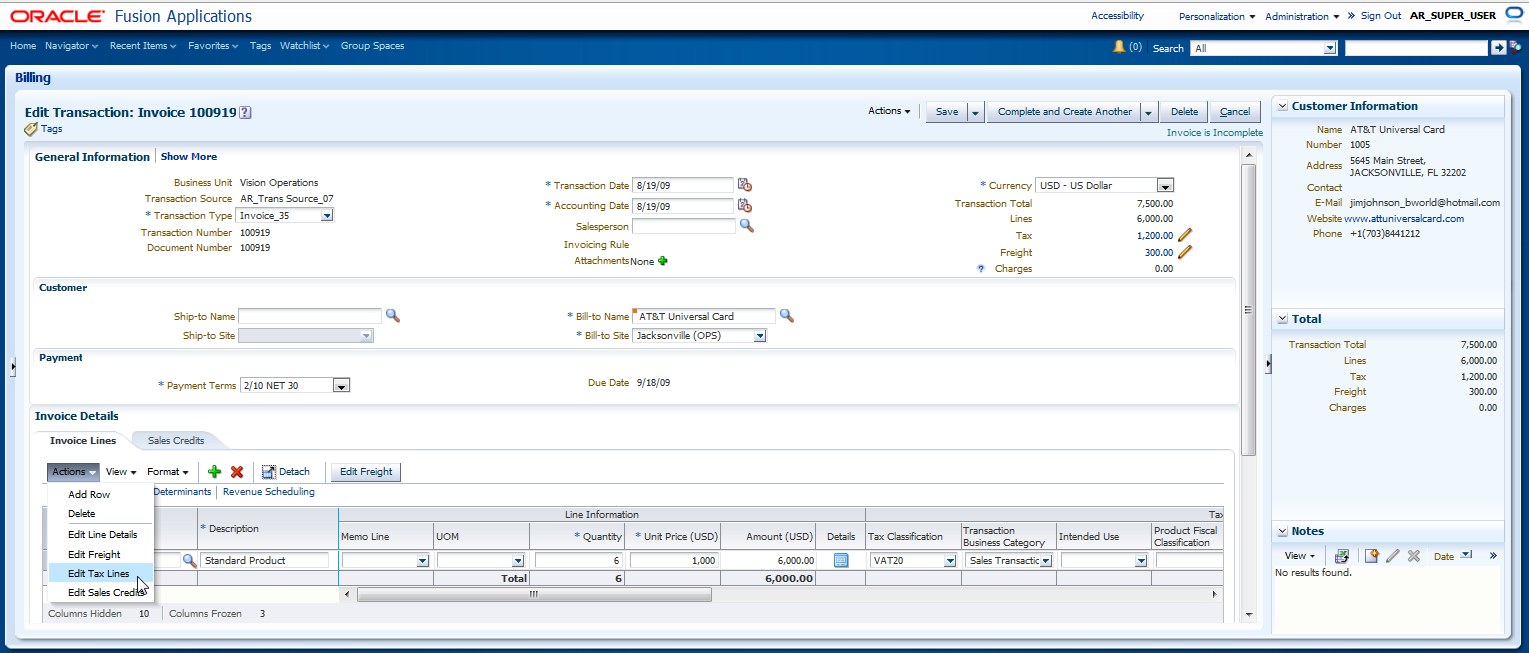
Edit Lines, Update Ship-to, Review Tax
-
Enter a new Quantity in the Invoice Details region, Invoice Lines tab
-
Update the Ship-To on the Invoice Lines tab
Select Actions> Edit Tax Lines and enter Ship-to Customer information
|
Field |
Value |
|
Name |
Business World |
|
Site |
Change from San Jose (USA1) to New York (USA1) so tax rate changes |
|
Contact |
Delete contact name |
Click the page level Save button.
-
Click the Edit Tax Lines button in the Tax Determinants region to review the new Tax information. After you are satisfied that the tax information is correct, click the Save and Close button in the pop-up window, then click the page level Save and Close button.
-
You are brought back to the Edit Transaction: Invoice page where you can review the invoice. The Tax and Total amounts are updated based on the new line level Ship-to information that was just entered.
After reviewing the invoice, you are satisfied that it is accurate, so you complete the transaction by clicking on the page level drop down > Complete and Close (located at the top of the page) > OK.
Billing Work Area – Focus on Task Pane
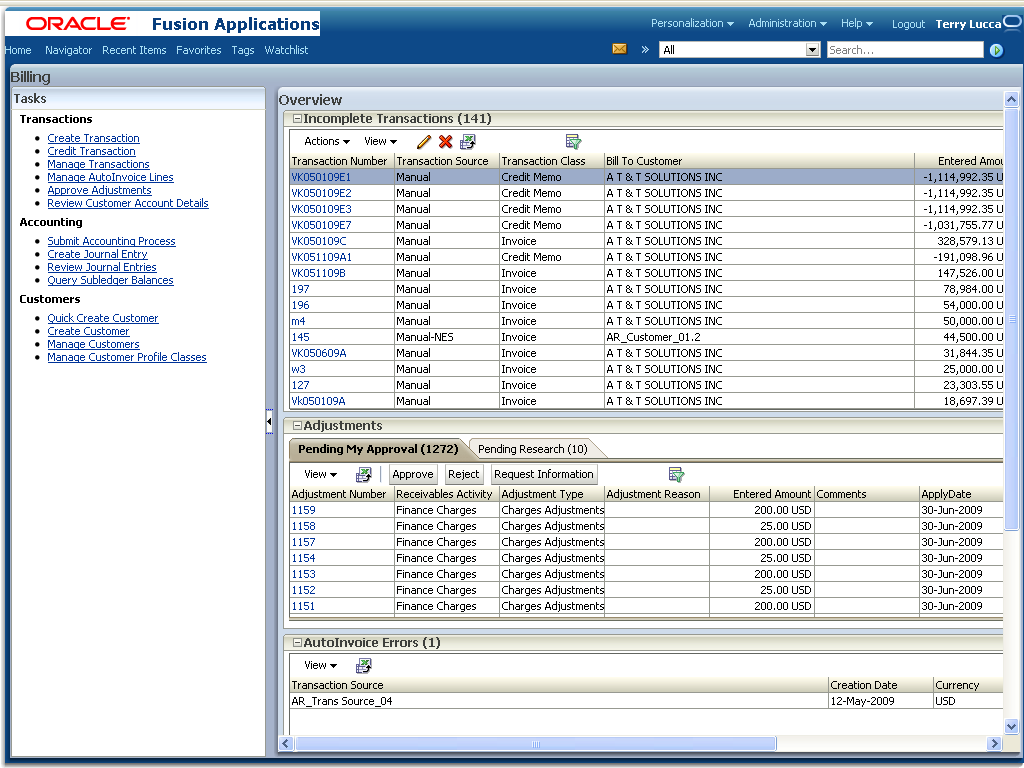
You are brought back to the Billing Work Area and the incomplete invoice has been removed from the list.
-
As a Billing Specialist, you also need to process a Credit transaction. Click on the Credit Transaction link in the Task pane.
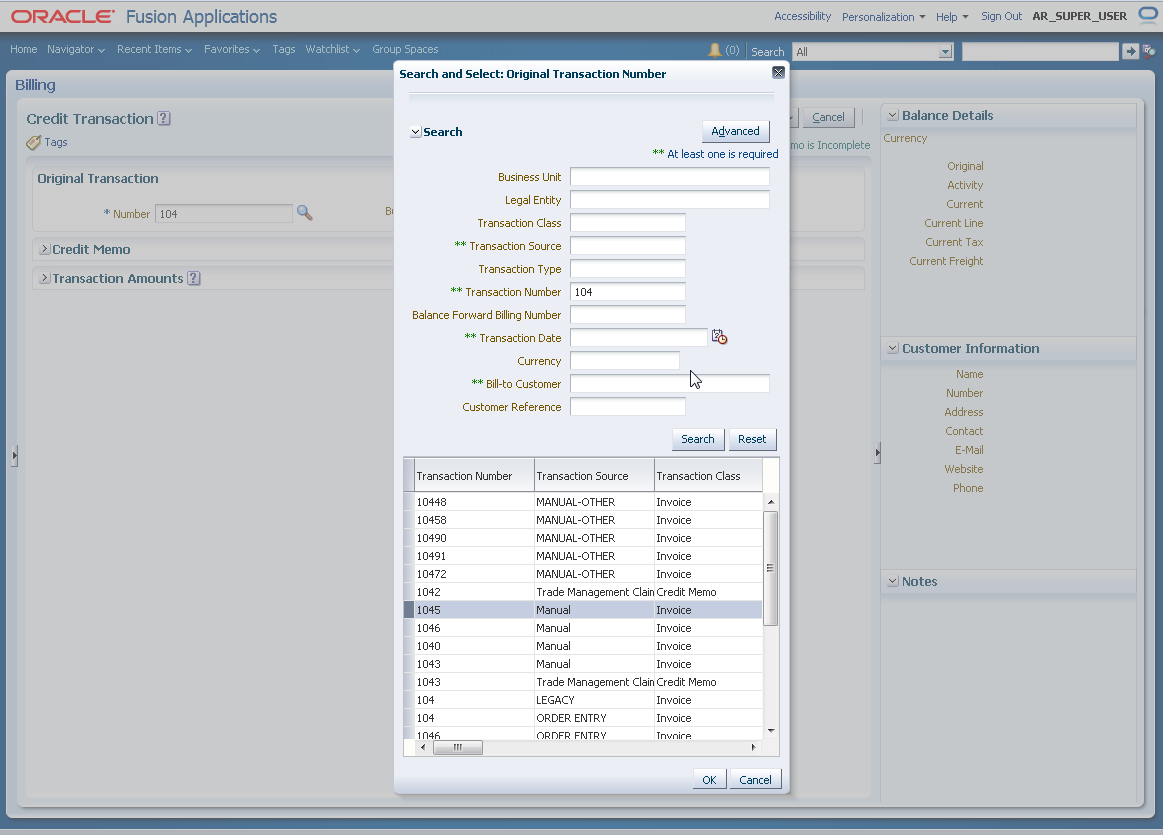
Credit Transaction – Search and Select
-
Click the Find icon (magnifying glass). You can search using various search criteria to locate the Transaction that needs to be credited.
|
Field |
Value |
|
Transaction Number |
Transaction number noted in pre-demo steps without the last 2 numbers of it so that you get more than one transaction in the search results. |
Click the Search button.
Double click the Transaction row to begin processing the Credit Memo (or highlight/select the transaction and click the OK button).
Credit Transaction
The original transaction information is displayed.
Enter Credit Reason Duplicate Billing.
You may quickly review and credit the entire transaction.
Click the Credit Entire Balance button.
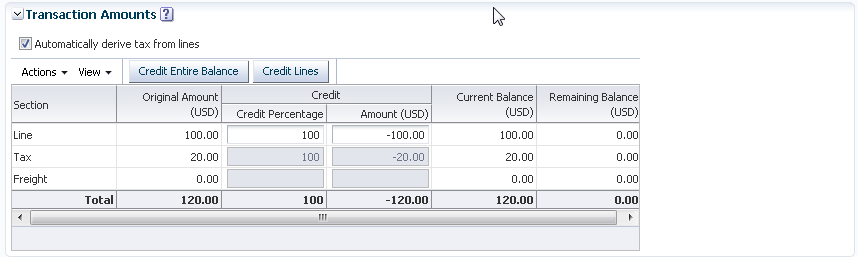
Note that the Credit Percentage and Amount columns are automatically updated for all applicable sections of the transaction.
-
Select the page level drop down > Complete and Review.
Review the Credit Memo and note that it is Complete.
-
You can review and print the Credit Memo from here.
Click the Preview button.
Click the OK button.

-
To create Draft Accounting, select page level Actions > Account in Draft.
-
To View the Draft Accounting, click the OK button and select page level Actions > View Accounting.
-
Review the accounting and click the View T-Accounts button.
-
Review the T-Accounts and click the Done button.
Note: You may also post accounting to the General Ledger now or wait for the next scheduled process to pick up these entries.
-
Click the Sign Out link
Billing Work Area – Adjustments

-
Next sign in as a Receivables Manager (Sneha.Thomas/Welcome1)
Navigator > Billing
Review the Adjustments section for any adjustments that need approval. You are able to quickly view summary information on the adjustment and if needed, drill into the Adjustment for further information. You can approve, reject or request additional information directly from the work area and are no longer required to drill into a search page to find adjustments that require attention. They are now brought directly to you for review and action. In this example, this adjustment is ready to be approved.
Select the row and click the Approve button. (Note: There is a bug that will not be fixed until next release. If you want to approve any Adjustment other than the first row, click on the number link and actually open it to approve. If you just highlight any row, other than the first, the approval will still be for the first row.)
Approve Adjustment
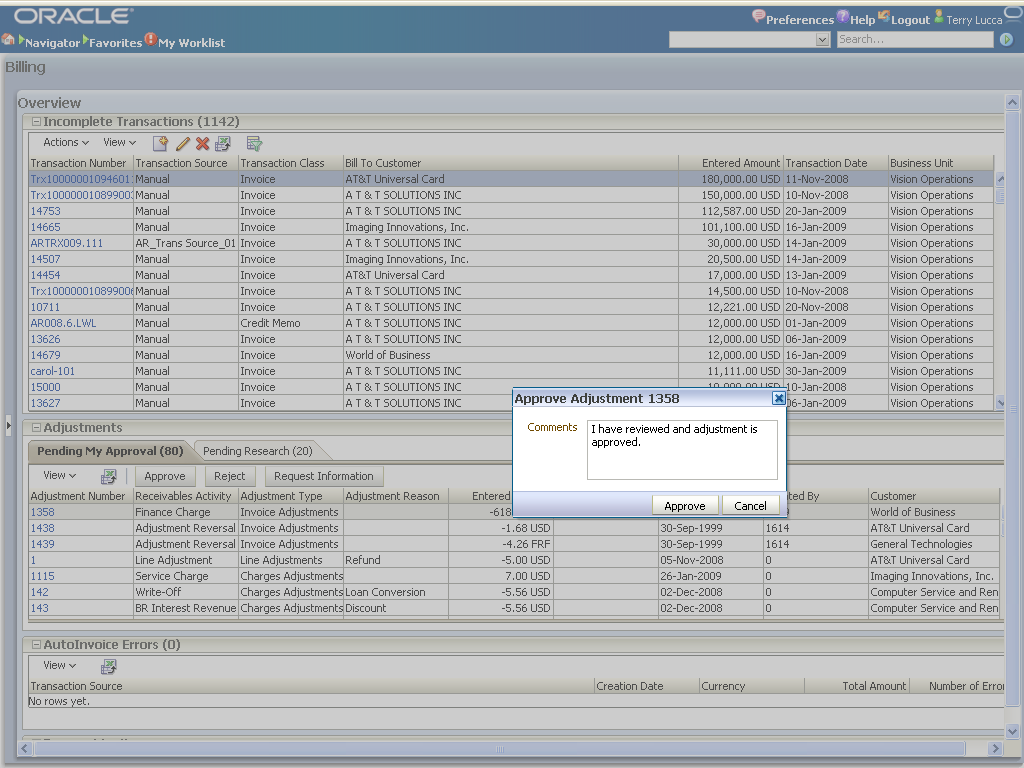
-
Enter any comments (these comments are stored in the adjustment history).
Click the Submit button, then the OK button.
In just a couple of steps, you had access to adjustments that require approval, could quickly understand what the adjustment was about and easily approved it.
Variations to the Demonstration Flow – Billing Work Area
-
Billing Specialist could choose different scenarios such as reviewing adjustments that are pending research and re-submit for approval.
-
Sort columns, change column order, personalization – hide/show regions
-
Use QBE and Export to Excel
Variations to the Demonstration Flow – Credit Bill
-
Credit at the line level (Note: need to create a manual invoice and make sure it has a Ship to or lines won’t be available to credit)
-
Perform % or amount credits
-
Edit Distributions that are created


Comments
updated with the most up-to-date news posted here.
RSS feed for comments to this post