
Objective : This article describes the installation of Oracle Database 11g Release 2 (11.2) (64-bit) on Oracle Linux 6 (64-bit), which is the pre-requisite for OIM installation. So before you install you first need to install WLS , and Oracle Database . The article is based on a server installation ,with SELinux set to permissive and the firewall disabled
1. Creating Required Operating System Groups and Users before installing 11gR2.
1.1 Creating dba and oinstall groups.
[root@a2f ~]# groupadd dba
[root@a2f ~]# groupadd oinstall
1.2 Creating oracle user.
[root@a2f ~]# useradd -g oinstall -G dba oracle
1.3 Setting password for user oracle
[root@a2f ~]# passwd oracle
2. Creating required software directories
To create the Oracle base directory and specify the correct owner, group, and permissions for it run the following commands.
2.1 Creating base directory
[root@a2f ~]# mkdir -p /u01/app/oracle
2.2 Specifying correct owner, group, and permissions for Oracle base directory.
[root@a2f ~]# chown -R oracle:oinstall /u01/app
[root@a2f ~]# chmod 775 /u01/app
2.3 Creating home directory
[root@a2f ~]# mkdir -p /u01/app/oraclee/product/11.2.0/dbhome_1
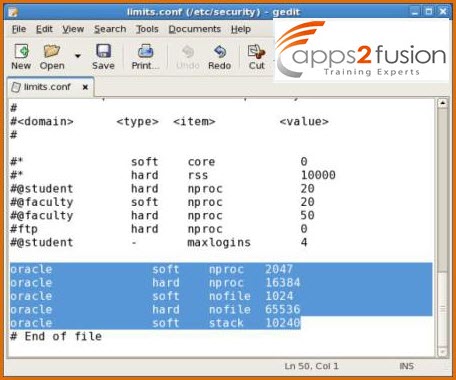
3. Configuring Resource Limits for the Oracle User.
Oracle recommends that you check and configure the resource limits for installation software owner. To do this update the resource limits in the /etc/security/limits.conf configuration file for the
installation owner (oracle) by adding the following lines to the /etc/security/limits.conf file using nano / gedit or any other text editor .
3.1[root@a2f ~]# gedit /etc/security/limits.conf &
oracle soft nproc 2047
oracle hard nproc 16384
oracle soft nofile 1024
oracle hard nofile 65536
oracle soft stack 10240
3.2 Add to the /etc/pam.d/login file the following lines
session required /lib/security/pam_limits.so
session required pam_limits.so
[root@a2f ~]# gedit /etc/pam.d/login &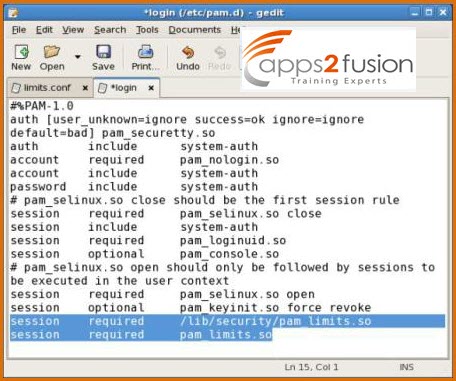
3.3 Add to the /etc/profile file the following lines
if [ $USER = "oracle" ]; then
if [ $SHELL = "/bin/ksh" ]; then
ulimit -p 16384
ulimit -n 65536
else
ulimit -u 16384 -n 65536
fi
umask 022
fi
[root@a2f ~]# gedit /etc/profile &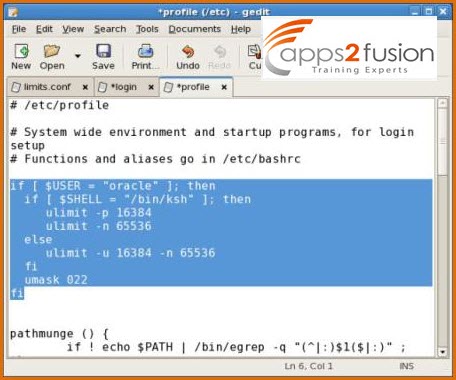
4. Download and unpack Oracle software.
4.1 Download oracle database software from http://www.oracle.com/technetwork/database/enterprise-edition/downloads/index.html to /u01/app folder.
4.2 Unzip downloaded files to /u01/app directory
[root@a2f ~]# unzip linux_11gR2_database_1of2.zip
[root@a2f ~]# unzip linux_11gR2_database_2of2.zip
This will create database directory in /u01/app/ containing installation files.
5. Update the Hosts File
The "/etc/hosts" file must contain a fully qualified name for the server.
<IP-address> <fully-qualified-machine-name> <machine-name>
For example.
127.0.0.1 a2f.localdomain a2f
192.168.2.181 a2f.oim a2f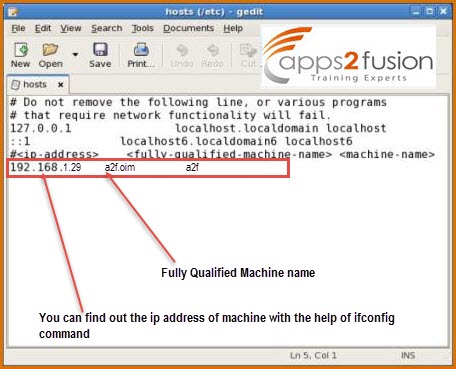
6.Automatic Setup
If you plan to use the "oracle-rdbms-server-11gR2-preinstall" package to perform all your prerequisite setup, follow the instructions at http://public-yum.oracle.com to setup the yum repository for OL,
then perform the following command.
# yum install oracle-rdbms-server-11gR2-preinstall
All necessary prerequisites will be performed automatically.
It is probably worth doing a full update as well, but this is not strictly speaking necessary.
# yum update
7.Login as root and issue the following command.
xhost +<machine-name>
8.Login as the oracle user and add the following lines at the end of the ".bash_profile" file.
# Oracle Settings
TMP=/tmp; export TMP
TMPDIR=$TMP; export TMPDIR
ORACLE_HOSTNAME=a2f.oim; export ORACLE_HOSTNAME
ORACLE_UNQNAME=orcl; export ORACLE_UNQNAME
ORACLE_BASE=/u01/app/oracle; export ORACLE_BASE
ORACLE_HOME=$ORACLE_BASE/product/11.2.0/db_1; export ORACLE_HOME
ORACLE_SID=orcl; export ORACLE_SID
PATH=/usr/sbin:$PATH; export PATH
PATH=$ORACLE_HOME/bin:$PATH; export PATH
LD_LIBRARY_PATH=$ORACLE_HOME/lib:/lib:/usr/lib; export LD_LIBRARY_PATH
CLASSPATH=$ORACLE_HOME/jlib:$ORACLE_HOME/rdbms/jlib; export CLASSPATH
9. Restart the system (System->Shut Down->Restart) and enter as user oracle
10.Start the Oracle Universal Installer (OUI) by issuing the following command in the database directory.
./runInstaller
10.1 Open the new terminal window (Right Click->Open Terminal) and go to the /u01/app/database folder
[oracle@db11gr2 ~]$ cd /u01/app/database
[oracle@a2f database]$ ls -l
drwxr-xr-x 12 root root 4096 May 8 11:52 doc
drwxr-xr-x 4 root root 4096 May 8 11:52 install
drwxr-xr-x 2 root root 4096 May 8 11:52 response
drwxr-xr-x 2 root root 4096 May 8 11:52 rpm
-rwxr-xr-x 1 root root 4352 Aug 13 2009 runInstaller
drwxr-xr-x 2 root root 4096 May 8 11:52 sshsetup
drwxr-xr-x 14 root root 4096 May 8 11:22 stage
-rwxr-xr-x 1 root root 5400 Aug 17 2009 welcome.html
10.2 Run the following command to start installation process.
[oracle@db11gr2 database]$ ./runInstaller
10.3 On the Oracle Universal Installer Security Updates screen uncheck “I wish to recive security updates via My Oracle Support” and click Next. Note that you can also configure this settings after
installation.
10.4 This will cause a notification window about email address providing. Click Yes to continue.
10.5 On installation Options window select “Create and configure a database” and click Next. Alternatively you can choose “Install database software only” and after installation create database
using DBCA or simply upgrade an existing Oracle database.
10.6 Starting with 11g Release 2 Oracle introduces a new option that enables you to specify the system type during installation. If you do not install database for production purposes simply select
Desktop Class option on System Class window and click Next. Note that there is no difference in the software that gets installed. Desktop Class option installs a single instance database without the advanced configuration options.
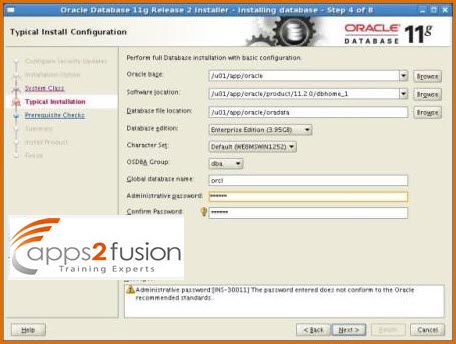
10.7 On Typical Install Configuration window enter oracle base [/u01/app/oracle], oracle home [/u01/app/oracle/product/11.2.0/dbhome_1], database file location [/u01/app/oracle/oradata],
database edition [Enterprise edition], character set [Default], OSDBA group [dba], global database name and administrative password [the password for sys database privilege].
10.8 If password you entered does not conform to the Oracle recommended standards you will prompted notification about this. Click Yes to continue or simply create password that meets
requirements listed below.
Oracle recommended password standards.
10.9 On Create Inventory window select Inventory directory and Inventory owner. Typically this is /u01/app/oraInventory directory and oinstall group respectively. Click Next to start Prerequisite checks.
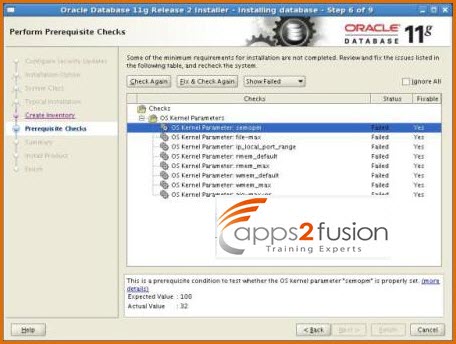
10.10 Starting with Oracle 11g R2 OUI checks and detects when minimum installation requirements are not completed. Simply click Fix & Check Again to generate fixup script to resolve problem.
10.11 Now fixup script is generated in /tmp directory and you must run this script as root user. Do not close this window yet. Open new Terminal window and run the following command then return
to the previous window and click OK. All minimum installation requirements will be checked again and if everything is ok you will be promted to the next Summary window.
[root@db11gr2 oracle]# /tmp/CVU_11.2.0.1.0_oracle/runfixup.sh
Response file being used is :/tmp/CVU_11.2.0.1.0_oracle/fixup.response
Enable file being used is :/tmp/CVU_11.2.0.1.0_oracle/fixup.enable
Log file location: /tmp/CVU_11.2.0.1.0_oracle/orarun.log
Setting Kernel Parameters...
kernel.sem = 250 32000 100 128
fs.file-max = 6815744
net.ipv4.ip_local_port_range = 9000 65500
net.core.rmem_default = 262144
net.core.wmem_default = 262144
net.core.rmem_max = 4194304
net.core.wmem_max = 1048576
fs.aio-max-nr = 1048576
10.12 On summary window you can save installation options as response file and use it on silent mode installation. This is more helpful if you plan to install similar databases on more than one
computer. To start installation process click Finish.
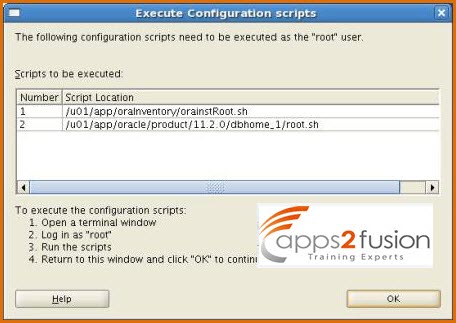
10.13 Before finishing the installation the OUI prompts you to run scripts with root privileges. Do not close this window yet. Open new terminal window change user to root and run this scripts in listed
order.
[oracle@db11gr2 ~]$ su
Password:
[root@db11gr2 oracle]# /u01/app/oraInventory/orainstRoot.sh
Changing permissions of /u01/app/oraInventory.
Adding read,write permissions for group.
Removing read,write,execute permissions for world.
Changing groupname of /u01/app/oraInventory to oinstall.
The execution of the script is complete.
[root@db11gr2 oracle]# /u01/app/oracle/product/11.2.0/dbhome_1/root.sh
Running Oracle 11g root.sh script...
The following environment variables are set as:
ORACLE_OWNER= oracle
ORACLE_HOME= /u01/app/oracle/product/11.2.0/dbhome_1
Enter the full pathname of the local bin directory: [/usr/local/bin]:
Copying dbhome to /usr/local/bin ...
Copying oraenv to /usr/local/bin ...
Copying coraenv to /usr/local/bin ...
Creating /etc/oratab file...
Entries will be added to the /etc/oratab file as needed by
Database Configuration Assistant when a database is created
Finished running generic part of root.sh script.
Now product-specific root actions will be performed.
Finished product-specific root actions.
[root@db11gr2 oracle]#
10.14 Close terminal window, return to the previous window and click OK.
10.15 Note the Enterprise Manager Database Control url and click Close to finish installation.
The database installation was successful. Let us connect and check it. First of all we need to set environment variables. Open new terminal window and run:
[oracle@db11gr2 ~]$ . oraenv
ORACLE_SID = [oracle] ? orcl
The Oracle base for ORACLE_HOME=/u01/app/oracle/product/11.2.0/dbhome_1 is /u01/app/oracle
This will set all required environment variables including ORACLE_HOME, ORACLE_SID and PATH. Now we can connect to database.
[oracle@db11gr2 ~]$ sqlplus /nolog
SQL*Plus: Release 11.2.0.1.0 Production on Sun May 8 21:48:00 2011
Copyright (c) 1982, 2009, Oracle. All rights reserved.
SQL> conn / as sysdba
Connected.
SQL> select status from v$instance;
STATUS
------------
OPEN
SQL>.


Comments
Please have a look at it and see if it would benefit your blog readers. We can also cross-promote your blog and content with us if you’re interested:
https://resource.neocortex.com/
RSS feed for comments to this post