
Guided Demonstration - Automatic Preparation of Mass Addition Lines
Distribution
List the long name of the product that this practice supports in Body Text Format - You can type over this statement.
Job Title*
Ownership
The Job Title [This email address is being protected from spambots. You need JavaScript enabled to view it.?Subject=LABxxxxx] is responsible for ensuring that this document is necessary and that it reflects actual practice.
Guided Demonstration - Automatic Preparation of Mass Addition Lines
Create a Value for a Minor Category
Before running Prepare Mass Additions to automatically prepare mass additions lines, you need to ensure you have a unique category and clearing account.
Responsibility: Assets, Vision Operations (USA)
(N) Setup > Financials > Flexfields> Key > Values
1. On the Find Key Flexfield Segment window, enter:
|
Field |
Value |
|
Application |
Assets |
|
Title |
Category Flexfield |
|
Structure |
Vision Category Flexfield |
|
Segment |
Minor Category |
|
Independent |
Computer |
2. (B) Find.
3. With your cursor in the first field in the Values table on the lower half of the window, (I) New to create a new record.
4. Enter a new value for the minor category, for example, modem or router. Enter the same value in the Description field.
5. Save your work and close the Segment Values window.
Create a Natural Account
Responsibility: Assets, Vision Operations (USA)
(N) Setup > Financials > Flexfields> Key > Values
6. On the Find Key Flexfield Segment window, enter:
|
Field |
Value |
|
Application |
General Ledger |
|
Title |
Accounting Flexfield |
|
Structure |
Operations Accounting Flex |
|
Segment |
Account |
7. (B) Find.
8. With your cursor in the first field in the Values table on the lower half of the window, (I) New to create a new record.
9. Enter a new four-digit account value, for example 1599.
Note: Ensure that the four-digit account value you enter has not been defined. If the value you enter has been defined previously, enter another value.
10. In the Description field, enter Demo Clearing Account XX.
11. Press the tab key until the Segment Qualifiers window opens.
12. Change the Account Type to Asset. Leave the other fields as they are.
13. (B) OK.
14. Save your work and close the Segment Values window.
Create an Asset Category
Responsibility: Assets, Vision Operations (USA)
You need to set up an asset category using the minor asset category and the new account value you defined.
(N) Setup > Asset System > Asset Categories
15. In the Category field, enter a major category of Computer. For minor category, enter the name of the minor category you set up. For example, COMPUTER-MODEM.
16. In the Book field, enter OPS CORP.
17. Enter the following account information:
|
Field |
Value |
|
Asset Cost |
01-000-5110-0000-000 |
|
Asset Clearing |
01-000-new clearing account you created-0000-000 |
|
Depreciation Expense |
01-000-6505-0000-000 |
|
Accumulated Depreciation |
01-000-1660-0000-000 |
18. Accept the defaults for Bonus Expense and Bonus Reserve.
19. (B) Default Rules.
20. Enter STL in the Method field.
21. Enter 5 in the Life Years field.
22. Enter Month in the Prorate Convention and Retirement Convention fields.
23. Save your work and close the Default Depreciation Rules window and the Asset Categories window.
Set Up Mass Additions Line Rules
Responsibility: Assets, Vision Operations (USA)
(N) Setup > Asset System > QuickCodes
24. Query the QuickCode Rules to Prepare Mass Additions.
25. Verify that USE CUSTOM and USE CUSTOM ENERGY have disable dates. Verify that USE DEFAULT has no disable date. For example:
|
Value |
Description |
Disable Date |
|
USE CUSTOM |
Use Custom |
15-JAN-2007 |
|
USE CUSTOM ENERGY |
Use Custom Energy |
15-JAN-2007 |
|
USE DEFAULT |
Use Default |
Create an Invoice in Oracle Payables
Responsibility: Payables, Vision Operations (USA)
26. Log in to the Oracle Applications and choose the Payables, Vision Operations (USA) responsibility.
27. Navigate to the Invoices form:
(N) Invoices > Entry > Invoices
28. Using the default Standard invoice type, enter the following Invoice Header information:
|
Field Name |
Values |
|
Trading Partner |
Advantage Corp |
|
Supplier Site |
ADVANTAGE - US |
|
Invoice Date |
Use date within current open period in Oracle Assets. For example, 15-DEC-2006 |
|
Invoice Number |
XXINVMA where XX represents any value you choose |
|
Invoice Curr |
USD |
|
Invoice Amount |
$ 5000 |
|
Payment Method |
Check |
29. Save the invoice by choosing the Save icon on the Toolbar or using the CTRL + S keys.
30. (T) Lines
31. Enter the following invoice line data (Note: you can use folder technology to make data entry easier):
|
Num |
Type |
Amount |
Distribution Account |
Description |
|
1 |
Item |
5000 |
01-000-the four-digit clearing account you created-0000-000 |
Computer Parts |
32. Scroll along the Invoice Lines window and click the Track As Asset check box.
33. Save your work.
34. Validate your invoice by selecting the (B) Actions..1 and then checking the Validate check box.
35. (B) OK.
36. Create accounting for your invoice by selecting the (B) Actions…1 and checking the Create Accounting check box. Select the Final option. Then select (B) OK. You will receive a message stating that accounting has been created for the invoice.
37. Close out of the Invoice Workbench window.
Create Mass Additions Lines
Responsibility: Payables, Vision Operations (USA)
38. Proceed to the Submit Request form:
(N) Other > Requests > Run
39. Choose Single Request and click (B) OK.
40. Choose to run the Transfer Journal Entries to GL process from the List of Values with the following parameters:
|
Parameter |
Value |
|
Ledger |
Vision Operations (USA) |
|
End Date |
Use the invoice date of the of the invoice you created (01-MMM-YYYY) |
|
Post in General Ledger |
No |
41. (B) OK.
42. (B) Submit.
43. View your concurrent request to ensure it completes normally.
(N) Other > Concurrent
44. (B) Find.
45. From the Requests form, select (B) Submit a New Request.
46. Select Single Request and click (B) OK.
47. Choose to run the Mass Additions Create process from the List of Values using the following parameters:
|
Parameter |
Value |
|
GL Date |
Use the invoice date of the invoice created (01-MMM-YYYY) |
|
Book |
OPS CORP |
48. (B) OK.
49. (B) Submit
50. View the concurrent request to ensure it completes normally.
51. Select (B) Submit a New Request.
52. Select Single Request and click (B) OK.
53. Select the Mass Additions Create Report from the List of Values and enter OPS CORP as the parameter. Select (B) Submit.
54. (B) No.
55. When the request finishes, select (B) View Output and review the Mass Addition lines that were created.
56. Close the Requests window.
Run the Prepare Mass Additions Program
Responsibility: Assets, Vision Operations (USA)
57. (N) Mass Additions > Prepare Mass Additions
58. Enter OPS CORP in the Book field and your invoice number in the Invoice field and click (B) Find.
59. (B) Open.
60. In the Mass Additions window, confirm that your invoice contains no category information.
61. Close out of the Mass Additions window.
62. Navigate to the Submit Request window.
63. (N) Other > Requests > Run
64. Choose Single Request and click (B) OK.
65. Enter Prepare Mass Additions in the Name field.
66. In the parameters window, enter OPS CORP in the Book field.
67. (B) OK.
68. (B) Submit.
69. When you receive the message Submit another request? Select (B) No.
70. Find your invoice again in the Mass Additions window and confirm that the category has been added.
71. Click (B) Assignments and confirm that the expense account has been added.
72. In the Assignments window, enter USA-CA-SAN FRANCISCO-100 in the Location field.
73. Save your work and close the Assignments window.
74. Back on the Mass Additions Summary window, enter a description in the Description field, for example, XX Asset.
75. Change the queue to Post.
Post Mass Additions
Responsibility: Assets, Vision Operations (USA)
76. Navigate to the Submit Request window.
(N) Mass Additions > Post Mass Additions
77. Enter the following values:
|
Program |
Stage |
Parameters |
|
Mass Additions Post |
Mass Additions Post |
OPS CORP |
|
Mass Additions Posting Report |
Mass Additions Posting Report |
OPS CORP |
78. (B) Submit.
79. Navigate to the Requests window to view your requests:
(N) Other > Requests > Concurrent
80. Choose (B) Find.
81. Select the Request ID of the Mass Additions Posting Report you just ran and choose (B) View Output.
82. View your asset in the Asset Workbench.
(N) Assets > Asset Workbench
83. Enter your asset number in the Asset Number field and OPS CORP in the Book field and click (B) Find.
84. Close the Assets window.
Practice - Set Up Group Assets
Distribution
List the long name of the product that this practice supports in Body Text Format - You can type over this statement.
Job Title*
Ownership
The Job Title [This email address is being protected from spambots. You need JavaScript enabled to view it.?Subject=LABxxxxx] is responsible for ensuring that this document is necessary and that it reflects actual practice.
Practice - Set Up Group Assets
Overview
In this practice, you will:
· Create a group asset.
· Assign a member asset to the group asset.
Assumptions
· Use Vision database
· Login information provided by your instructor
· Replace XX with the number provided by your instructor
· Use Assets, Vision Operations (USA) responsibility
· OPS CORP must be enabled for group depreciation by the instructor before the start of the practice (the instructor needs to check the Allow Amortized Changes and Allow Group Depreciation check boxes on the Accounting Rules tabbed region of the Book Controls window.
Tasks
Create a Group Asset
Create a group asset using Detail Additions with the following values:
|
Description |
GROUP_ASSET_XX |
|
Major Category |
Computer |
|
Minor Category |
PC |
|
Asset Type |
Group |
|
Book |
OPS CORP |
In the Assignments window, enter:
|
Unit Change |
Expense Account |
Location |
|
1 |
00-000-7360-0000-000 |
USA-DC-WASHINGTON, DC-NONE |
Assign a Member Asset to a Group Asset
Create a new asset using QuickAdditions with the following values and assign the asset to the group asset you created previously:
|
Field |
Value |
|
Description |
Member Asset XX |
|
Major Category |
Computer |
|
Minor Category |
PC |
|
Book |
OPS CORP |
|
Method |
STL |
|
Cost |
$5000 |
|
Date in Service |
Use default |
|
Prorate Convention |
Mid-Month |
|
Expense Account |
00-000-7360-0000-000 |
|
Location |
USA-DC-WASHINGTON, DC-NONE |
Solution – Set Up Group Assets
Responsibility = Assets, Vision Operations
Create a Group Asset
1. (N) Assets > Asset Workbench
2. (B) Additions.
3. In the Description field, enter GROUP_ASSET_XX.
4. In the Category field, enter a major category of Computer and a minor category of PC.
5. In the Asset Type file, select Group.
6. (B) Continue.
7. In the Book field, enter OPS CORP.
8. (B) Continue
9. In the Assignments window, enter:
|
Unit Change |
Expense Account |
Location |
|
1 |
00-000-7360-0000-000 |
USA-DC-WASHINGTON, DC-NONE |
10. (B) Done to save your asset.
11. Write down your group asset number __________.
Assign a Member Asset to a Group Asset
12. From the Assets window, (B) QuickAdditions.
13. In the QuickAdditions window enter:
|
Field |
Value |
|
Description |
Member Asset XX |
|
Major Category |
Computer |
|
Minor Category |
PC |
|
Book |
OPS CORP |
|
Method |
STL |
|
Cost |
$5000 |
|
Date in Service |
Use default |
|
Prorate Convention |
Mid-Month |
|
Expense Account |
00-000-7360-0000-000 |
|
Location |
USA-DC-WASHINGTON, DC-NONE |
14. (B) Done to save your asset.
15. Write down the asset number _________.
16. Close out of the Assets window.
17. Query the member asset you just created:
· (N) Assets > Asset Workbench
18. In the Find Assets window, enter the asset number of the member asset you just created in the Asset Number field and OPS CORP in the Book field.
19. (B) Find.
20. (B) Books.
21. Enter OPS CORP in the Book field.
22. (T) Group Asset.
23. Enter the group asset number of the asset you created in step 11 in the Group Asset field.
24. (B) Done to save your asset.
Guided Demonstration - Run Create Accounting
Distribution
List the long name of the product that this practice supports in Body Text Format - You can type over this statement.
Job Title*
Ownership
The Job Title [This email address is being protected from spambots. You need JavaScript enabled to view it.?Subject=LABxxxxx] is responsible for ensuring that this document is necessary and that it reflects actual practice.
Guided Demonstration - Run Create Accounting
1. Open the Submit Requests window.
· (N) Create Accounting
2. In the Parameters window, enter the following:
|
Field |
Value |
|
Book Type Code |
OPS CORP |
|
End Date |
Leave as the system date |
|
Accounting Mode |
Draft |
|
Errors Only |
No |
|
Report |
Summary |
|
Include User Transaction Identifiers |
No |
Note: The Transfer to General Ledger and Post in General Ledger fields are disabled when you run the process in the Draft accounting mode.
3. (B) Okay.
4. (B) Submit.
Guided Demonstration - Oracle Assets Key Flexfield Setup
Distribution
Job Title*
Ownership
The Job Title [This email address is being protected from spambots. You need JavaScript enabled to view it.?Subject=LABxxxxx] is responsible for ensuring that this document is necessary and that it reflects actual practice.
Guided Demonstration - Oracle Assets Key Flexfield Setup
Responsibility: Assets, Vision Operations (USA)
(N) Setup > Financials > Flexfields > Key > Segments
1. Use the Find icon to query the Key Flexfield – Oracle Assets – Category Flexfield
2. Note the following on the Key Flexfield Segments form:
· Only one enabled flexfield structure is found (only one allowed per Oracle Assets installation)
· The Allow Dynamic Inserts checkbox is not enabled (should not be allowed with the Asset Category key flexfield)
3. Click on the Segments button to open the Segments Summary form
4. With the Major Category segment selected, click on the Value Set button and note on the Value Sets form that the Value Validation is Independent.
5. Close the Value Sets form.
6. Select the Minor Category segment and click on the Value Set button.
7. Note that the Value Set for this segment is Dependent.
8. Close the Value Sets form.
9. On the Segments Summary form, again select the Major Category segment and click the Flexfield Qualifiers button. On the Flexfield Qualifiers form, note that the Major Category segment is checked as enabled for the qualifier Major Category (no redundancy intended)
10. Close the Flexfields Qualifier form.
11. Back on the Segments Summary form, click on the Open button.
12. Review the fields on the Segments form noting that the Major Category segment is Required.
13. Close the Segments and segments Summary forms.
14. If time permits, place the cursor back in the Application field and Find the other two Oracle Assets key flexfields.
15. For each applicable key flexfield, note the following:
· Location Key Flexfield
· Cross-Validate Segments and Allow Dynamic Inserts are enabled
· The State segment is designated as the State segment qualifier
· Asset Key Key Flexfield
· In the Segments form, note that the Required checkbox is not checked meaning entry of the Asset Key key flexfield is not required when adding an asset.
Guided Demonstration - Create a Location Flexfield Combination
Distribution
Job Title*
Ownership
The Job Title [This email address is being protected from spambots. You need JavaScript enabled to view it.?Subject=LABxxxxx] is responsible for ensuring that this document is necessary and that it reflects actual practice.
Guided Demonstration - Create a Location Flexfield Combination
Responsibility: Assets, Vision Operations (USA)
(N) Setup > Asset System > Locations
1. Perform a Find All in the Locations form to show current combinations that exist in the database.
2. Click on the New icon to add a new record.
3. Add the following combination:
|
Country |
USA |
|
State |
VA |
|
City |
Reston |
|
Building |
Sales |
4. Save your work.
Guided Demonstration - System Controls Form
Distribution
Job Title*
Ownership
The Job Title [This email address is being protected from spambots. You need JavaScript enabled to view it.?Subject=LABxxxxx] is responsible for ensuring that this document is necessary and that it reflects actual practice.
Guided Demonstration - System Controls Form
Responsibility: Assets, Vision Operations (USA)
(N) Setup > Asset System > System Controls
1. In the System Controls form, note the following:
· All fields except the Enterprise Name field are not updatable. If this was a new installation, all fields would allow entry but only the Enterprise Name and Oldest Date Placed in Service would allow update after the record was saved. The Oldest Date Placed in Service can be updated only until any calendar is assigned to any asset book.
· Last number used is updated each time a new asset number is assigned by the system.
Guided Demonstration - QuickCodes
Distribution
Job Title*
Ownership
The Job Title [This email address is being protected from spambots. You need JavaScript enabled to view it.?Subject=LABxxxxx] is responsible for ensuring that this document is necessary and that it reflects actual practice.
Guided Demonstration - QuickCodes
Responsibility: Assets, Vision Operations (USA)
(N) Setup > Asset System > QuickCodes
1. Perform a Find All once in the QuickCodes form.
2. With the cursor still in the Type field, hit the down arrow on the keyboard noting the existing QuickCode Types and values already in the database.
3. When you get to the Type - Queue Name, click in the first line and choose to enter a new record.
4. Add the following new record for the Queue Name Type:
|
Value |
CONTROLLER HOLD |
|
Description |
Hold for Controller Approval |
5. Save your work.
6. Place your cursor back in the Type field and continue to scroll down through the remaining QuickCode Types and their existing values.
Guided Demonstration - Fiscal Years & Calendars
Distribution
Job Title*
Ownership
The Job Title [This email address is being protected from spambots. You need JavaScript enabled to view it.?Subject=LABxxxxx] is responsible for ensuring that this document is necessary and that it reflects actual practice.
Guided Demonstration - Fiscal Years & Calendars
Responsibility: Assets, Vision Operations (USA)
(N) Setup > Asset System > Fiscal Years
1. Perform a Find All in the Asset Fiscal Years form
2. Review existing fiscal years data in the database
3. Use the down arrow until you open a new record
4. Enter the following data in the Asset Fiscal Years form:
Fiscal Year Name Demo
Description Class Demo FY
From Date 01-JAN-YYYY (use your own preferred year)
To Date 31-DEC-YYYY
Fiscal Year YYYY
5. After entering a value in the Fiscal Year field, hit the tab key to demonstrate that the system automatically calculates the next fiscal year’s values for you.
6. Save you work.
7. Go back to the Navigator and go to the Asset Calendars form
(N) Setup > Asset System > Calendars
8. Perform a Find All in the Asset Calendars form
9. Review existing fiscal years data in the database
10. Use the down arrow until you open a new record
11. Enter the following information in the Asset Calendars form:
Calendar Demo
Description Demo Calendar for Class
Period Suffix Fiscal
Fiscal Year Name Demo (LOV)
Periods Per Year 12
Period Name Jan
Period From Date 01-JAN-YYYY (use your own preferred year)
Period To Date 31-JAN-YYYY
12. After entering the Period To Date, tab to the next line and note that the system automatically fills out the Period From and Period To dates.
13. Enter Feb for the second Period name and continue through until Period Dec-YY is completed.
14. Save your work.
Guided Demonstration - Oracle Assets Profile Options
Distribution
Job Title*
Ownership
The Job Title [This email address is being protected from spambots. You need JavaScript enabled to view it.?Subject=LABxxxxx] is responsible for ensuring that this document is necessary and that it reflects actual practice.
Guided Demonstration - Oracle Assets Profile Options
Responsibility: Assets, Vision Operations (USA)
(N) Other > Profile
or
(M) Edit > Preferences > Profiles
1. In the Personal Profiles Values form, go into query mode
2. In the Profile Name field enter FA% then execute the query.
3. Review the returned Profile options noting which are updatable by the User and which must be maintained by the Systems Administrator.
Guided Demonstration - Add Assets Using Web ADI
Distribution
Job Title*
Ownership
The Job Title [This email address is being protected from spambots. You need JavaScript enabled to view it.?Subject=LABxxxxx] is responsible for ensuring that this document is necessary and that it reflects actual practice.
Guided Demonstration - Add Assets Using Web ADI
Prerequisites for this Demonstration:
· Must have Excel 2000, 2002, or 2003.
· If you have Excel 2002 or 2003 installed, change the Macro settings in Excel as follows:
1. From the Tools menu, select Macro, then Security, then Security Level.
2. Select the Medium option.
3. Select the Trusted Sources tab.
4. Select the Trust access to Visual Basic Project option.
Create a New Spreadsheet in Web ADI
Responsibility: Assets, Vision Operations (USA)
(N) Mass Additions > Additions Integrator
1. Enter the following values:
|
Corporate Asset Book |
OPS CORP |
|
Viewer |
Excel 2003 |
|
Layout |
Add Assets – Default |
2. (B) Open
3. Select (B) Enable Macros, if necessary.
4. On the Download window, choose (B) Close when you receive confirmation that the spreadsheet has been created.
5. In the header information, ensure that:
· Asset Type is set to Capitalized
· Depreciate is set to Yes
· Queue Name is set to Post
6. Enter the following data into your assets worksheet:
|
Column |
Asset # 1 |
Asset # 2 |
|
Description |
XX_Admin Bldg |
XX_BMW |
|
Major Category |
BUILDING |
VEHICLE |
|
Minor Category |
OFFICE |
OWNED LUXURY |
|
Units |
1 |
1 |
|
Cost |
750,000 |
25,000 |
|
Country |
USA |
USA |
|
State |
NY |
CA |
|
City |
NEW YORK |
SAN FRANCISCO |
|
Building |
NONE |
NONE |
|
Expense Account |
01 110 7320 0000 000 |
01 120 7350 0000 000 |
|
Clearing Account |
01 000 1570 0000 000 |
01 000 1570 0000 000 (add using Excel copy and paste functionality) |
|
Date Placed in Service |
First day of current open period in OPS CORP book |
First day of current open period in OPS CORP book (add using Excel copy and paste functionality) |
Upload Assets to Interface
7. From your spreadsheet, choose Oracle > Upload.
8. Choose the following options:
· Rows to Upload = Flagged Rows
· Check Validate Before Upload and Create Assets.
9. (B) Upload.
10. When you receive a confirmation that the upload was successful, nothe the request numbers and choose (B) Close.
11. Navigate to the Requests window to view the out put of the Mass Additions Posting Report you ran when creating the upload.
(N) Assets > Asset Workbench
12. Select the Find icon.
13. In the Find Assets form, enter XX_% in the Description field and OPS CORP in the Book field and select (B) Find.
14. You should now see the two assets you added using the Web ADI Create Assets spreadsheet.
Guided Demonstration - Create a CIP Asset and Build Costs
Distribution
Job Title*
Ownership
The Job Title [This email address is being protected from spambots. You need JavaScript enabled to view it.?Subject=LABxxxxx] is responsible for ensuring that this document is necessary and that it reflects actual practice.
Guided Demonstration - Create a CIP Asset and Build Costs
Responsibility: Assets, Vision Operations (USA)
(N) Assets > Assets Workbench (B) QuickAdditions
1. Add an asset using QuickAdditions with the following data:
|
Field Name |
Value |
|
Description |
Office Building |
|
Tag Number |
XXCIP1 |
|
Category |
BUILDING-OFFICE |
|
Asset Type |
CIP |
|
Book |
OPS CORP |
|
Expense Account |
01-110-7320-0000-000 |
|
Location |
USA-CA-SAN FRANCISCO-NONE |
2. (B) Done
3. In the Assets form, query the asset you just added using the unique Tag Number XXCIP1.
4. (B) Source Lines
5. Enter the following source line data:
|
Field Name |
Value |
|
Invoice Number |
04111983 |
|
Line |
2 |
|
Description |
Hard Labor |
|
Line Amount |
85,000 |
6. (B) Done
Now let's add a mass addition line to this asset.
(N) Mass Additions > Prepare Mass Additions
7. In the Find Mass Additions form, enter Invoice Number XXSEP1234 and Line 4 .
This invoice was created in the previous chapter.
8. (B) Find
9. In the Mass Additions Summary form, with the line DESIGN FEES selected, click (B) Add to Asset.
10. In the Find Assets form, enter XXCIP1 in the Tag Number field then select (B) Find.
11. (B) Done
12. (B) Open. Change the Queue to Post (system will change it to COST ADJUSTMENT)
13. (I) Save
(N) Mass Additions > Post Mass Additions
14. Run the Post Mass Additions process for the OPS CORP asset book.
15. (M) View > Requests to ensure the Post Mass Additions process completes normally.
(N) Assets > Asset Workbench
16. Find the asset with the Tag Number XXCIP1. Select (B) Source Lines.
17. Note that the DESIGN FEES from Invoice SEP1234 are now displayed and the cost of the asset is $205,000.
18. (B) Cancel
Guided Demonstration - Transfer Invoice Lines
Distribution
Job Title*
Ownership
The Job Title [This email address is being protected from spambots. You need JavaScript enabled to view it.?Subject=LABxxxxx] is responsible for ensuring that this document is necessary and that it reflects actual practice.
Guided Demonstration - Transfer Invoice Lines
Responsibility: Assets, Vision Operations (USA)
(N) Assets > Assets Workbench (B) QuickAdditions
1. Add a second CIP asset using QuickAdditions with the following data:
|
Field Name |
Value |
|
Description |
Storage Shed |
|
Tag Number |
XXCIP2 |
|
Category |
BUILDING-MANUFACTURING |
|
Asset Type |
CIP |
|
Book |
OPS CORP |
|
Expense Account |
01-130-7320-0000-000 |
|
Location |
UK-N/A-LONDON-NONE |
2. (B) Done
3. In the Assets form, query the asset with the unique Tag Number XXCIP1.
4. (B) Source Lines
5. Transfer 25,000 of cost from the Hard Labor line to the asset you added above by entering 25,000 in the Transfer Amount field and hitting the tab key (you must do this to enable the Transfer To button).
6. Select (B) Transfer To…
7. In the Transfer To form, go into query mode (F11) and enter XXCIP2 in the Tag Number field. Execute the query.
8. (B) Done
9. From the Assets form, select (I) Find and enter XXCIP% in the Tag Number field of the Find Assets window to query both CIP assets. Select (B) Find.
10. With both CIP assets now displayed, select the XXCIP1 asset.
11. (B) Source Lines
12. Note that the line for Hard Labor now has a cost of 60,000.
13. (B) Cancel
14. Back in the Assets form, select the XXCIP2 asset.
15. (B) Source Lines
16. Note that there is now a line for Hard Labor for 25,000.
17. (B) Cancel
Guided Demonstration - Capitalizing a CIP Asset
Distribution
Oracle Assets
Job Title*
Ownership
The Job Title [This email address is being protected from spambots. You need JavaScript enabled to view it.?Subject=LABxxxxx] is responsible for ensuring that this document is necessary and that it reflects actual practice.
Guided Demonstration - Capitalizing a CIP Asset
Responsibility: Assets, Vision Operations (USA)
(N) Assets > Capitalize CIP Assets
1. In the Find Assets form, enter the Book OPS CORP and the Tag Number XXCIP1 to find the first CIP asset you added in a previous Demo.
2. (B) Find
3. Note in the Capitalize CIP Assets form that you can change the Date Placed in Service to any date in the current or any prior period for the OPS CORP asset book.
4. Select the checkbox to the left of the Asset Number field.
5. (B) Capitalize
6. The record should save automatically and the Find Assets window will be displayed again.
7. To demonstrate the reverse capitalization feature, accept the default information in the Find Assets form except for changing the Asset Type to Capitalized.
8. (B) Find
9. Select the checkbox to the left of the Asset Number field.
10. (B) Reverse
Guided Demonstration - Perform Single Asset Adjustments
Distribution
Job Title*
Ownership
The Job Title [This email address is being protected from spambots. You need JavaScript enabled to view it.?Subject=LABxxxxx] is responsible for ensuring that this document is necessary and that it reflects actual practice.
Guided Demonstration - Perform Single Asset Adjustments
Note: You can perform this demonstration in its entirety after you have discussed all asset adjustments or you can perform the demonstration in steps after completing each type of asset adjustment.
Responsibility: Assets, Vision Operations (USA)
(N) > Assets > Asset Workbench (B) QuickAdditions
1. Using QuickAdditions, add a new asset with the following data:
|
Field Name |
Value |
|
Description |
Storage Building |
|
Tag Number |
XXBUILDING |
|
Category |
BUILDING-OFFICE |
|
Units |
2 |
|
Book |
OPS CORP |
|
Cost |
50,000 |
|
Employee Name |
Ackroyd, Mr. Charles |
|
Expense Account |
01-110-7320-0000-000 |
|
Location |
USA-CA-SAN FRANCISCO-NONE |
2. (B) Done
(N) Assets > Asset Workbench (B) Open
Asset Reclass
3. In the Assets form, find the asset you just added and perform a reclassification by changing the Category in the Asset Details form from BUILDING-OFFICE to BUILDING-MANUFACTURING.
4. (B) Done
Unit Adjustment
5. In the Assets form, find the asset you just added again and change the number of Units from 2 to 1 by using the (B) Open from the Asset Workbench. You must tab through the Units field to get the Continue button to light up at the bottom of the window. Decrease the unit in the Assignment window.
6. (B) Done
(N) Assets > Asset Workbench (B) Books
Cost Adjustment
7. In the Assets form, find the same asset again and make a cost adjustment by choosing the (B) Books.
8. Enter OPS Corp in the Book field and tab to the Current Cost field.
9. Change the Current Cost from 50,000 to 40,000.
10. (B) Done
(N) Assets > Asset Workbench (B) Assignments
Transfer an Asset
11. Be sure to requery the Storage Building asset in the Assets form before performing this step (to ensure the unit change and cost change are accurately reflected.
12. In the Assignments form, Transfer .5 of a unit to Employee Name Art Vandelay with the same Expense Account but at Location USA-NY-NEW YORK-NONE.
13. Enter -.5 in the Unit Change field of the existing Assignment line and add a new line with .5 units to the Employee Name and Location mentioned above. Use the keys SHIFT + F5 to copy the Expense Account field from the first line.
14. (B) Done
Guided Demonstration - Perform Mass Transactions
Distribution
Job Title*
Ownership
The Job Title [This email address is being protected from spambots. You need JavaScript enabled to view it.?Subject=LABxxxxx] is responsible for ensuring that this document is necessary and that it reflects actual practice.
Guided Demonstration - Perform Mass Transactions
Responsibility: Assets, Vision Operations (USA)
Perform a Mass Reclassification
(N) > Mass Transactions > Reclassifications
1. In the Mass Reclassifications form, enter the following data:
|
Field Name |
Value |
|
Book |
OPS CORP |
|
Category |
VEHICLE-LEASED STANDARD |
|
New Category |
VEHICLE-OWNED STANDARD |
|
Checkboxes |
Select all 3 |
2. (B) Preview
3. Note the Mass Transaction Number ______
4. View the Mass Reclassification Preview Report by going to the View Request form.
(M) View > Requests
5. Select the Mass Reclassification Preview Report request.
6. (B) View Output
7. Close the Report window and return to the Navigator.
8. Navigate back to the Mass Reclassifications form.
(N) Mass Transactions > Reclassifications
9. Go into Query Mode and enter the Mass Transaction Number in the field with the same name. Execute the query.
10. Note that both the Run and Preview buttons are now lighted.
11. Delete the Mass Reclassification by selecting (M) Edit > Delete.
12. (B) OK
Mass Change
(N) Mass Transactions > Changes
13. In the Mass Changes form, enter the following data:
|
Field Name |
Value |
|
Book |
OPS CORP |
|
Depreciation Method - Before |
STL |
|
Depreciation Method - After |
STL |
|
Life – Before |
30 |
|
Life – After |
33 |
14. Select (B) Preview. Note the Mass Transaction number ___________.
15. View the Mass Change Preview Report by going to the View Request form.
(M) View > Requests
16. Select the Mass Change Preview Report request and then (B) View Output
17. Close the Report window and return to the Navigator.
18. Navigate back to the Mass Changes form.
(N) Mass Transactions > Changes
19. Go into Query Mode and enter the Mass Transaction Number in the field with the same name. Execute the query.
20. Note that both the Run and Preview buttons are now lit.
21. To avoid someone later running this Mass Transaction, delete the Mass Change by selecting (M) Edit > Delete.
22. (B) OK
Mass Transfer
(N) Mass Transactions > Transfers
23. In the Mass Transfers form, enter the following data:
|
Field Name |
Value |
|
Book |
OPS CORP |
|
Location Transfer From |
USA-CA-SAN FRANCISCO-NONE |
|
Location – Transfer To |
USA-NY-NEW YORK-NONE |
24. (B) Preview
25. Note the Mass Transaction number ___________.
26. View the Mass Transfer Preview Report by going to the View Request form.
(M) View > Requests
27. Select the Mass Transfer Preview Report request and then (B) View Output
28. Close the Report window and return to the Navigator.
29. Navigate back to the Mass Transfers form.
(N) Mass Transactions > Transfers
30. Go into Query Mode and enter the Mass Transaction Number in the field with the same name. Execute the query.
31. Note that both the Run and Preview buttons are now lighted.
32. To avoid someone later running this Mass Transaction, delete the Mass Transfer by selecting (M) Edit > Delete.
33. (B) OK
Guided Demonstration - Perform a Mass Retirement
Distribution
Job Title*
Ownership
The Job Title [This email address is being protected from spambots. You need JavaScript enabled to view it.?Subject=LABxxxxx] is responsible for ensuring that this document is necessary and that it reflects actual practice.
Guided Demonstration - Perform a Mass Retirement
Responsibility: Assets, Vision Operations (USA)
(N) Mass Transactions > Retirements > Create and Reinstate
1. In the Mass Retirements form, enter the following data:
|
Field Name |
Value |
|
Book |
OPS CORP |
|
Retire Date |
Accept Default |
|
Retirement Type |
Sale |
|
Proceeds of Sale |
5,000,000 |
|
Cost of Removal |
50,000 |
|
Location |
USA-CA-SAN FRANCISCO-OFFICE1 |
2. (B) Create
3. Navigate to the View Requests form.
4. Select the Mass Retirements Report line.
5. (B) View Output
6. Close the View Output window and then close the Requests form.
7. Reopen the Mass Retirements form.
8. Query the mass retirement you just created.
9. (B) Retire
10. Select the Mass Retirements Report line.
11. (B) View Output
12. Back in the Mass Retirements form, query the mass retirement you just performed.
13. (B) Undo
14. (B) OK
Guided Demonstration -Perform Asset Inquiries
Distribution
Job Title*
Ownership
The Job Title [This email address is being protected from spambots. You need JavaScript enabled to view it.?Subject=LABxxxxx] is responsible for ensuring that this document is necessary and that it reflects actual practice.
Guided Demonstration -Perform Asset Inquiries
Responsibility: Assets, Vision Operations (USA)
(N) Inquiry > Financial Information
1. In the Find Assets window, enter 100111 in the Asset Number field and OPS CORP in the Book field, and select (B) Find.
2. When the Find is complete, select (B) Assignments to view the assignment information for the asset.
3. Return to the Assets form and select (B) Source Lines. Review the Source Line information for the asset.
4. Return to the Assets form and select (B) Books. Review the Financial information for the asset.
5. Select (B) Transactions and click on the ADDITION transaction type line.
6. Select (B) Details to review the detail information for the ADDITION.
7. Close windows until you return to the View Financial Information form. Select (T) Depreciation and view depreciation history for the asset.
8. Return to the View Financial Information form and select (T) Cost History. Review the information.
9. Go back to (T) Depreciation and select (M) Tools > View Accounting. Click (B) View Journal Entry. Select (B) T Accounts.
10. In the Options form, select (B) T Accounts and note the T Account presentation. Select (B) Activity Summary and review the information.
11. Return to the Navigator.
(N) Inquiry > Transaction History
12. In the Find Transactions form, enter the following data:
|
Field Name |
Value |
|
Book |
OPS CORP |
|
Asset Numbers |
101125 - 101125 |
13. Select (B) Find.
14. In the Transaction History form, select (M) Tools > View Accounting. Note the accounting data also is available in this type of inquiry.
15. Close all windows and return to the navigator.
(N) Inquiry > Subledger Accounting > Accounting Events
16. On the Accounting Events page, enter:
|
Field Name |
Value |
|
From Transaction Date |
01-Nov-2006 |
|
To Transaction Date |
30-Apr-2007 |
|
Ledger |
Vision Operations (USA) |
17. (B) Go.
18. Click Show on any transaction in the list of accounting events.
19. (B) View Transaction. The Transaction History window in Oracle Assets opens, displaying information about the accounting event.
20. Close the Transaction History window.
21. Go back to the Accounting Events window (you may need to click (I) Back) and click (B) View Journal Entries to view journal entries for this accounting event.
22. Click (B) View T-Account.
23. In Oracle Assets on the Options window, click (B) T Accounts.
24. Close all pages and forms.
(N) Inquiry > Subledger Accounting > Journal Entries
25. On the Subledger Journal Entries page, enter:
|
Field Name |
Value |
|
Ledger (is) |
Vision Operations (USA) |
|
From GL Date (after) |
31-Dec-2006 |
26. (B) Go.
27. Click the Select check box next to the first two journal entries.
28. (B) Compare.
29. Close the Subledger Journal Entries page.
(N) Inquiry > Subledger Accounting > Journal Entry Lines
30. On the Journal Entry Lines page, enter:
|
Field Name |
Value |
|
Ledger (is) |
Vision Operations (USA) |
|
Balancing Segment (is) |
01 |
31. (B) Go.
32. Select one of the transactions.
33. Click (B) View Transaction.
34. Click (B) View Journal Entry.
35. Close the Subledger Journal Entry Lines window.
Practice - Add Asset Category Key Flexfield Values
Distribution
Job Title*
Ownership
The Job Title [This email address is being protected from spambots. You need JavaScript enabled to view it.?Subject=LABxxxxx] is responsible for ensuring that this document is necessary and that it reflects actual practice.
Practice - Add Asset Category Key Flexfield Values
Overview
In this Practice, you will add new values for each of the Asset Category Key Flexfield segments.
Assumptions
· If you are not attending training at an Oracle University or Authorized Partner Education Center, you must have access to an Oracle Application Vision database or comparable training test instance on which to complete this Practice.
· Use the Oracle Oracle Assets seeded Responsibility > Assets, Vision Operations (USA).
· Replace XX in the Practice with a unique identifier such as your initials or a number. (For Instructor Led Training classes, this number will be assigned to you). This is necessary in order to create unique records within the database when performing the Practice.
Tasks
Add Category Key Flexfield Values
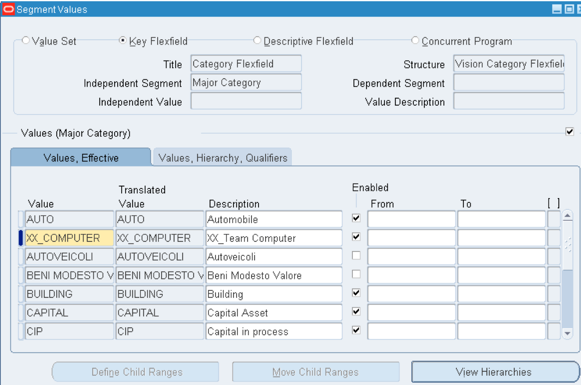
Add the following values to the Major Category and Minor Category segments of the Asset Category Key Flexfield. Remember that the Minor Category segment is Dependent on the value in the Major Category segment:
|
Segment |
Value |
Description |
|
Major Category |
XX_COMPUTER |
XX_Team Computer |
|
Minor Category |
XX_PC |
XX_Personal Computer |
|
Minor Category |
XX_SERVER |
XX_Server |
Solution – Add Asset Category Key Flexfield Values
Add Category Key Flexfield Values
1. Navigate to the Segment Values form.
(N) Setup > Financials > Flexfields > Key > Values
2. Enter the following in the Find Key Flexfield Segment form:
|
Application |
Assets |
<List of Values> |
|
Title |
Category Flexfield |
<List of Values> |
|
Structure |
Vision Category Flexfield |
<List of Values> |
|
Segment |
Major Category |
<List of Values> |
3. (B) Find

4. Place you cursor in the Value field.
5. (I) New
6. Enter the following information:
|
Value |
Description |
|
XX_COMPUTER |
XX_Team Computer |
7. (I) Save
8. Place your cursor in the Independent Segment field.
9. (I) Find
10. In the Find Key Flexfield Segment window, change the Segment Value to "Minor Category" and in the Independent Value field, select XX_COMPUTER from the List of Values.
11. (B) Find
12. Click in an empty Value field and enter the following new records:
|
Value |
Description |
|
XX_PC |
XX_Personal Computer |
|
XX_SERVER |
XX_Server |
13. (I) Save
Practice - Define Asset Categories
Distribution
Job Title*
Ownership
The Job Title [This email address is being protected from spambots. You need JavaScript enabled to view it.?Subject=LABxxxxx] is responsible for ensuring that this document is necessary and that it reflects actual practice.
Practice - Define Asset Categories
Overview
In this Practice , you will define a new Asset Category combination and associate it with two asset books.
Assumptions
· If you are not attending training at an Oracle University or Authorized Partner Education Center, you must have access to an Oracle Application Vision database or comparable training test instance on which to complete this Practice.
· Use the Oracle Assets seeded Responsibility > Assets, Vision Operations (USA)
· Replace XX in the Practice with a unique identifier such as your initials or a number (for Instructor Led Training classes, this number will be assigned to you). This is necessary in order to create unique records within the database when performing the Practice.
Tasks
Create an Asset Category Combination and Attach to Asset Books
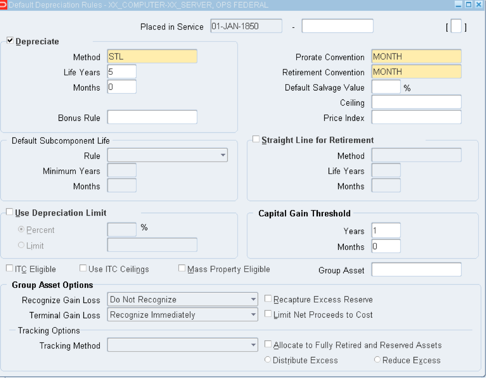
Define a new Asset Category combination with the Major category named XX_COMPUTER and the Minor Category XX_SERVER. Assets in this Category will be Non-leased, owned, personal property with a property class of 1245. You want to allow this Asset Category to be used in both the OPS CORP and OPS FEDERAL asset books. Use the following general ledger accounts and default depreciation rules:
|
Field Name |
OPS CORP Book |
OPS FEDERAL Book |
|
Asset Cost Account |
01-000-1560-0000-000 |
01-000-1560-0000-000 |
|
Asset Clearing Account |
01-000-1570-0000-000 |
01-000-1570-0000-000 |
|
Depreciation Expense |
01-000-7360-0000-000 |
01-000-7360-0000-000 |
|
Accumulated Depreciation Account |
01-000-1660-0000-000 |
01-000-1660-0000-000 |
|
Bonus Expense |
01-000-7360-0000-000 |
01-000-7360-0000-000 |
|
Bonus Reserve |
01-000-1660-0000-000 |
01-000-1660-0000-000 |
|
Revaluation Reserve |
01-000-1550-0000-000 |
01-000-1550-0000-000 |
|
Depreciation Method |
STL |
STL |
|
Life |
7 Years 0 Months |
5 Years 0 Months |
|
Prorate Convention |
FOL-MONTH |
MONTH |
|
Retirement Convention |
FOL-MONTH |
MONTH |
Solution – Define Asset Categories
Create an Asset Category Combination and Attach to Asset Books
1. Navigate to the Asset Categories form.
(N) Setup > Asset System > Asset Categories
2. In the Category field, choose XX_COMPUTER as the Major Category segment and XX_SERVER as the Minor Category segment.
3. Accept the default values in the checkboxes and enter the following information:
|
Description |
XX-Category |
|
Category Type |
Non-lease |
|
Ownership |
Owned |
|
Property Type |
Personal |
|
Property Class |
1245 |
4. In the Book field, select OPS CORP from the LOV.
5. Enter the general ledger accounts as shown below:
|
Field Name |
OPS CORP Book |
OPS FEDERAL Book |
|
Asset Cost Account |
01-000-1560-0000-000 |
01-000-1560-0000-000 |
|
Asset Clearing Account |
01-000-1570-0000-000 |
01-000-1570-0000-000 |
|
Depreciation Expense Segment |
01-000-7360-0000-000 |
01-000-7360-0000-000 |
|
Accumulated Depreciation Account |
01-000-1660-0000-000 |
01-000-1660-0000-000 |
|
Bonus Expense |
01-000-7360-0000-000 |
01-000-7360-0000-000 |
|
Bonus Reserve |
01-000-1660-0000-000 |
01-000-1660-0000-000 |
|
Revaluation Reserve |
01-000-1550-0000-000 |
01-000-1550-0000-000 |
|
Depreciation Method |
STL |
STL |
|
Life |
7 Years 0 Months |
5 Years 0 Months |
|
Prorate Convention |
FOL-MONTH |
MONTH |
|
Retirement Convention |
FOL-MONTH |
MONTH |
6. (B) Default Rules
7. Enter the Default Depreciation Rules as shown in the Task.
8. Save your work and close the Default Depreciation Rules form.
9. The cursor should be in the Book field of the Asset Categories window.
10. (I) New
11. Select OPS FEDERAL from the LOV.
12. Enter the general ledger accounts as shown in the Task.
13. (B) Default Rules
14. Enter the Default Depreciation Rules as shown in the Task.
15. (I) Save
16. Close the Default Depreciation Rules form.
Practice - Add an Asset Using QuickAdditions
Distribution
Job Title*
Ownership
The Job Title [This email address is being protected from spambots. You need JavaScript enabled to view it.?Subject=LABxxxxx] is responsible for ensuring that this document is necessary and that it reflects actual practice.
Practice - Add an Asset Using QuickAdditions
Overview
In this Practice, you will add a new asset using the manual QuickAdditions feature.
Assumptions
· If you are not attending training at an Oracle University or Authorized Partner Education Center, you must have access to an Oracle Application Vision database or comparable training test instance on which to complete this Practice.
· Use the Oracle Assets seeded Responsibility > Assets, Vision Operations (USA).
· Replace XX in the Practice with a unique identifier such as your initials or a number. (For Instructor Led Training classes, this number will be assigned to you). This is necessary in order to create unique records within the database when performing the Practice.
· Replace the year references of YYYY and YY with the calendar year of your choice or as directed by the Instructor (e.g. 2002 or Jan-02). Keep in mind though, that some transactions require calendar dates and calendar periods be defined and enabled in order to be processed.
Tasks
Enter an Asset Using QuickAdditions
Your organization has just purchased a Ford Explorer. Use the QuickAdditions feature of Oracle Assets to record the purchase of this asset. The asset will be added to the OPS CORP book, categorized as a standard vehicle and has a cost of 20,000. It should be assigned to Brian Adams and depreciation expense will be charged to Dept. 110. The Explorer is located in Building 1 in the San Francisco office and should be tagged XXCAR. It's plate number is ORACLE1 which is renewed on December 31 of each year.
Perform an Asset Inquiry
Review the Ford Explorer addition transactions by performing a Transaction History inquiry.
Solution – Add an Asset Using QuickAdditions
Enter an Asset Using QuickAdditions
1. Open the QuickAdditions form:
(N) Assets > Asset Workbench (B) QuickAdditions
2. Leave the asset number field blank to allow automatic numbering.
3. Enter the following information in the applicable fields:
|
Field Name |
Value |
|
Description |
Ford Explorer |
|
Tag Number |
XXCAR (where XX is your unique identifier) |
|
Category |
VEHICLE-OWNED STANDARD |
|
License Plate |
ORACLE1 |
|
License Renewal Date |
31-DEC-YYYY |
|
Asset Type |
Capitalized |
|
Book |
OPS CORP |
|
Cost |
20,000 |
|
Date Placed in Service |
(Accept the Default Date) |
|
Employee Name |
Adams, Mr. Brian |
|
Expense Account |
01-110-7350-0000-000 |
|
Location |
USA-CA-SAN FRANCISCO-1 |
4. Leave the Supplier information, Asset Key and Serial Number fields blank.
5. Save by selecting the Done button.
6. Note your asset number assigned __________________
7. Click (B) OK and close the Assets window to return to the Navigator form.
Perform an Asset Inquiry
8. Open the Transaction History form:
(N) Inquiry > Transaction History
9. In the Find Transactions form, enter the Book OPS CORP and the asset number for the Ford Explorer.
10. (B) Find
11. Review the transactions by selecting each Transaction Type and clicking the Details button.
12. When finished reviewing, close the Transaction History form and return to the Navigator.
Practice - Add an Asset Using Detail Additions
Distribution
Job Title*
Ownership
The Job Title [This email address is being protected from spambots. You need JavaScript enabled to view it.?Subject=LABxxxxx] is responsible for ensuring that this document is necessary and that it reflects actual practice.
Practice - Add an Asset Using Detail Additions
Overview
In this Practice, you will add an asset using the Detail Additions feature.
Assumptions
· If you are not attending training at an Oracle University or Authorized Partner Education Center, you must have access to an Oracle Application Vision database or comparable training test instance on which to complete this Practice.
· Use the Oracle Assets seeded Responsibility > Assets, Vision Operations (USA).
· Replace XX in the Practice with a unique identifier such as your initials or a number. (For Instructor Led Training classes, this number will be assigned to you). This is necessary in order to create unique records within the database when performing the Practice.
· Replace the year references of YYYY and YY with the calendar year of your choice or as directed by the Instructor (e.g. 2002 or Jan-02). Keep in mind though, that some transactions require calendar dates and calendar periods be defined and enabled in order to be processed.
Tasks
Add an Asset Using Detail Additions
Your organization has just purchased an office building to increase overhead and reduce profitability. Use the Detail Additions feature of Oracle Assets to record the purchase of this asset. Add the asset to OPS CORP book, categorized as an office building that has a cost of $10,000,000. It should be assigned to Ellen Palm and depreciation expense will be charged to Dept. 110. The building's location is in New York City and is designated as Building 2. Because management is afraid of misplacing it, it should be tagged XXBLDG. It's insured by Fidelity and is 500,000 square feet in size. The building is considered Real Property classified as 1250 property. This building will be depreciated using the STL method for 15 years.
Solution - Add an Asset Using Detail Additions
Add an Asset Using Detail Additions
1. Open the Detail Additions form.
(N) Assets > Asset Workbench (B) Additions
2. Leave the asset number field blank to allow automatic numbering.
3. Enter the following information in the Asset Details form's applicable fields:
|
Field Name |
Value |
|
Description |
Overhead Office Building |
|
Tag Number |
XXBLDG (where XX is your unique identifier) |
|
Category |
BUILDING-OFFICE |
|
Insurer |
FIDELITY |
|
Building Size |
500000 |
|
Asset Type |
Capitalized |
|
Property Type |
Real |
|
Property Class |
1250 |
4. (B) Continue

5. Enter the following information in the Books form:
|
Field Name |
Value |
|
Book |
OPS CORP |
|
Current Cost |
10,000,000 |
|
Method |
STL 15 years 0 Months |
6. Accept the default values for the other fields and click the Continue button.
7. Enter the following information in the Assignments form:
|
Field Name |
Value |
|
Unit Change |
1 |
|
Employee Name |
Palm, Mrs. Ellen |
|
Expense Account |
01-110-7320-0000-000 |
|
Location |
USA-NY-NEW YORK-2 |
8. Save by selecting the Done button.
9. Note your asset number assigned __________________
10. Click (B) OK and close the Assets window to return to the Navigator form.
Practice - Create Mass Addition Lines
Distribution
Oracle Assets
Job Title*
Ownership
The Job Title [This email address is being protected from spambots. You need JavaScript enabled to view it.?Subject=LABxxxxx] is responsible for ensuring that this document is necessary and that it reflects actual practice.
Practice - Create Mass Addition Lines
Overview
In this Practice, you will enter an invoice in Oracle Payables with distribution lines that are to be transferred to Oracle Assets. After the invoice is approved, accounted, and transferred to the General Ledger, Mass Addition lines will be created from it.
Assumptions
· If you are not attending training at an Oracle University or Authorized Partner Education Center, you must have access to an Oracle Application Vision demonstration database or comparable training test instance on which to complete this Practice.
· Use the Oracle Assets seeded Responsibility > Assets, Vision Operations (USA)
· Replace XX in the Practice with a unique identifier such as your initials or a number (for Instructor Led Training classes, this number will be assigned to you). This is necessary in order to create unique records within the database when performing the Practice.
· Replace any year references of YYYY and YY with the calendar year of your choice or as directed by the Instructor (e.g. 2008 or Jan-08). Keep in mind that some transactions require calendar dates and calendar periods be defined and enabled beforehand in order to be processed.
· The segment separator for the accounting flexfield may not be a dash "-". Substitute the applicable segment separator if necessary.
· The Use Batch Controls option is not enabled in Oracle Payables
Tasks
Enter an Invoice in Oracle Payables
Your organization has received a standard invoice from Star Gate LTD for $86,414.15. You need to make payment to the STAR GATE – PAY Site and the Invoice Number is XXINV. The invoice date just happens to be the first day of the current open period in your asset book OPS CORP. (If you don't know what date this is, ask your instructor or review the OPS CORP book controls). The distribution information for this invoice is as follows:
|
Num |
Type |
Amount |
Account |
Description |
|
1 |
Item |
2828.31 |
01-000-1570-0000-000 |
Dealer Prep |
|
2 |
Item |
51000.00 |
01-000-1570-0000-000 |
Truck |
|
3 |
Item |
24000.00 |
01-000-1570-0000-000 |
4 Laptops |
|
4 |
Item |
2000.00 |
01-000-1570-0000-000 |
Really Cool Stereo |
Enter the invoice and then validate and create accounting for it.
Create Mass Addition Lines
Create Mass Addition lines for the invoice you just entered. Remember that all invoices lines to be created as Mass Additions must first be transferred to the General Ledger. Run the Mass Additions Create Report to review Mass Addition lines that were created.
Solution – Create Mass Additions
Create an Invoice in Oracle Payables
1. Log in to the Oracle applications and choose the Payables, Vision Operations (USA) responsibility
2. Navigate to the Invoices form:
· (N) Invoices > Entry > Invoices
3. Using the default Standard invoice type, enter the following Invoice Header information:
|
Field Name |
Values |
|
Trading Partner |
Star Gate Ltd |
|
Site |
STAR GATE – PAY |
|
Invoice Date |
Use the first day of the open period in the OPS CORP asset book (01-MMM-YYYY) |
|
Invoice Number |
XXINV where XX represents your student number |
|
Invoice Amount |
$86,414.15 |
4. (T) Lines. Enter the following invoice line data (Note: you can use folder technology to make data entry easier):
|
Num |
Type |
Amount |
Account |
Description |
Track As Asset |
|
1 |
Item |
2828.31 |
01-000-1570-0000-000 |
Dealer Prep |
Checked |
|
2 |
Item |
51000.00 |
01-000-1570-0000-000 |
Truck |
Checked |
|
3 |
Item |
24000.00 |
01-000-1570-0000-000 |
4 Laptops |
Checked |
|
4 |
Item |
2000.00 |
01-000-1570-0000-000 |
Really Cool Stereo |
Checked |
5. (B) Calculate Tax.
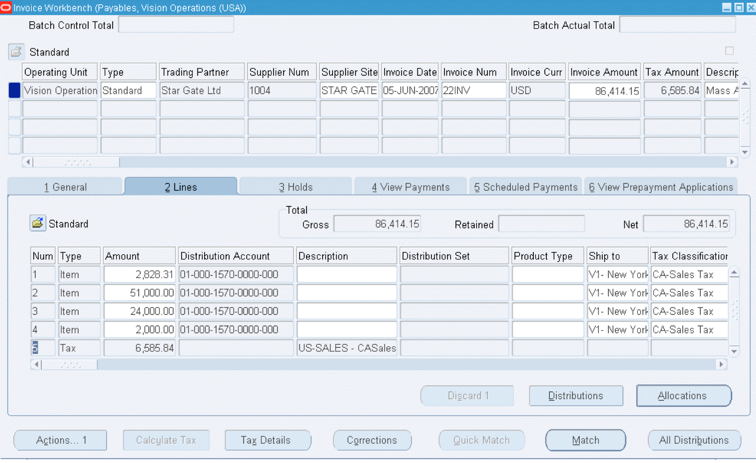
Note that the tax line is automatically calculated. Also note that the Gross Total in the Lines tab is now equal to the invoice amount.
6. Enable the Track as Asset check box for the Tax line.
7. Save your work.
8. Validate your invoice by selecting the (B) Actions..1 and then checking the Validate checkbox.
9. (B) OK.
10. Create accounting for your invoice by selecting the (B) Actions…1 and checking the Create Accounting checkbox, and the Final option. Then select the (B) OK.
11. (B) OK. To accept the confirmation message.
12. Close out of the Invoices form.
Create Mass Additions Lines
NOTE: In a class situation where more than one student is performing this Practice at the same time, only one person should execute the following tasks. In the case of Instructor led training, the Instructor or their designate will perform these tasks.
13. Proceed to the Submit Request form:
· (N) Other > Requests > Run
14. Choose to run the Transfer Journal Entries to GL process from the List of Values with the following parameters:
|
Parameter |
Value |
|
Ledger |
Vision Operations (USA) (default) |
|
End Date |
Use the invoice date of the invoice created (01-MMM-YYYY) |
|
Post in General Ledger |
No |
15. (B) Submit
16. View your concurrent request to ensure it completes normally.
· (M) View > Requests
17. From the Requests form, choose to Submit a New request.
18. Choose to run the Mass Additions Create process from the List of Values with the following parameters:
|
Parameter |
Value |
|
GL Date |
Use the invoice date of the invoice created (01-MMM-YYYY) |
|
Book |
OPS CORP |
19. (B) Submit
20. View the concurrent request to ensure it completes normally.
· (M) View > Requests
21. Select (B) Submit a New Request.
22. Select the Mass Additions Create Report from the List of Values and enter OPS CORP as the parameter. Select (B) Submit.
23. When the request finishes, select (B) View Output and review the Mass Addition lines that were created.
Practice - Prepare Mass Addition Lines
Distribution
<Body Text Format - List the long name of the product that this practice supports - REMOVE this statement after adding the product name>
Job Title*
Ownership
The Job Title [This email address is being protected from spambots. You need JavaScript enabled to view it.?Subject=LABxxxxx] is responsible for ensuring that this document is necessary and that it reflects actual practice.
Practice - Prepare Mass Addition Lines
Overview
In this Practice, you will prepare the Mass Addition lines you created from the invoice in the previous Practice in this module (XXINV). You will perform a merge, split, and add to existing asset as well as prepare line for posting to Oracle Assets.
Assumptions
· If you are not attending training at an Oracle University or Authorized Partner Education Center, you must have access to an Oracle Application Vision demonstration database or comparable training test instance on which to complete this Practice.
· Use the Oracle Assets seeded Responsibility > Assets, Vision Operations (USA)
· Replace XX in the Practice with a unique identifier such as your initials or a number (for Instructor Led Training classes, this number will be assigned to you). This is necessary in order to create unique records within the database when performing the Practice.
· Replace any year references of YYYY and YY with the calendar year of your choice or as directed by the Instructor (e.g. 2002 or Jan-02). Keep in mind that some transactions require calendar dates and calendar periods be defined and enabled before hand in order to be processed.
· The segment separator for the accounting flexfield may not be a dash "-". Substitute the applicable segment separator if necessary.
Tasks
Merge and Prepare for Posting Mass Addition Lines
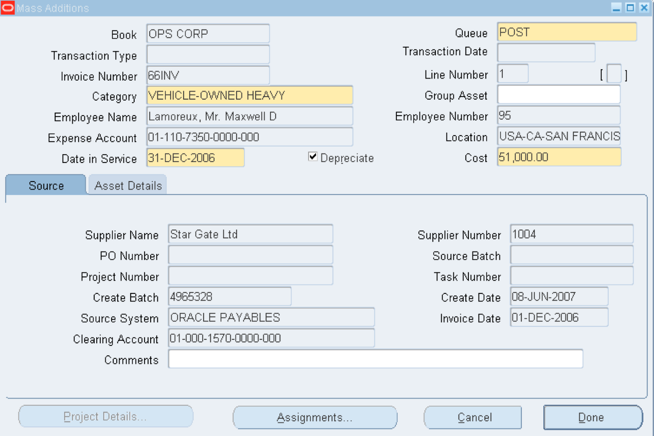
Using mass addition lines from the invoice created in the previous Practice (invoice XXINV), query the mass addition lines associated with this invoice and merge the SALES TAX and DEALER PREP lines into the TRUCK line. Then prepare the TRUCK line for posting by assigning it the following data and assigning the correct queue name:
|
Field Name |
Value |
|
Category |
VEHICLE-OWN HEAVY |
|
Employee Name |
Lamoreux, Mr. Maxwell D. |
|
Depreciation Expense Account |
01-110-7350-0000-000 |
|
Location |
USA-CA-SAN FRANCISCO-1 |
Split a Mass Addition Line
Split the line for 4 LAPTOPS into 4 separate mass addition lines and prepare them for posting. Note: Since you entered the invoice in Payables you were not able to assign units; therefore, you must change the number of units to 4 for this line so you may split it into separate assets. Also, it is advisable to prepare the original line with all necessary data prior to splitting it as this information will carry over to each new split line and will not have to be reentered. The Laptops should have the following data assigned to them:
|
Field Name |
Value |
|
Category |
COMPUTER-PC |
|
Description |
Laptop |
|
Employee Name |
Adams, Mr. Brian |
|
Depreciation Expense Account |
01-110-7360-0000-000 |
|
Location |
USA-CA-SAN FRANCISCO-2 |
Add a Mass Addition Line to an Existing Asset
Add the line for the REALLY COOL STEREO to the asset with the description XX CHEVY IMPALA in the OPS CORP asset book (XX must be a number between 01 and 24 in order to assign it to an asset already seeded in the OPS CORP asset book. Use your unique number as noted in the Practice assumptions or as assigned by your Instructor). You do want to amortize any depreciation adjustments due to the change in asset cost.
Use the Post All Feature
Change the Queue for the new LAPTOP lines and the REALLY COOL STEREO by using the Post All feature. You must requery your mass addition lines for your invoice so that only the ON HOLD queue lines are displayed before you can use the Post All feature.
Solution – Prepare Mass Addition Lines
Merge and Prepare for Posting Mass Addition Lines
1. Navigate to the Prepare Mass Additions form:
(N) Mass Additions > Prepare Mass Additions
2. In the Find Mass Additions form, enter OPS CORP in the Book field and the invoice number you created in the previous Practice (XXINV) in the Invoice Number field and select (B) Find.
3. In the Mass Additions Summary form, click on Line 2 TRUCK and select the (B) Open.
4. Enter the following data in the Mass Additions form:
|
Field Name |
Value |
|
Category |
VEHICLE-OWN HEAVY |
|
Employee Name |
Lamoreux, Mr. Maxwell D. |
|
Depreciation Expense Account |
01-110-7350-0000-000 |
|
Location |
USA-CA-SAN FRANCISCO-1 |
5. Change the Queue Name filed from NEW to POST and select the (B) Done.
Split a Mass Addition Line
6. In the Mass Additions Summary form, click on Line 3, 4 Laptops and select the (B) Open.
7. In the Category field, enter COMPUTER-PC.
8. Click on the Asset Details Tab and change the Description to just Laptop.
9. Change the Units field to 4.
10. Select the (B) Assignments.
11. Change the Units column to 4 and enter the Employee Name Adams, Mr. Brian, Depreciation Expense Account 01-110-7360-0000-000 and Location USA-CA-SAN FRANCISCO-2.
12. Select the (B) Done and close the Mass Additions form.
13. You should be back on the Mass Additions Summary form with Line 3 selected. Choose the (B) Split. Acknowledge the message windows by clicking OK. Note the 4 additional lines for LAPTOP with Queue of ON HOLD.

Add a Mass Addition Line to an Existing Asset
14. Click on Line 4 for the REALLY COOL STEREO and select the (B) Add to Asset.
15. In the Find Assets window, enter %XX CHEVY% in the Description field and select the (B) Find.
16. Check the Amortize Adjustment checkbox for the XX CHEVY IMPALA in the Add to Asset form and then select the (B) Done.
Use the Post All Feature
17. Select the Find icon on the Toolbar. Your Invoice Number should still be listed in the Find Mass Additions form. Leave it there and choose the queue ON HOLD from the LOV in the Queue field. Select the (B) Find.

18. You should now see the Mass Additions Summary form with only 5 Lines for your invoice, all with the queue ON HOLD. Choose the (M) Tools > Post All.
19. Click (B) OK.
20. Requery the window.
21. Note that 4 lines change to POST queue and 1 line to COST ADJUSTMENT.
22. Save your work.
Practice - Perform a What-If Depreciation Analysis
Distribution
Oracle Assets
Job Title*
Ownership
The Job Title [This email address is being protected from spambots. You need JavaScript enabled to view it.?Subject=LABxxxxx] is responsible for ensuring that this document is necessary and that it reflects actual practice.
Practice - Perform a What-If Depreciation Analysis
Overview
In this Practice, you will perform a What-If depreciation analysis.
Assumptions
· If you are not attending training at an Oracle University or Authorized Partner Education Center, you must have access to an Oracle Application Vision demonstration database or comparable training test instance on which to complete this Practice.
· Use the Oracle Assets seeded Responsibility > Assets, Vision Operations (USA)
· Replace XX in the Practice with a unique identifier such as your initials or a number (for Instructor Led Training classes, this number will be assigned to you). This is necessary in order to create unique records within the database when performing the Practice.
· Replace any year references of YYYY and YY with the calendar year of your choice or as directed by the Instructor (e.g. 2002 or Jan-02). Keep in mind that some transactions require calendar dates and calendar periods be defined and enabled before hand in order to be processed.
Tasks
Perform a What-If Depreciation Analysis
You have been asked what the depreciation effect would be if the depreciation method for all assets in the COMPUTER-PC category in the OPS CORP asset book was changed to 150DB with a 3 year life. The request asked for depreciation for 12 periods starting with period Jul-YY.
Solution – Perform a What-If Depreciation Analysis
Perform a What-If Depreciation Analysis
Responsibility = Assets, Vision Operations (USA)
1. Navigate to the What-If Analysis form.
· (N) Depreciation > What-If Analysis
2. Enter the following data:
|
Field Name |
Value |
|
Book |
OPS CORP |
|
Start Period |
Jul-YY (must be a period after the current open period and all projection periods must be defined). |
|
Number of Periods |
12 |
|
Category |
COMPUTER-PC |
|
Method |
150DB |
|
Life Years |
3 |
3. Select (B) Run.
4. Navigate to the View Requests form.
· (M) View > Requests
5. Select the What-If Depreciation Report line and click (B) View Output.

Practice - Perform a Retirement and Reinstatement
Distribution
Oracle Assets
Job Title*
Ownership
The Job Title [This email address is being protected from spambots. You need JavaScript enabled to view it.?Subject=LABxxxxx] is responsible for ensuring that this document is necessary and that it reflects actual practice.
Practice - Perform a Retirement and Reinstatement
Overview
In this Practice, you will perform a partial asset retirement, run the Calculate Gains and Losses program and then reinstate the retirement.
Assumptions
· If you are not attending training at an Oracle University or Authorized Partner Education Center, you must have access to an Oracle Application Vision demonstration database or comparable training test instance on which to complete this Practice.
· Use the Oracle Assets seeded Responsibility > Assets, Vision Operations (USA)
· Replace XX in the Practice with a unique identifier such as your initials or a number (for Instructor Led Training classes, this number will be assigned to you). This is necessary in order to create unique records within the database when performing the Practice.
· Replace any year references of YYYY and YY with the calendar year of your choice or as directed by the Instructor (e.g. 2002 or Jan-02). Keep in mind that some transactions require calendar dates and calendar periods be defined and enabled before hand in order to be processed.
Tasks
Perform a Partial Asset Retirement
Part of the asset with the tag number XXBLDG has been destroyed. You need to retire half of the asset.
Process Asset Retirements
Run the appropriate program that will calculate gains and losses for the asset you retired.
Reinstate the Retirement
The XXBLDG asset has been rebuilt and the retirement needs to be cancelled.
Solution – Perform a Retirement and Reinstatement
Perform a Partial Asset Retirement
Responsibility = Assets, Vision Operations (USA)
1. Navigate to the Asset Workbench:
· (N) Assets > Asset Workbench
2. Click (I) Find.
3. In the Tag Number field, enter XXBLDG.
4. In the Book field, enter OPS CORP
5. Click (B) Find.
6. Select (B) Retirements.
7. Enter the following data in the Retirements form:
|
Field Name |
Value |
|
Book |
OPS CORP |
|
Retire Date |
Accept default date |
|
Cost Retired |
2,500,000.00 |
|
Retirement Type |
DESTROYED |
8. Select (B) Done.
9. Close the Assets window to return to the Navigator.
Process Asset Retirements
10. Navigate to the Calculate Gains and Losses program submission form.
· (N) Depreciation > Calculate Gains and Losses
11. In the Parameters window, enter OPS CORP.
12. Select (B) OK then (B) Submit.
13. View your request to ensure it completes normally:
· (N) Other > Concurrent
14. Click (B) Find.
Reinstate the Retirement
15. Navigate to the Asset Workbench and find the asset on which you performed the partial retirement above.
· (N) Assets > Asset Workbench (I) Find
16. When the asset is displayed, select (B) Retirements.
17. Query the retirement you processed by entering CTRL + F11 in the Retirements form.
18. Note the Gain/Loss field has data. Select (B) Reinstate.
19. Confirm the reinstatement then select (B) Cancel.
Practice - Define a Lease
Distribution
List the long name of the product that this practice supports in Body Text Format - You can type over this statement.
Job Title*
Ownership
The Job Title [This email address is being protected from spambots. You need JavaScript enabled to view it.?Subject=LABxxxxx] is responsible for ensuring that this document is necessary and that it reflects actual practice.
Practice - Define a Lease
Overview
Body Text Format - One brief paragraph explaining what will be accomplished in this practice.
· Use List Bullet Format to list practice items here, if needed
· Use List Bullet Format to list practice items here, if needed
Assumptions
· If you are not attending training at an Oracle University or Authorized Partner Education Center, you must have access to an Oracle Application Vision demonstration database or comparable training test instance on which to complete this Practice.
· You must have access to the Oracle Applications Desktop Integrator that is linked to an instance of the Vision demonstration database.
· Use the Oracle Assets seeded Responsibility > Assets, Vision Operations (USA)
· Replace XX in the Practice with a unique identifier such as your initials or a number (for Instructor Led Training classes, this number will be assigned to you). This is necessary in order to create unique records within the database when performing the Practice.
Tasks
Define a lease with the following data:
|
Field Name |
Value |
|
Lease Number |
XX_12345 |
|
Description |
Mercedes Benz C-240 Lease |
|
Lessor |
GE Capital |
|
Lessor Site |
Danbury |
|
Lease Type |
Capitalized |
|
Payment Schedule |
Car Lease Schedule |
|
Payment Account |
01.110.7530.0000.000 |
|
Lease Terms in Months |
48 |
|
Asset Life in Months |
60 |
|
Fair Value |
$36,550.00 |
|
Present Value |
$36,550.00 |
Solution - Define a Lease
Responsibility = Assets, Vision Operations (USA)
1. Open the Lease Details window.
(N) Setup > Asset System > Leases > Lease Details
2. Enter the Lease Number and a Description.
3. Enter the Lessor.
4. In the Lessor Site field, enter Danbury.
5. Enter the Lessor Site, which is the location to which payments will be sent. This field is required if you plan to export lease payments to Oracle Payables.
6. Select a Lease Type of Capitalized.
7. In the Payment Schedule field, select Car Lease Schedule from the list of values.
8. Currency is USD.
9. Enter the Fair Value of the leased asset.
10. Enter the Present Value of the leased asset.

11. (I) Save
Guided Demonstration - Define an Asset Book
Distribution
Job Title*
Ownership
The Job Title [This email address is being protected from spambots. You need JavaScript enabled to view it.?Subject=LABxxxxx] is responsible for ensuring that this document is necessary and that it reflects actual practice.
Guided Demonstration - Define an Asset Book
Responsibility: Assets, Vision Operations (USA)
(N) Setup > Asset System > Book Controls
1. Enter Book Name of DEMO CORP BOOK.
2. Leave the Class as Corporate.
3. Description should also be DEMO CORP BOOK.
4. For the Ledger, choose Vision Operations from the LOV.
5. For both the Depreciation and Prorate Calendar choose Monthly from the LOV.
6. Current Period should be DEC-YY (use the prior year).
7. Leave the Divide Depreciation field as is and let the Last Run Date for depreciation be the default of today’s date.
8. Tab through the remaining fields in the Calendar region or click on the Accounting Rules tab.
9. Click the Allow Amortized Changes and Allow Mass Changes checkbox. Note that the default for these checkboxes is unchecked.
10. Accept the remaining defaults for the rest of this region. You may want to click any checkbox in the Tax Rules or Allow Mass Copy regions to show that since this is a corporate book, those region’s checkboxes are not allowed to be updated.
11. Tab through the remaining fields of the Accounting Rules region or click on the Natural Accounts tab.
12. Enter the following Natural Account values:
|
Gain |
Loss |
Clearing |
|
|
Proceeds of Sale |
7850 |
7851 |
1247 |
|
Cost of Removal |
7852 |
7853 |
2240 |
|
Net Book Value Retired |
7854 |
7855 |
|
|
Reval Reserve Retired |
7854 |
7855 |
|
|
Deferred Depreciation Reserve |
2540 |
||
|
Deferred Depreciation Expense |
7860 |
||
|
Depreciation Adjustment |
1690 |
||
|
Account Generator Defaults |
01-000-9999-0000-000 |
13. Save your work.
Guided Demonstration - Security by Book Setup (Optional)
Distribution
Job Title*
Ownership
The Job Title [This email address is being protected from spambots. You need JavaScript enabled to view it.?Subject=LABxxxxx] is responsible for ensuring that this document is necessary and that it reflects actual practice.
Guided Demonstration - Security by Book Setup (Optional)
This demonstration reviews the already existing Security by Book setup in the Vision Demonstration Database. The Assets Hierarchy that will be demonstrated is diagrammed as follows:

Responsibility: Assets, Vision Operations (USA)
(N) Setup > Security > Organization > Description
1. In the Find Organization window that appears, choose Vision Operations from the LOV in the Name field and click on the Find button.
2. In the Organization window for Vision Operations, click on the Organization Classifications Name Asset Organization and then click the Others button.
3. What appears is the Book Controls form and all asset books that have been assigned to the Asset Organization for the Vision Operations Organization are shown. You can scroll down through the list of asset books by using the down arrow on the keyboard.
4. If you wanted to add another asset book to this Asset Organization, you could define a new asset book here or query an existing asset book. In order to save this book to the organization, the form trigger must recognize that a change has occurred to the book information. To create a simple change that will enable the Save function to work, enter the Book Controls Description field and simply add a space at the end. Then, navigate to the File menu and select File: Save. Although there is no visible alteration to the book information, the form will now be able to save the book to the organization.
5. Close the Book Controls form.
6. Back in the Organizations form, place the cursor back in the Name field and then click the Find icon. In the Find Organization window, choose the Vision Corporation organization and click the Find button.
7. In the Organization window for Vision Corporation, click on the Organization Classifications Name Asset Organization and then click the Others button.
8. This time, no asset books appear in the Book Controls form. That is because in this hierarchy, the Vision Corporation is set up to view all asset books of the organizations subordinate to it. Therefore, we don't have to add any books to the Vision Corporation organization if they are part of an organization that will be subordinate to it. We'll see this when we look at the Asset Hierarchies form later.
9. Close the Book Controls and Organizations forms and return to the Navigator.
(N) Security > Organization > Hierarchy
10. In the Organization Hierarchy form, go into query mode and query on Asset%. The name Assets Hierarchy should be returned.
11. Click in the Organization region of the form in the Name field and again go into query mode. Query on Vision Op%. Vision Operations will be returned. Note that Vision Operations is part of this Asset Hierarchy and has another organization subordinate to it; Vision Project Mfg. What this means is that in this hierarchy, a user that can access the Vision Operations organization would be able to see all asset books associated with that organization plus the asset books associated with the Vision Proj Mfg organization. This is how the hierarchy is built.
12. Make sure the cursor is in the Organization Name field and go into query mode again. Query on Vision Corp%. Vision Corporation will be returned. Note the organizations that are subordinate to this organization. They include Vision Operations which shows 1 subordinate organization to it which is the Vision Proj Mfg organization we saw above. Thus a user with access to the Vision Corporation organization, would be able to see all asset books associated with its subordinate organizations and any organization's asset books subordinate to them.
13. Close the Organization Hierarchy window and return to the Navigator.
(N) Setup > Security > Security
14. In the Security Profile form, go into query mode and query FA:Vision Op%. The security Profile FA:Vision Operations is returned. Note the Organization Hierarchy of Assets Hierarchy and the Top Organization of Vision Operations. The Security Profile FA:Vision Operations is what would be assigned to a Responsibility to limit any user with that Responsibility to only being able to access the asset books associated with the Vision Operations organization as we saw in the Asset Hierarchy form.
15. Place your cursor in the Name field and query the Security Profile named FA:Vision Corporate. Here you'll note this Security Profile has the Top Organization Vision Corporation within the Assets Hierarchy assigned to it.
16. Close the Security Profile form and return to the Navigator.
17. At this point in our Security by Book setup we would run the Security List Maintenance Program for each Security Profile defined from the Submit Request form. The Oracle System Administrator would then create a new Responsibility and assign the newly defined Security profiles to them or we could assign the Security Profiles to existing Responsibilities. In either case, the Profile Option FA: Security Profile is used to assign the Security Profile names.
(N) Other > Profile
18. In the Personal Profile Values form, query the profile option FA: Security Profile.
19. Note that the Responsibility we are using is assigned the FA: Vision Operations Security Profile. Close the Personal Profile Values form.


Comments
This publish truly made my day. You cann't imagine simply how so much time I had spent for this info!
Thanks!
RSS feed for comments to this post