
Navigating Azure SQL Data Migration: Addressing Foreign Key Complexities

Client Requirement for Azure SQL Data Migration
The client’s requirement was to migrate data from their Azure SQL Server production databases to Azure SQL databases in the UAT environment. However, they specifically needed to migrate only the data. Copying the entire database would not suffice as it would revoke all access and essentially recreate the database as a production environment in UAT, which was not the desired outcome.
Challenges
The challenge arose from the presence of multiple foreign key constraints across various tables in the database. Foreign key constraints maintain data integrity by enforcing referential integrity among interconnected tables. However, they can complicate data migration processes, especially when using methods like ‘select * into’, which doesn’t work in certain Azure SQL versions.
Approach
1. To overcome this challenge, we developed a systematic approach. We created a flow diagram that meticulously mapped out which foreign key IDs were referencing which tables. This mapping provided us with a clear understanding of the relationships between tables and allowed us to devise a strategy for sequential data insertion.
By following the flow diagram, we could ensure that data was inserted into tables in the correct order, maintaining referential integrity throughout the migration process. This approach minimized the risk of data inconsistencies or errors that could arise from attempting to insert data into tables with unresolved foreign key dependencies.
Exploring a career path in Azure?
Get started with our FREE Azure Fundamentals AZ-900 course
2. Additionally, we explored an alternative approach during testing: temporarily disabling/dropping foreign keys, performing the data export, and then re-enabling/re-creating the foreign keys. This method is being evaluated to determine its effectiveness in simplifying the migration process while still preserving data integrity. Testing is essential to ensure that this approach meets the client’s requirements and does not introduce any unforeseen issues.
STEP 1: Need to identify all foreign keys in Azure SQL Database
SELECT f.name AS ForeignKey,
OBJECT_NAME(f.parent_object_id) AS TableName,
COL_NAME(fc.parent_object_id, fc.parent_column_id) AS ColumnName,
OBJECT_NAME (f.referenced_object_id) AS ReferenceTableName,
COL_NAME(fc.referenced_object_id, fc.referenced_column_id) AS ReferenceColumnName
FROM sys.foreign_keys AS f
INNER JOIN sys.foreign_key_columns AS fc
ON f.OBJECT_ID = fc.constraint_object_id
STEP 2: Need to identify all foreign keys Enable or Disable status in Azure SQL Database
SELECT
OBJECT_NAME(parent_object_id) AS ‘Table’,
name AS ‘Constraint’,
is_disabled,
is_not_trusted
FROM sys.foreign_keys
UNION
SELECT
OBJECT_NAME(parent_object_id),
name,
is_disabled,
is_not_trusted
FROM sys.check_constraints;
**NOTE: Keep dropping and creating scripts before taking any actions on DB**
STEP 3: Drop all Foreign keys and check and verify all foreign key details in the Azure SQL Database from the Step 1 script.
ALTER TABLE [dbo]. [TableName] DROP CONSTRAINT [FK_ForeignkeyName]
GO
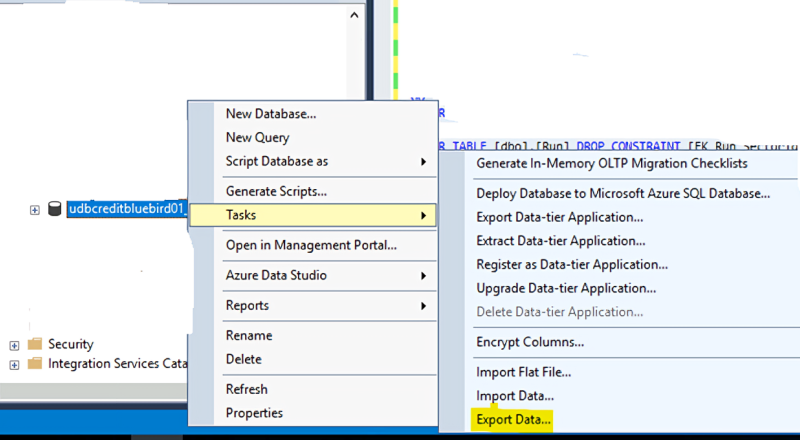
STEP 4: Use the Export data wizard from SSMS to proceed with data migration giving SQL server.
STEP 5: Once validation is done that all data migration is completed, Recreate Foreign keys and enable it.
ALTER TABLE [dbo].[TableName] WITH CHECK ADD CONSTRAINT [FK_ForeignkeyName] FOREIGN KEY([SectorId])
REFERENCES [dbo]. [Sector] ([Id])
GO
ALTER TABLE [dbo]. [TableName] CHECK CONSTRAINT [FK_ForeignkeyName]
GO
STEP 6: Validate all data migration and all foreign keys enabled.