
This tutorial deals with Oracle Fusion Financials and how it functions. In this tutorial we will look at the definition of the enterprise structure in Oracle Fusion.
Defining the Enterprise Structure
One of the most critical decisions for any project is the enterprise structure. As discussed before, the Enterprise is at the top of the structure. There can be only one enterprise for a project in Fusion.
The next step after the creation of an implementation project and implementation users is to configure the enterprise structure of the project. The following steps detail the method of configuring the enterprise structure:
-
Go to the required implementation project by clicking on its name from the Manage Implementation Projects page.
-
Expand the task list and click on the Go To Task icon (circled in the screenshot below) corresponding to the Manage Enterprise HCM Information task under Define Enterprise for Financials.
-
The details of the enterprise will be shown. By default, the name of the enterprise will be “Setup Enterprise.” To change the name or any other detail of the enterprise, click on the Edit button, followed by the Update or Correct option (circled in the screenshot below). The fields will then become editable. After making any necessary changes, click on the Submit button.
The difference between the two options is the maintenance of history. If you choose the Update option, the detail(s) will be updated in the database along with a version history. The Correct option simple changes the detail(s) in the same version of the entry, without a historical record of the previous data, rather than updating it. -
Click on the Done button after making any changes required.
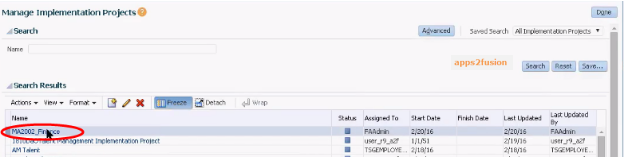
Fig. 1 - The required implementation project

Fig. 2 - The ‘Manage Enterprise HCM Information’ task

Fig. 3 - The ‘Update’ and ‘Correct’ options to change the details of the enterprise
Managing Locations
To create a location for the enterprise follow the steps detailed below:
-
Expand the task list of the implementation project and click on the Go To Task icon corresponding to the Manage Location task under Define Enterprise for Financials.
-
The Manage Locations page will open. To create a location, click on the Create button, followed by the Create option. In case a large number of locations need to be created, the Create in Spreadsheet option may be used.
-
Enter the basic details and other location information. Make sure that all of the mandatory fields, marked by an asterisk (*), are filled.
-
After entering the required details, click on the Submit button.
-
A pop-up message will appear asking you to confirm the submission of the details. Click on the Yes button.
-
A confirmation message will pop up. Click on the OK button.
Managing Legal Jurisdictions
A jurisdiction is a physical territory, such as a group of countries, country, state, county, or parish, where a particular piece of legislation applies. French Labour Law, Singapore Transactions Tax Law, and U.S. Income Tax Laws are some examples of particular legislations that apply to legal entities operating in different countries’ jurisdictions. Judicial authority may be exercised within a jurisdiction.
The following steps detail how to manage legal jurisdictions in an implementation project in Oracle Fusion:
-
Go to the required implementation project by clicking on its name from the Manage Implementation Projects page.
-
Expand the task list and click on the Go To Task icon corresponding to the Manage Legal Jurisdictions task under Define Legal Jurisdictions and Authorities for Financials.
-
In order to search for the territory, click on the arrow of the Territory field dropdown and click on the Search… option (shown in the screenshot below).
-
Search for the name of the territory (you can use the ‘%’ symbol as a wildcard character). Select the territory from the search results and click on the OK button (circled in the screenshot below).
-
Click on the Search button.
-
From the search results, click on the name of the required jurisdiction (circled in the screenshot below).
-
The details of the legal jurisdiction will be displayed. After making any edits if necessary, click on the Save and Close button, otherwise click on the Cancel button.

Fig. 4 - Searching for a territory
Managing Legal Addresses
The next step in configuring the enterprise structure of the project is to manage the legal addresses of the enterprise. The following steps detail the method of managing the legal addresses:
-
Expand the task list and click on the Go To Task icon corresponding to the Manage Legal Addresses task under Define Legal Jurisdictions and Authorities for Financials.
-
The Manage Legal Addresses page will open. To create a new legal address, click on the Create icon.
-
Enter the details of the location and click on the OK button.
(The next tutorial will explain about legal entities in the enterprise)


