
This tutorial deals with the Oracle Identity Manager and its role in identity management and identity administration. In this part, we discuss the Oracle Identity Manager System Administration console.
Oracle Identity System Administration
Creating an IT Resource:
To create a new IT Resource in the system, follow the steps below:
-
Log in to the Oracle Identity Manager System Administration console.
-
From the task list on the left, click on IT Resource under Configuration.
-
To search for an IT resource, enter the name and select its type from the dropdown list (e.g. OID Server, Laptop, etc.). Then, click on the Search button.
-
To create a new IT resource, click on the Create IT Resource button (circled in the screenshot below).
-
Enter the IT Resource Name in the field.
-
Click on the magnifying glass icon to search and select the IT Resource Type. Note that the proper connector has to be installed for the IT resource type to appear in the list.
-
In the pop-up window, you can search for a specific IT Resource type by using the search filter field. You can also navigate through the list by using the <<Previous and Next>> links. Click on the required resource type and click on the Select button.
-
Then, click on the Continue>> button.
-
In the next step, you have to specify the IT resource’s parameter values. Refer the product document for the values needed to be entered. Then click on the Continue>> button.
-
The administrative roles and permissions are assigned by default. In case you want to edit, use the Assign Role or the Update Permissions buttons. Click on the Continue>> button.
-
On the next step, verify the IT resource details. Once you finish reviewing, click on the Continue>> button.
-
After viewing the IT resource connection results, click on the Continue>> button.
-
The IT resource will then be created. Click on the Finish button.

Fig. 2 - Specifying the IT resource’s parameter values
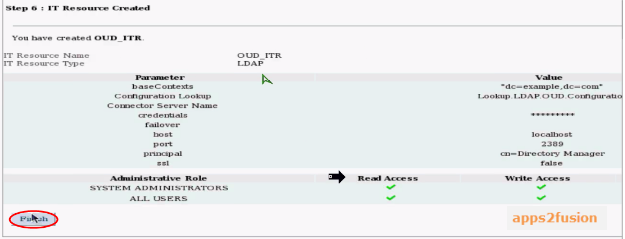
Fig. 3 - Creation of the IT resource
Creating an Application Instance:
To create an application instance in the system, we have to first create a Sandbox. Whenever there are changes made in applications, they are not immediately made live. A Sandbox first captures those application instances, which are available only to the administrator. Once these are checked and confirmed to be working properly, the Sandbox is then exported to be made available to the live users. In case anything goes wrong, the Sandbox can simply be deleted without causing much trouble.
Creating a Sandbox
To create a Sandbox, follow the steps below:
-
Log in to the Oracle Identity Manager System Administration console.
-
On the Identity System Administration home page, click on the Sandboxes link on the top right-hand corner of the page.
-
The Manage Sandboxes tab will open to the right of the task list. Click on the Create Sandbox button.
-
Enter the name of the Sandbox and a description. Make sure that the Activate Sandbox checkbox is ticked. Then, click on the Save and Close button.
-
Once it has been created, a confirmation message will pop up. Click on the OK button.
-
The name of the Sandbox will then appear next to the Sandboxes link at the top of the page (circled in the screenshot below). Only one Sandbox can be kept active at a time.
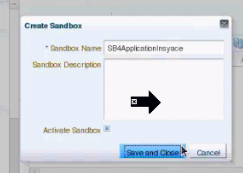
Fig. 4 - Creating a new Sandbox
Creating an Application Instance
Once a Sandbox is created, an application instance can be created. Follow the steps below:
-
Click on Application Instances under Configuration from the task list on the left.
-
The Application Instances tab will open on the right of the task list. Click on the Create button.
-
Enter the details of the application instance.
-
Click on the magnifying glass icons to search and select the appropriate Resource Object and IT Resource Instance.
-
In the Form field, click on Create to create a new form.
-
Enter the Form Name and click on the Create button. A pop-up confirmation message will appear on top.
-
Select the created form from the dropdown list.
-
After filling in the required details, click on the Save button.
Exporting the Sandbox
Once a Sandbox and an application instance are created, the Sandbox has to be exported to make the changes in the application instance(s) live. Follow the steps below:
-
Click on the Sandboxes link at the top of the Oracle Identity Manager System Administration page.
-
Select the required Sandbox under Available Sandboxes.
-
If anything has gone wrong and you need to delete the instance, click on the Delete Sandbox button.
-
To publish the Sandbox, click on the arrow on top of the list and select Publish Sandbox (shown in the screenshot below).
-
-
Click on the Yes button to publish the Sandbox.
-
There will then be no active Sandbox after publishing. Click on Published Sandboxes to view the list of published Sandboxes.
(continued in Part 3)


Comments
out much. I hope to give something back and help others like you aided me.
RSS feed for comments to this post