
This tutorial deals with the Oracle Identity Manager and its role in identity management and identity administration. In this part, we discuss the Oracle Identity Manager System Administration console.
Oracle Identity System Administration
Running the Scheduled Job Before Provisioning:
Before provisioning the IT resources created, a scheduled job has to be run. To do so, follow the steps below:
-
Log in to the Oracle Identity Manager System Administration console.
-
From the task list on the left, click on Scheduler under System Management.
-
Search for the LDAP Connector OU Lookup Reconciliation job in the Search Scheduled Jobs section. This job is for the Container Lookups, for people (users) and groups (privileges). You can use the asterisk, ‘*’, as a wildcard.
-
Click on the name of the job.
-
A tab will open on the right with the details of the scheduled job. Scroll down and enter the name of the IT resource to be provisioned in the IT Resource Name field.
-
Scroll back up and click on the Apply button.
-
Once the page refreshes, click on the Run Now button.
-
Click on the Refresh button and scroll down to see if the Job Status has changed from Running to Stopped (look at the top-most entry with the latest timestamp in the End Time column).
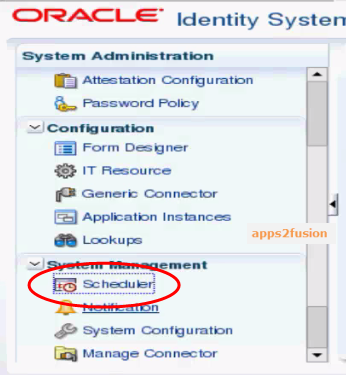
Fig. 1 - The ‘Scheduler’ task
Similarly, you can run the LDAP Connector Group Lookup Reconciliation scheduled job. This job is required for Entitlement Harvesting. Once these jobs have been run, you can request accounts and entitlements from the Oracle Identity Self Service console, which is discussed below.
Provisioning a Resource for a User:
To provision an IT resource to a user after creating it, follow the steps below:
-
Log in as an administrator to the Oracle Identity Self Service console by going to the following URL in your browser:
http://identity.oracleads.com:14000/identity (or) http://<local host>:14000/identity -
Go to Administration -> Users from the home page.
-
Search for the required user and click on the Search button.
-
Click on the User Login of the user to which you need to provision the resource.
-
On the User Details page, go to the Accounts tab.
-
Click on the Request Accounts button.
-
Search for the application instance (you can use ‘*’ as a wildcard) and click on the arrow button.
-
From the search results, locate the required item. You can view the type by referring to the Categories section on the right, denoting that the item is an application instance.
-
Click on the Add to Cart button corresponding to the required application instance.
-
Scroll to the right and click on the Checkout button.
-
Scroll down and enter the details of the provisioned resource for the user. The User ID and Password fields denote the credentials to be used by the user for that particular application instance. If left blank, the same credentials as those for the OIM User account will be used by default.
-
After entering the details, click on the Ready to submit button under the Cart Items section.
-
After the page refreshes, click on the Submit button at the top right-hand corner.
-
A confirmation message will be displayed upon successful provisioning. This will bypass the approval process if you have logged in as an administrator. Else, the operation will have to be approved by an administrator before it can be used.
-
Go back to the User Details tab and click on the Refresh button. The application instance will show up in the Accounts tab with the Status set to Provisioned.

Fig. 2 - Going to the ‘Users’ page in the Oracle Identity Self Service console
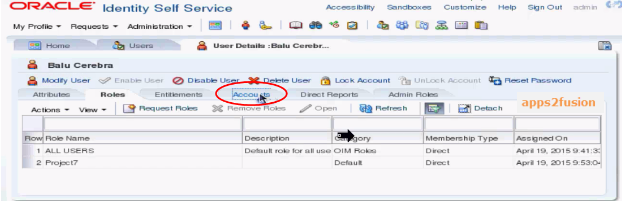
Fig. 3 - Going to the ‘Accounts’ tab

Fig. 4 - The ‘Request Accounts’ button

Fig. 5 - Searching for the application instance in the catalog
Provisioning an Entitlement:
Users require entitlements in order to perform certain tasks related to their position. These entitlements can be provisioned in the same manner as an application instance, as discussed above. The screenshot below shows the Advertising entitlement being provisioned to the user in the Entitlements tab.
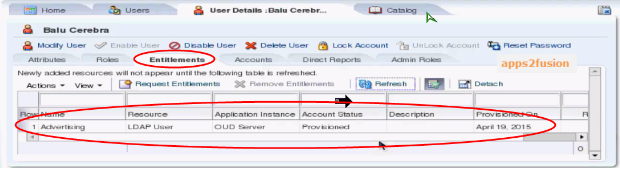
Fig. 6 - The ‘Advertising’ entitlement has been provisioned to the user


