
var msg="Opps..We Donot allow to copying the copyrighted material !"; // DISABLE MOUSE RIGHT CLICK function clickExplorer() { if( document.all ) { alert('Stop copying the copyrighted material1!'); } return false; } function clickOther(e) { if( document.layers || ( document.getElementById && !document.all ) ) { if ( e.which == 2 || e.which == 3 ) { alert(msg); return false; } } } if( document.layers ) { document.captureEvents( Event.MOUSEDOWN ); document.onmousedown=clickOther; } else { document.onmouseup = clickOther; document.oncontextmenu = clickExplorer; } //disable mouse drag select start document.onselectstart = new Function('return false'); function dMDown(e) { return false; } function dOClick() { return true; } document.onmousedown = dMDown; document.onclick = dOClick; $("#document").attr("unselectable", "on"); //disable mouse drag select end //disable right click - context menu document.oncontextmenu = new Function("return false"); //disable CTRL+A/CTRL+C through key board start //use this function function disableSelectCopy(e) { // current pressed key var pressedKey = String.fromCharCode(e.keyCode).toLowerCase(); if (e.ctrlKey && (pressedKey == "c" || pressedKey == "x" || pressedKey == "v" || pressedKey == "a")) { return false; } } document.onkeydown = disableSelectCopy; //or use this function $(function () { $(document).keydown(function (objEvent) { if (objEvent.ctrlKey || objEvent.metaKey) { if (objEvent.keyCode == 65 || objEvent.keyCode == 97) { return false; } //} } }); });
Objective:In this article we will learn about the SOA 11g Installation.
Installing Oracle SOA Suite 11g requires:
-
Installing Oracle Database 10g or 11g XE
-
Creating schemas for Oracle SOA Suite in an Oracle Database nothing but installing Repository Creation Utility aka RCU.
-
Installing Oracle WebLogic Server.
-
Installing Oracle SOA Suite. (Part1 and Part2)
-
Configuring a domain in Oracle WebLogic Server to support both Oracle SOA Suite and Oracle Enterprise Manager.
-
Verify the Installation
So let's follow the above parts in order to start and complete the installation and configuration of Oracle SOA suite 11g.
1.Installing Oracle Database:
For Database installation steps click here
2. Installation of Repository Creation Utility
For RCU installation steps click here.
3. Install Weblogic server:
For weblogic installation click here.
4. Installing Oracle SOA Suite
Download the SOA Suite from here (All the above downloads can be found here):
http://www.oracle.com/technetwork/middleware/soasuite/downloads/index.html
(Be sure you are downloading 2 parts)
After downloading the 2 parts of SOA Suite installation (2 ZIP files):
1. Unpack Part 1 & Part 2 zip files (Disk1-5 folders)
2. Inside Disk1 create a file called install.bat as below:
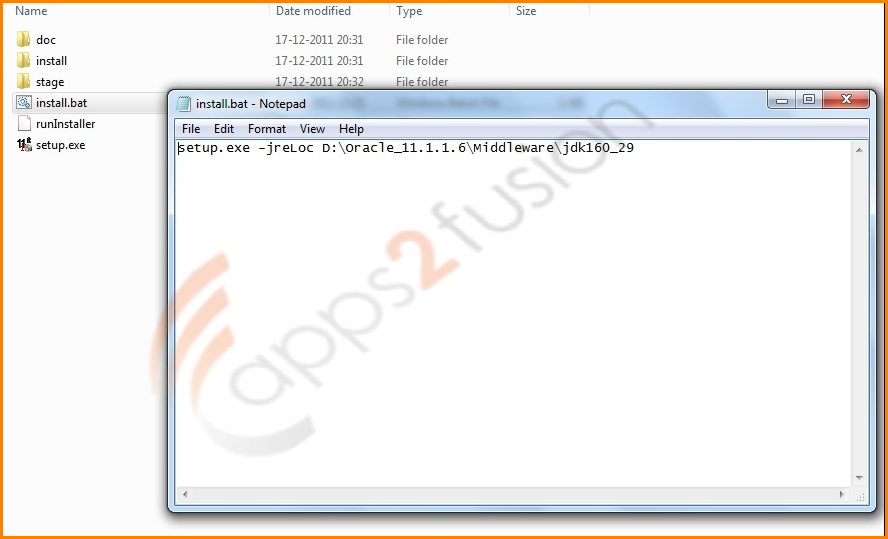
3. after creating the install.bat, double click on it to start the installation.
4. Welcome screen appears, click next
5. Select skip software updates, click next.
6. Verify that all of the validations completed successfully and click next.
7. Choose the MW home directory (I have installed in D drive), and specify the Oracle Home Directory (you can leave
the default – Oracle_SOA1) and click next.
8. Leave the default selected Weblogic server and click next.
9. Verify that all installation details are correct and click Install:
10. Follow the installation Progress and verify it complete successfully.
11. During the installation you will be prompted to point on the location of ‘Disk4&5’ folders that were already unpacked prior the installation). Browse the Disk 4 and Disk5 and click next.
12. When finished click next. Save the installation details (include details like directories, URL’s, ports numbers etc..)
and click Finish.
5. Configuring a domain in Oracle Weblogic Server for SOA suite.
In this part we will run the ‘Oracle Fusion Middleware Configuration Wizard’. The wizard will help us to create a
WebLogic domain, that will contain an Administration server & Managed Server/s.
1. Start the wizard by running the file config.cmd (In my installation:
D:\Oracle_11.1.1.6\Middleware\Oracle_SOA1\common\bin).
2. Choose ‘Create New Weblogic Domain’ and click Next:
3. Choose the required product that will be supported by the created domain.
In this example I choose ‘Oracle SOA Suite’, ‘Oracle BPM Suite’, ‘Oracle BAM’ & ‘Oracle Enterprize Manager’.
Note that ‘Oracle WSM Policy Manager’ & ‘Oracle JRF’ were marked automatically as well.
Click next
4. In the Domain Name and Location you can leave the default values (verify the MW home is correct) or change it,
and click next:
5. Put the Administration User, password details and click Next:
6. Choose ‘Sun SDK’ for better performance,click Next.
7. Enter the JDBC details (like those entered when configured RCU) in the following order:
1) Check all Component Schema
2) Enter the schema password
3) Enter the Service name
4) Enter the Host Name
5) Enter Port number
for eg: select BAM schema and provide below details:
Schema Owner: DEV_ORABAM
DBMS/Service: XE
Hostname: localhost
Port:1521
Schema password: the password entered while installing DB
When finish click Next:
8. Verify the JDBC test connection completed successfully and click Next
9. In the configuration settings, select Administration server, Managed servers, clusters and machines, Deployment and services.
In this example i will configure the admin server which hosts Oracle Enterprise Manager Fusion Middleware Control for performing administrative tasks; the Managed Server (soa_server1 and bam_server1) is an instance of an Oracle WebLogic Server used to host deployed applications.
Click next.
10. In the configuration of Administration server, specify the name as Admin server and port number 9001 (i have used 9001 because other ports are already in use), click next.
11. In the configuration of managed servers, change the listen port for soa_server1 to 9002 and bam_server1 port to 9003 and click next.
12. Assign the Admin server to Local machine and click next
13. check the target deployments and services and click next.
14. In the configuration summary check the details and click create
15. Make sure the installation finishes successfully. click done
6. Verify the Installation
You can verify the installation by starting Admin and Managed servers.
1. Open a command window and go to D:\Oracle_11.1.16\Middleware\user_projects\domains\soa_domain\bin) and run the command: startWebLogic.cmd
2. make sure the server starts in Running mode...
3. Open a command window and go to D:\Oracle_11.1.16\Middleware\user_projects\domains\soa_domain\bin) and run the command: startManagedWebLogic.cmd soa_server1
On the command window log you will be prompt to give the user name/password. Put the user/password you’ve provided while configuring the domain.
make sure the soa_server1 also starts in Running Mode.
4) Repeat the above steps to start bam_server1
5) Once all the servers are in running state access the consoles.
1. WebLogic: http://localhost:9001/console
2. Enterprise Manager: http://localhost:9002/em
3. BAM http://localhost:9003/OracleBAM


Comments
https://www.oracleappsdba.com
RSS feed for comments to this post