


Overview
By the end of this tutorial you will be able to:
1. Use HTTP Analyzer
2. Query Opportunity web service by name
3. Set up opportunity attributes retrieved
Instructions
1. In JDeveloper click on menu: Tools -> HTTP Analyzer.
2. HTTP Analyzer will show up in the bottom of the IDE.
3. Click “create a new request” icon at the bottom of the IDE.
4. HTTP Analyzer page will show up
5. Click on Open WSDL button on the top right side; enter the WSDL URL for the Opportunity.
Service: https://<your-osc-crmendpoint>/opptyMgmtOpportunities/OpportunityService?WSDL (Please use the correct
Oracle Sales Cloud address that has been allocated to you) and click on OK.
6. Wait for the fetching of WSDL documentation to complete.
7. Request Template will show up.
8. Select “OpportunityServiceSoapHttpPort.findOpportunity(,).
9. Click on the HTTP Content tab.
10. Copy payload and paste it to the HTTP Content.
<env:Envelope xmlns:env="http://schemas.xmlsoap.org/soap/envelope/"
xmlns:ns1="http://xmlns.oracle.com/apps/sales/opptyMgmt/opportunities/opportunityService/types/" xmlns:ns2="http://xmlns.oracle.com/adf/svc/types/">
<env:Header/>
<env:Body>
<ns1:findOpportunity>
<ns1:findCriteria>
<ns2:fetchStart>0</ns2:fetchStart>
<ns2:fetchSize>-1</ns2:fetchSize>
<ns2:filter>
<ns2:group>
<ns2:item>
<ns2:upperCaseCompare>true</ns2:upperCaseCompare>
<ns2:attribute>Name</ns2:attribute>
<ns2:operator>=</ns2:operator>
<ns2:value>Q3 Green Server 5000 Opportunity</ns2:value>
</ns2:item>
</ns2:group>
</ns2:filter>
</ns1:findCriteria>
<ns1:findControl>
<ns2:retrieveAllTranslations>false</ns2:retrieveAllTranslations>
</ns1:findControl>
</ns1:findOpportunity>
</env:Body>
</env:Envelope>
11. Click on the SOAP Structure tab; then click on “Request HTTP Headers”.
12. Click on the “+” Add headers icon (Sometimes, the “+” may not be visible. You may
have to expand the Request HTTP Headers” panel by dragging the splitter bar to the
right).
13. Choose “Authorization basic”.
14. Fill up the username and password (as “Matt.Hooper” and the Oracle Sales Cloud
password sent to you).
15. Click on the “Send Request” button.
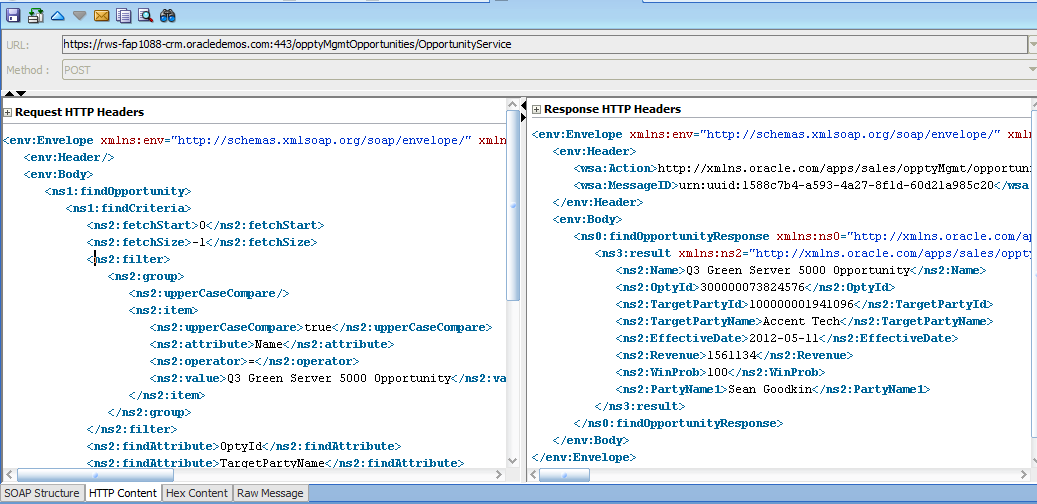
16. Review the Response payload on the right-hand side window. Note that this is
only to show you how the request is sent and the response is received. Do not worry if
there is no opportunity named “Q3 Green Server 5000 Opportunity”. If you are already
familiar with Oracle Sales Cloud you may want to create an Opportunity by this name
and test it, or you can change the “value” for the Name attribute, assigning a name available
in the Oracle Sales Cloud instance you are working with (this is not mandatory for this
lab).

17. Next, you will create a new request using a different SOAP payload. Click
again on the “Create a new request” icon at the bottom of the IDE.
18. The HTTP Analyzer page shows up.
19. Click on the “Open WSDL” button on the upper right-side of the page. Enter the same
URL you used on your first test. Please use the Correct Oracle Sales Cloud instance
that has been allocated to you and click on OK.
20. Wait for the fetching of WSDL documentation to complete.
21. The Request Template will show up.
22. Select “OpportunityServiceSoapHttpPort.findOpportunity(,)”.
23. Click on the HTTP Content tab.
Copy the payload and paste it to the HTTP Content.
<env:Envelope xmlns:env="http://schemas.xmlsoap.org/soap/envelope/"
xmlns:ns1="http://xmlns.oracle.com/apps/sales/opptyMgmt/opportunities/opportu
nityService/types/" xmlns:ns2="http://xmlns.oracle.com/adf/svc/types/">
<env:Header/>
<env:Body>
<ns1:findOpportunity>
<ns1:findCriteria>
<ns2:fetchStart>0</ns2:fetchStart>
<ns2:fetchSize>-1</ns2:fetchSize>
<ns2:filter>
<ns2:group>
<ns2:item>
<ns2:upperCaseCompare>true</ns2:upperCaseCompare>
<ns2:attribute>Name</ns2:attribute>
<ns2:operator>=</ns2:operator>
<ns2:value>Q3 Green Server 5000 Opportunity</ns2:value>
</ns2:item>
</ns2:group>
</ns2:filter>
<ns2:findAttribute>OptyId</ns2:findAttribute>
<ns2:findAttribute>TargetPartyName</ns2:findAttribute>
<ns2:findAttribute>TargetPartyId</ns2:findAttribute>
<ns2:findAttribute>Name</ns2:findAttribute>
<ns2:findAttribute>PartyName1</ns2:findAttribute>
<ns2:findAttribute>WinProb</ns2:findAttribute>
<ns2:findAttribute>EffectiveDate</ns2:findAttribute>
<ns2:findAttribute>Revenue</ns2:findAttribute>
</ns1:findCriteria>
<ns1:findControl>
<ns2:retrieveAllTranslations>false</ns2:retrieveAllTranslations>
</ns1:findControl>
</ns1:findOpportunity>
</env:Body>
</env:Envelope>
25. Click on the SOAP Structure tab and then click on “Request HTTP Headers”
26. Click on the “+” Add headers icon (Sometimes, the “+” may not be visible. You may
have to expand the Request HTTP Headers” panel by dragging the splitter bar to the
right).
27. Choose “Authorization basic”.
28. Fill up the username and password.
29. Click on the “Send Request” button.
30. Get back the result; then click on the HTTP Content (this is only to show how the
request is sent and the response is received).
Do not worry if there is no opportunity by name “Q3 Green Server 5000 Opportunity”.
If you are already familiar with Oracle Sales Cloud you may want to create an Opportunity by this name and test it, but it is not mandatory for this tutorial.
