
Objective
The ICS(Integration Cloud Service) connection is the mechanism that provides connectivity details that ICS uses to interact with SaaS or On-Premise application instances. A connection must be created for every SaaS or On-Premise application instance that participates in ICS integrations. Once the connection is created, it can be used in multiple integration flows.
In this tutorial you will create three connections, respectively Oracle RightNow Cloud, Oracle Sales Cloud and Eloqua application instances. These three application instances are used in integration flows that you develop in the following sections.
In this lab you will create an integration flow between Oracle Sales Cloud and Oracle RightNow Cloud, and later you will enrich the flow. We will discuss in detail about the flow in following sections.
In this article we will be learning creating connections for Saas applications , integration flow between Oracle Sales Cloud and RightNow Cloud , extending integration flows , creating lookups and creating integration flows using lookups as listed below .
1a. Creating connections for SaaS applications
Create a Connection for RightNow SaaS Application
Create a Connection for Oracle Sales Cloud SaaS Application
Create a Connection for Eloqua SaaS Application
1b. Creating an Integration Flow between Oracle Sales Cloud and Oracle RightNow Cloud
Create an Integration Flow
Map Data for the Request Message
1c. Extending the integration flow-Oracle Sales Cloud and RightNow Cloud
1d. Creating Lookups
1e. Creating an integration flow that uses lookup values
1a. Create connections for SaaS applications
In this first part you will learn how to create connections to various SaaS applications.
Create a Connection for RightNow SaaS Application
1. Open the ICS console.
2. Click on the Designer button to open the Designer Portal.
3. In Designer Portal, click on Connections.
4. Click on Create New Connection.
5. Select the RightNow connector.
6. Enter the following connection information:
|
Field |
Action |
|
Connection Name |
Give a proper Connection name. In may case I am giving OracleRightNow_A2f_49_138 |
|
Identifier |
Nothing to enter. Automatically generated from the connection name: |
|
Connection Role |
Trigger and Invoke |
7. Click Create.
8. Enter the administrator’s Email Address. For example:This email address is being protected from spambots. You need JavaScript enabled to view it.
9. Click Configure Connectivity to configure the WSDL URL.
Use the following URL: WSDL URL: https://pts-spare152-19.rightnowdemo.com/cgi-bin/pts_spare152_19.cfg/services/soap?wsdl
And click on OK
NOTE: Be sure that there are no extra spaces before or after the WSDL URL after you paste it into ICS. Note that this WSDL URL is for the RightNow site that is participating in your integration. This WSDL provides operations for inserting, updating and deleting records in RightNow business objects. This WSDL also provides operations to retrieve the metadata, custom attributes and custom objects.
10. Click on Configure Security and enter the following information:
|
Field |
Action |
|
Username |
Admin1 |
|
Password |
Admin1234 |
|
Confirm PAssword |
Admin1234 |
Note that Admin1 represents the integration user account created in RightNow. To enable use of the Oracle
RightNow Connect Web Services for SOAP API, permissions for the public SOAP API have been enabled for this user
Account.
11. Click on the Test button to verify the connection. You should see the message "Connection Tested Successfully!" at
the top of the window.
12. Note that Flow Progress Indicator shows that the integration is 100% complete
13. Save the connection.
14. Now Click on Exit Connection
Create a Connection for Oracle Sales Cloud SaaS Application
1. Click on the Designer button to open the Designer Portal.
2. In Designer Portal, click on Connections.
3. Click on Create New Connection.
4. Select the Oracle Sales Cloud connector.
7. Enter the following connection information
|
Field |
Action |
|
Connection Name |
Give a proper Connection name. In may case I am giving Oracle OracleSalesCloud_A2f_49_138 |
|
Identifier |
Nothing to enter. Automatically generated from the connection name: |
|
Connection Role |
Trigger and Invoke |
6. Click Create.
7. Enter the administrator’s Email Address. For example: This email address is being protected from spambots. You need JavaScript enabled to view it.
8. Click on Configure Connectivity to configure WSDL URL. Use the following URL:
OSC Services Catalogue WSDL URL:
https://fs-aufsn4x0ala.oracleoutsourcing.com/fndAppCoreServices/ServiceCatalogService?wsdl
Do not enter any value for OSC Events Catalogue URL (Optional).
NOTE: Be sure that there are no extra spaces before or after the WSDL URL after you paste it into ICS.
9. Click on Configure Security .
And enter the following information, click OK.
|
Field |
Action |
|
Username |
Enter value matt.hooper |
|
Password |
Enter value Welcome1 |
|
Confirm Password |
Enter value Welcome1 |
10. Click on the Test button to verify the Connection. You should see the message "Connection Tested Successfully!" at
the top of the page.
11. Note that Flow Progress Indicator shows that the integration is 100% complete.
12. Save the connection.
13. Click on Exit Connection
Creating a Connection for Eloqua SaaS Application
1. Click on the Designer button to open the Designer Portal.
2. In Designer Portal, click on Connections.
3. Click on Create New Connection.
4. Select the Eloqua connector.
5. Enter the following connection information:
|
Field |
Action |
|
Connection Name |
Give a proper Connection name. In may case I am giving Oracle OracleEloqua_A2f_49_138 |
|
Identifier |
Nothing to enter. Automatically generated from the connection name: |
|
Connection Role |
Invoke |
10. Click Create.
11. Enter the administrator’s Email Address. For example: This email address is being protected from spambots. You need JavaScript enabled to view it.
12. Click on Configure Security and enter the following information:
|
Field |
Action |
|
Company |
OraclePTSEloqua |
|
Username |
Enter value scott.campbell |
|
Password |
Enter value Welcome1 |
|
Confirm Password |
Enter value Welcome1 |
13. Click on the Test button to verify the Connection. You should see the message "The connection test was successful!"
at the top of the page.
14. Note that Flow Progress Indicator shows that the integration is 100% complete.
15. Save the connection, then Exit Connection
.
Learning: In this tutorial, till now you have learnt how to create connections to three different SaaS applications. Oracle
RightNow, Oracle Sales Cloud and Oracle Eloqua.
------------------------------------------------------------------------------------------------------------------------------------------------------
1b. Create an Integration Flow between Oracle Sales Cloud and Oracle RightNow Cloud
Now you will be using the connections that you have created in the previous section and build an integration flow between Oracle Sales Cloud and Oracle RightNow Cloud. In this integration scenario you are trying to fetch a list of incidents related to an organization from Oracle RightNow Cloud. Please see the flow diagram for the integration scenario that you will be creating in this section.
Create an Integration Flow
1. Click the Designer link in the upper right corner.
2. Click Integrations.
Click Create New Integration
. The Create Integration – Select a Pattern dialog will be displayed.
Select the Basic Map My Data option
3. Provide the following information, and click Create Integration:
|
Field |
Action |
|
Integration Name |
Give a proper Connection name. In may case I am giving Oracle GetRNIncidents_A2f_49_138 |
|
Identifier |
Nothing to enter. Automatically generated from the connection name: |
|
Version |
Invoke |
|
Package Name |
Leave blank |
|
Description |
Leave blank |
4. From the Connections column, drag the Oracle Sales Cloud (e.g. OracleSalesCloud_A2f_49_138) icon to the Trigger/Source area.
Search for the connection you had created
Drag and Drop it to Trigger Source Area
5. Provide the following information on the Basic Info page, and click Next Step:
|
Field |
Action |
|
What do you want to call your endpoint? |
Enter value Request |
|
What does this connection do? |
Enter value Receive request from OSC to fetch incidents in RightNow for an account ID. |
.
6. Provide the following information on the Request Configuration page, and click Next Step.
Field Action
|
Field |
Action |
|
Configure a Request |
By default With Business Objects radio button is selected |
|
Select Business Object |
Select Account object |
7. Provide the following information on the Response Configuration page, and click Next Step.
|
Field |
Action |
|
Immediate |
By default Immediate radio button is selected leave it like that. |
|
Select Business Object |
Select ICS_CrmCommonRefCO custom business object |
Note: Enter ICS in the Search field and press Enter to display only business objects that include ICS in the name.
8. Review your selections on the Summary page, and click done.
9. From the Connections column, drag the Oracle RightNow Cloud (e.g. OracleRightNow_A2f_49_138) icon to the Invoke/Target area.
10. Provide the following information on the Basic Info page, and click Next:
|
Field |
Action |
|
What do you want to call your endpoint? |
Enter value Response |
|
What does this connection do? |
Enter value Sends request to RightNow to fetch the Incidents. |
11. Provide the following information on the Operations page, and click Next.
|
Field |
Action |
|
Select an Operation Mode |
By default Single Operation leave it like that |
|
Select an Operation Type |
Select ROQL from the drop down. The wizard screen refreshes, then displays with new set of configurations specific to this Operation. |
|
ROQL Query |
Enter the query select Incident from Incident where Incident.Organization.ID=&orgId in the box. |
|
orgId |
Enter value 24 |
|
Test My Query |
Click Test My Query option to test the ROQL query. If successful,output is displayed in the field. If unsuccessful, errors messages are displayed. Fix your query and retry. |
Note: After entering the above statement, click the refresh icon adjacent to Parameter Bindings option. This action displays a field
in which you can enter the value for the orgId binding parameter.
12. Review your selections on the Summary page, and click Done.
We have configured both trigger/source and invoke/target applications, now we will create the data mapping by using the
ICS mapper functionality.
Now we will Map Data for the Request Message
1. Click the Request Mapping icon to invoke the mapper.
2. Map the following trigger/source field to the invoke/target field. You can see QueryObjectsParameters element once you collapse Incident element.
|
Trigger/Source Field |
Invoke/Target Field |
|
Process > Account > PartyId |
QueryObjects > QueryObjectsParameters > orgId |
3. Drag the source field over the target field, aligning the text of the source field with the text of the target field.
4. Click Save, then click Exit Mapper. The request mapping will be in green, indicating that it has been configured
5. Click the Response Mapping icon to invoke the mapper.
6. In the Target column, click ICS_CrmCommonRefCO to invoke the Mapping Builder dialog.
7. On the left side of the Mapping Builder dialog, expand the Mapping Components section. This provides you with
access to the mapping functions available for transforming input data to the format required for the mapping output.
8. Expand XSL Elements.
9. Drag the for-each element on top of ICS_CrmCommonRefCO.
The Drag and Drop or Type here … for ‘select’ message is added to the statement.
10. On the left side of the Build Mapping dialog, expand the Source section (This will be top left corner). This
returns you to the source data schema so you can map from the input message.
11. Expand QueryObjectsResponse.
12. Drop the Incident element on top of the Drag and Drop or Type here … for ‘select’ message.
The page is refreshed to display the Incident element in the statement.
13. Click Save, then click Close to return to the mapper. After you save the mapping, the above statement contracts
to three lines.
14. Map the following source field to the target field.

Note: Ensure that the source field is Incident>ID>id. One common error is that attendees select Incident>ID instead of Incident>ID>id.
Drag the source field over the target field, aligning the text of the source field with the text of the target field. If the mapping is successful
15. Click Save, then click Exit Mapper.
16. Configure the “Business Identifier for Tracking” by clicking on Tracking option on the top. Expand the process-
>Account element from the Available Trigger/Source Fields, then drag and drop the PartyId to Tracking Field
column. Enter value for the Tracking Name – Party ID. The screen will appear like below.

17. Click Done.
18. Click Save. Then click on Exit Integration.
19. Identify the flow then click Activate to activate the integration, a confirmation dialog will appear “Are you sure
you want to activate integration “ GetRNIncidents_A2f_49138”, select Enable detailed tracing option
and then click Activate to confirm.
20. Click the information icon to see details about the integration.
Copy the endpoint URL and save it, we will use this for testing the flow.(https://ics21-usoracle72468.integration.us2.oraclecloud.com/integration/flowsvc/osc/GETRNINC_A2F_49138/v01/?wsdl)
Now that the flow is activated and ready to be tested, you can use SOAP UI or any other SOAP client to test the flow. Let
us use SOAP UI and test the flow that we have created.
Testing the application with SOAP UI
Please follow the steps menioned below to create a SOAPUI project and add the WSDL for the service.
Step 1: Create New SOAP Project
Enter Project Name and WSDL URL details. Then click OK.
Step 2: Expand process node and then double click Request1 node.
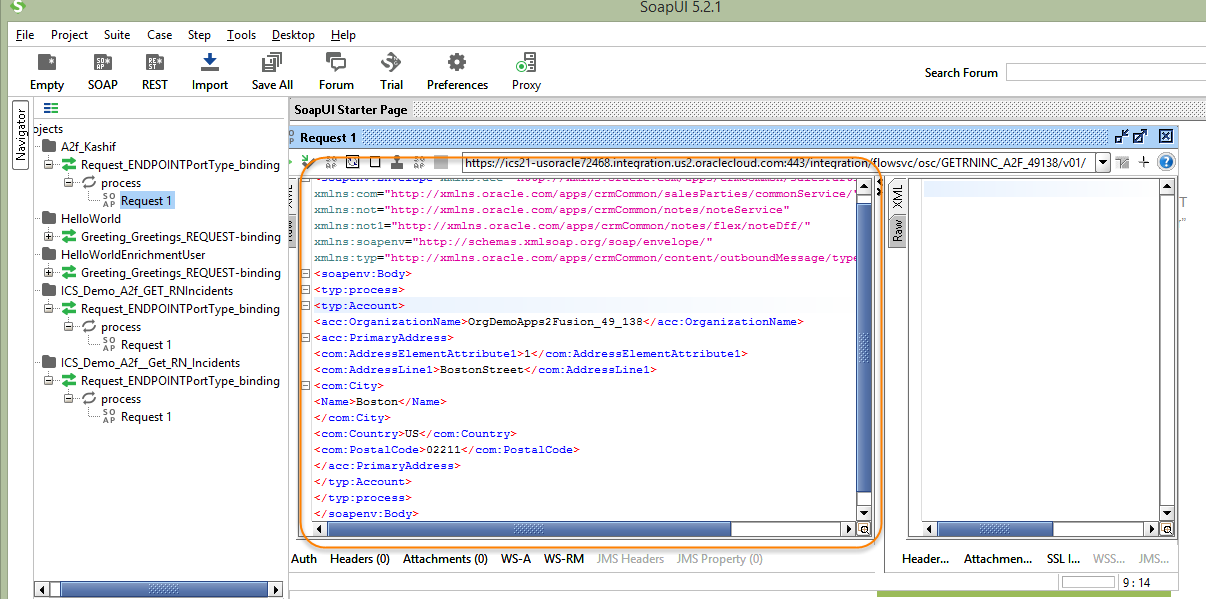
Edit the SOAP request message, remove everything in the soap request. Copy paste the below message into the request window.
<soapenv:Envelope xmlns:acc="http://xmlns.oracle.com/apps/crmCommon/salesParties/accountService/"
xmlns:com="http://xmlns.oracle.com/apps/crmCommon/salesParties/commonService/"
xmlns:not="http://xmlns.oracle.com/apps/crmCommon/notes/noteService"
xmlns:not1="http://xmlns.oracle.com/apps/crmCommon/notes/flex/noteDff/"
xmlns:soapenv="http://schemas.xmlsoap.org/soap/envelope/"
xmlns:typ="http://xmlns.oracle.com/apps/crmCommon/content/outboundMessage/types/">
<soapenv:Header>
</soapenv:Header>
<soapenv:Body>
<typ:process>
<!--Zero or more repetitions:-->
<typ:Account>
<!--Optional:-->
<acc:PartyId>24</acc:PartyId>
</typ:Account>
</typ:process>
</soapenv:Body>
</soapenv:Envelope>
Step 3: Select Auth option to add Basic Authentication.
Select Type as Basic, and then click OK.
Add your Username and Password for the Integration Cloud Service.
Right click anywhere inside the request panel and select Add WSS Username Token option, you will be prompted with
Specify Password Type option select PasswordText type, then select OK.
This should add WSS security header to the soap request, it should appear as below.
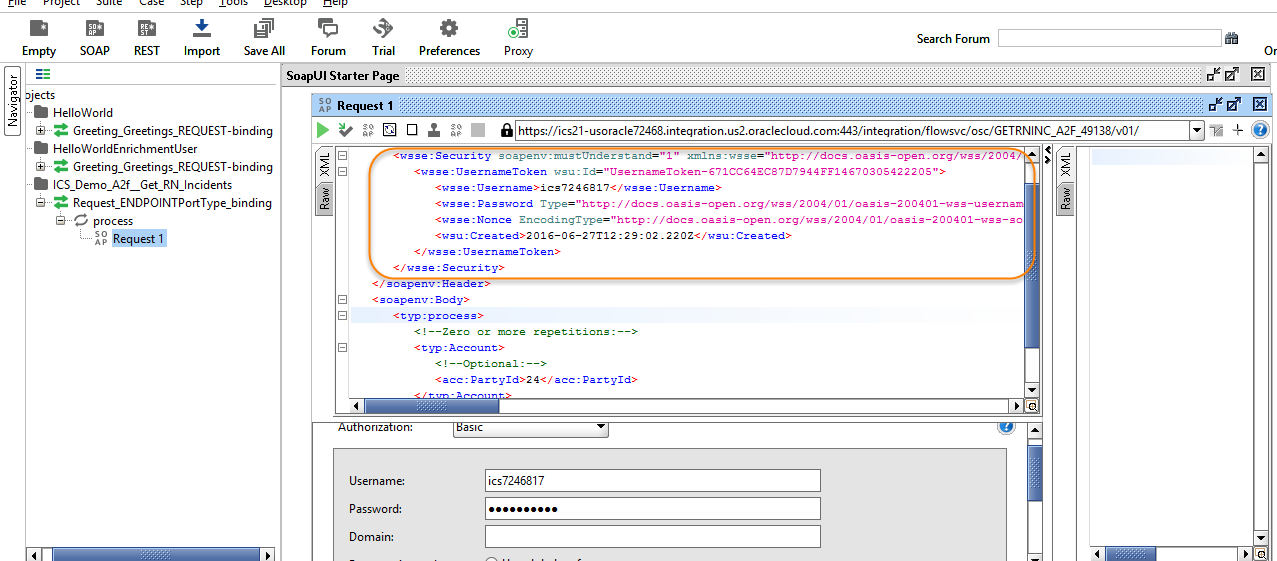
Now again right click anywhere inside the request panel, select Add WS-Timestamp, you will be prompted to enter
Specify Time-To-Live option, provide 10000 in the text box.
The request payload should appear now as below shown.

Now you are ready to send a request. Submit the request by clicking icon in the request panel.
You should be seeing a response message like shown below.
<env:Envelope xmlns:env="http://schemas.xmlsoap.org/soap/envelope/">
<env:Header/>
<env:Body>
<nstrgmpr:processResponse xmlns:errors="http://xmlns.oracle.com/adf/svc/errors/"
xmlns:ns1="http://xmlns.oracle.com/cloud/adapter/osc/Request_REQUEST"
xmlns:nsmpr4="/oracle/apps/cdm/foundation/custextn/views/common/"
xmlns:nstrgmpr="http://xmlns.oracle.com/apps/crmCommon/content/outboundMessage/types/"
xmlns:orafault="http://xmlns.oracle.com/oracleas/schema/oracle-fault-11_0"
xmlns:plnk="http://schemas.xmlsoap.org/ws/2003/05/partner-link/"
xmlns:soap="http://schemas.xmlsoap.org/wsdl/soap/"
xmlns:tns="http://xmlns.oracle.com/apps/crmCommon/salesParties/accountService/"
xmlns:types="http://xmlns.oracle.com/apps/crmCommon/salesParties/accountService/types/"
xmlns:wsdl="http://schemas.xmlsoap.org/wsdl/">
<nstrgmpr:ICS_CrmCommonRefCO>
<nsmpr4:Id>723</nsmpr4:Id>
</nstrgmpr:ICS_CrmCommonRefCO>
<nstrgmpr:ICS_CrmCommonRefCO>
<nsmpr4:Id>724</nsmpr4:Id>
</nstrgmpr:ICS_CrmCommonRefCO>
</nstrgmpr:processResponse>
</env:Body>
</env:Envelope>
Learning: In this article you have learnt how to create connections and how to create and test integration flows.
--------------------------------------------------------------------------------------------------------------------------------------------------
1c. Extend the integration flow-Oracle Sales Cloud and RightNow Cloud.
In the following exercise you will learn how to enrich the existing flow.
1. Deactivate the integration flow that you created in the previous section and open it. (Since the integration flow
has been deactivated, you can now edit it.
2. From the Connections palette, drag the OracleRightNow_A2f_49_138 icon to the request enrichment part of the Trigger/Source area,You may need to click on Show Palette to see the Connections palette.
3. Provide the following information on the Basic Info page, and click Next:
|
Field |
Action |
|
What do you want to call your endpoint? |
Enter value Organization |
|
What does this connection do? |
Enter value Send request to RightNow to fetch the Organization. |
4. Provide the following information on the Operations page, and click Next.
|
Field |
Action |
|
Select an Operation Mode |
By default Single Operation will be selected, leave it like that. |
|
Select an Operation Type |
Select CRUD and Get from the respective drop boxes. |
|
Select Business Objects |
Organization |
Note: Double click Organization to move it to the YourSelected Objects list.
5. Review your selections on the Summary page, and click Done. You will be prompted with the below shown
dialog box, select Yes.
6. You will recreate your mappings in subsequent steps.
The integration canvas now looks as shown below.

7. Click the Request Enrichment Mapping icon to invoke the mapper.
8. Map the following source field to the target field.
|
Source Field |
Target Field |
|
Process > Account > OrganizationName |
Get > Organization > LookupName |
Drag the source field over the target field, aligning the text of the source field with the text of the target field.
9. Click Save, then click Exit Mapper. The response enrichment mapper is displayed in green, indicating that it has
been configured.
10. Remove the existing mappings. Click the Request Mapping icon to invoke the mapper again.
11. Map the following source field to the target field.

Drag the source field over the target field, aligning the text of the source field with the text of the target field.
Note: Ensure that the source field is Organization>ID>id. One common error is that attendees select Organization>ID instead of Organization>ID>id.
12. Click Save, then click Exit Mapper. Please observe that the request mapper object now turned to green,
indicating that it has been configured.
14. Remove the existing Response mappings. Click the Response Mapping icon to invoke the mapper again.
15. In the Target column, click ICS_CrmCommonRefCO to invoke the Mapping Builder dialog.
16. On the left side of the Build Mapping dialog, expand the Mapping Components section. This provides you with access to the mapping functions available for transforming input data to the format required for the mapping output.
17. Expand XSL Elements.
18. Drag the for-each element on top of ICS_CrmCommonRefCO.
19. Drag and Drop or Type here … for ‘select’ message is added to the statement.
20. On the left side of the Build Mapping dialog, expand the Source section. This returns you to the source data
schema so you can map from the input message.
21. Expand QueryObjectsResponse.
22. Drag and Drop the Incident element on top of the Drag and Drop or Type here … for ‘select’ message.
23. The page is refreshed to display the Incident element in the statement.
24. Click Save, then click Close to return to the mapper. After you save the mapping, the above statement contracts
to three lines.
25. Map the following source field to the target field.
|
Source Field |
Target Field |
|
QueryObjectsResponse > Incident > ID >id |
processResponse > ICS_CrmCommonRefCO > Id |
Drag the source field over the target field, aligning the text of the source field with the text of the target field.
Note: Ensure that the source field is Incident>ID>id. One common error is that attendees select Incident>ID instead of Incident>ID>id.
If the mapping is successful, the UI looks like this:

26. Click Save, then click Exit Mapper.
27. Click Save to save the integration, then click Exit Integration
28. Verify that the integration flow is ready to be activated.
29. Click Activate. You will be prompted with a dialog click Activate.
30. Verify that the integration is active and tracing is enabled.
31. Click the information icon to display details about the integration. Copy and save this URL to invoke the flow in
the next step. You will need the endpoint URL for testing.

Now that we have successfully activated the enrichment flow, let us test the flow using SOAP UI.
32. Test the integration using SOAP UI. Please follow the detailed steps given earlier in the lab 1b.
a. Create new SOAP UI project, enter Project Name and WSDL URL details. Then click OK.
b. Expand process node and then double click Request1 node. Edit the SOAP request message. Remove
everything in the soap request. Copy paste the below message into the request window
<soapenv:Envelope xmlns:soapenv="http://schemas.xmlsoap.org/soap/envelope/"
xmlns:typ="http://xmlns.oracle.com/apps/crmCommon/content/outboundMessage/types/"
xmlns:acc="http://xmlns.oracle.com/apps/crmCommon/salesParties/accountService/"
xmlns:com="http://xmlns.oracle.com/apps/crmCommon/salesParties/commonService/"
xmlns:not="http://xmlns.oracle.com/apps/crmCommon/notes/noteService"
xmlns:not1="http://xmlns.oracle.com/apps/crmCommon/notes/flex/noteDff/">
<soapenv:Header/>
<soapenv:Body>
<typ:process>
<typ:Account>
<acc:OrganizationName>PTS Test Org 2</acc:OrganizationName>
</typ:Account>
</typ:process>
</soapenv:Body>
</soapenv:Envelope>
c. Select Auth option, and then select Add New Authorization to add Basic Authentication
d. Enter Username and Password details
e. Right click anywhere inside the request panel and select Add WSS Username Token option, you will be prompted with Specify Password Type option select PasswordText type, then select OK.
This should add WSS security header to the soap request.
f. Now again right click anywhere inside the request panel, select Add WS-Timestamp, you will be
prompted to enter Specify Time-To-Live option, provide 10000 in the text box.
This should add time stamp to the WSS security header.
g. Now you are ready to send a request. Submit the request by clicking icon in the request panel. You should receive a SOAP response with Incidents of that particular organization.
<env:Envelope xmlns:env="http://schemas.xmlsoap.org/soap/envelope/">
<env:Header/>
<env:Body>
<nstrgmpr:processResponse xmlns:errors="http://xmlns.oracle.com/adf/svc/errors/"
xmlns:ns1="http://xmlns.oracle.com/cloud/adapter/osc/Request_REQUEST"
xmlns:nsmpr6="/oracle/apps/cdm/foundation/custextn/views/common/"
xmlns:nstrgmpr="http://xmlns.oracle.com/apps/crmCommon/content/outboundMessage/types/"
xmlns:orafault="http://xmlns.oracle.com/oracleas/schema/oracle-fault-11_0"
xmlns:plnk="http://schemas.xmlsoap.org/ws/2003/05/partner-link/"
xmlns:soap="http://schemas.xmlsoap.org/wsdl/soap/"
xmlns:tns="http://xmlns.oracle.com/apps/crmCommon/salesParties/accountService/"
xmlns:types="http://xmlns.oracle.com/apps/crmCommon/salesParties/accountService/types/"
xmlns:wsdl="http://schemas.xmlsoap.org/wsdl/">
<nstrgmpr:ICS_CrmCommonRefCO>
<nsmpr6:Id>723</nsmpr6:Id>
</nstrgmpr:ICS_CrmCommonRefCO>
<nstrgmpr:ICS_CrmCommonRefCO>
<nsmpr6:Id>724</nsmpr6:Id>
</nstrgmpr:ICS_CrmCommonRefCO>
</nstrgmpr:processResponse>
</env:Body>
</env:Envelope>
Learning: In this exercise, you have learnt how to use the enrichment feature in an integration flow.
---------------------------------------------------------------------------------------------------------------------------------------------------------------
1d. Creating Lookup
In this part you will learn how to create lookup values.
-
Click the Designer link at the top right corner of the Home page.
-
Click on Lookups
-
Click on Create New Lookup.
-
Enter new integration information into the New Lookup – Information dialog box.
|
Field |
Enter |
|
Lookup Name |
AddressType e.g. AddressType_A2f_49_138 |
|
Description |
Lookup to up to identify AddressType |
Click Create.
5) Click on Domain Name 1.
6) Select the Oracle Sales Cloud connector from the Select Adapter dialog.
7) Click on Use Domain Name 2.
8) Select the Oracle RightNow connector from the Select Connector dialog.
The page should look like this:

Click on the icon at bottom to add values.
In Row 1, enter 1 under Oracle Sales Cloud and Billing under Oracle RightNow.
In Row 2, enter 2 under Oracle Sales Cloud and Shipping in Oracle RightNow.
Save the lookup.
Click Exit Lookup to exit.
---------------------------------------------------------------------------------------------------------------------------------------------------------------
1e. Creating an integration flow that uses lookup values
Now we will learn how to use the lookup values that were created in the preceding section.
-
Click on Designer.
-
Click on the Integration link.
3. Click on the Create New Integration button. Select the Map my Data option and click select.
4. Enter the following information into the New Integration Information dialog box:
|
Field |
Enter |
|
Integration Name |
Enter OSC_Accoun_A2f_49_138 To RNow Org Using DVM Flow |
|
Identifier |
Nothing to enter. Automatically generated from the integration name: |
|
Version |
Nothing to enter. Use the default value of 01.00.0000 |
|
Description |
Leave blank for this lab. |
|
Package Name |
Leave blank for this lab. |
4. Define the trigger/source. Drag the <ClassID> <StudentID> Oracle Sales Cloud connection icon over the
trigger/source area.
5. Enter the information into the Basic Info page as show below, and then click Next.
|
Field |
Action |
|
What do you want to call your endpoint? |
Enter value SynchrnoizeAccountUsingDVM |
|
What does this connection do? |
Enter value Receive request from OSC to create Organization in RightNow |
6. On the Request page, select the with business objects radio button.
7. Select Account in the Select Business Object list
8. Click Next.
9. In the Response page, select the option “None”.
Click Next and then click Done on the Summary page.
10. Define the invoke/target. Drag the Oracle RightNow connection icon over the invoke/target area.
11. Enter the information into the Basic Info page as show below, and then click Next Step.
|
Field |
Enter |
|
What do you want to call your endpoint? |
Enter value RNowOrgOutboundAdapter |
|
What does this connection do? |
Enter value Sends request to RightNow to create Organization |
12. In the Operations page, double-click the Organization item in the Select Business Objects scrolling list. The
Organization item moves to the Your Selected Objects list. Select Operation Type as CRUD and Create
13. Click Next Step.
14. Click Done on the Summary page.
15. Click the Map icon to open the mapper.
16. Use the mapper to map the following source elements to the corresponding target elements as shown in the table.
Drag the source field over the target field, aligning the text of the source field with the text of the target field.
17. Add a lookup to an element.
Search for the AddressType element in the target list and then select the Name element under it
Click on the Name element text to invoke the Mapping Builder window
18. Expand the Mapping Components pane in the left column.
Expand the mapping components to reveal: Mapping Components > Functions > ICS > lookupValue.
19. Drag-and-drop the lookupValue item over the “Drag and Drop or Type here…” target in the mapping pane.
The Lookup Browser opens and displays all the Lookup Tables. From the Lookup Tables column, select the entry that
corresponds to the Lookup Name AddressType_A2f …. that we created earlier.
Click the Use button.
20. Expand the Source pane in the Mapping Builder and search for the AddressElementAttribute1 element. Drag-anddrop
the AddressElementAttribute1 element on to srcValue under osc.
Click on defaultValue under the rightnow entry and enter Billing as the default value.
21. Click Save and Close.
22. In the Target list, define the Create > Organization > Addresses > TypedAddressList > action attribute.
Use the search feature to find the TypedAddressList element in the target list. Scroll down the list till you see the
action attribute.
23. Click on the action attribute (on the text, not the icon).
24. In the Mapping Builder window, click on “- Drag and Drop or Type here…” and then type “add”.
34. Click Save and Close.
25. In the mapper window, click Save and then click on Exit Mapper.
26. Click on “Tracking” option on the top of the canvas, and then configure “Business Identifiers for Tracking” as shown
Below.

Drag And Drop OrganizationName under Source to Tracking Field
27. Click Done. Observe that the flow is 100% now.
28. In the integration window, click Save and then click on Exit Integration
29. Note that the integration status is ready to be activated.
30. Click the Activate button to activate the integration. Enable detailed tracing.
31. Note that integration status is displayed as active. Click on the information icon to see the endpoint URL.
49. Test the integration using SOAP UI. Please follow the detailed steps given earlier in the Lab 1b.
a. Use the endpoint and create the new project
b. Expand process node and then double click Request1 node. Edit the SOAP request message, remove
everything in the soap request. Copy paste the below message into the request window
<soapenv:Envelope xmlns:acc="http://xmlns.oracle.com/apps/crmCommon/salesParties/accountService/"
xmlns:com="http://xmlns.oracle.com/apps/crmCommon/salesParties/commonService/"
xmlns:not="http://xmlns.oracle.com/apps/crmCommon/notes/noteService"
xmlns:not1="http://xmlns.oracle.com/apps/crmCommon/notes/flex/noteDff/"
xmlns:soapenv="http://schemas.xmlsoap.org/soap/envelope/"
xmlns:typ="http://xmlns.oracle.com/apps/crmCommon/content/outboundMessage/types/">
<soapenv:Body>
<typ:process>
<typ:Account>
<acc:OrganizationName>OrgDemoApps2Fusion_49_138</acc:OrganizationName>
<acc:PrimaryAddress>
<com:AddressElementAttribute1>1</com:AddressElementAttribute1>
<com:AddressLine1>BostonStreet</com:AddressLine1>
<com:City>
<Name>Boston</Name>
</com:City>
<com:Country>US</com:Country>
<com:PostalCode>02211</com:PostalCode>
</acc:PrimaryAddress>
</typ:Account>
</typ:process>
</soapenv:Body>
</soapenv:Envelope>
c. Select Auth option, and then select Add New Authorization to add Basic Authentication.
d. Add Username and Password details.
e. Right click anywhere inside the request panel and select Add WSS Username Token option, you will be
prompted with Specify Password Type option select PasswordText type, then select OK
This should add WSS security header to the soap request.
f. Now again right click anywhere inside the request panel, select Add WS-Timestamp, you will be
prompted to enter Specify Time-To-Live option, provide 10000 in the text box.
It should add timestamp to the WSS security header.
g. Now you are ready to send a request. Submit the request by clicking icon in the request pane.
. If successful, you should see a HTTP/1.1 200 OK when you click on the Raw tab in the right window in
SOAPUI.


