
This tutorial deals with the Oracle Identity Manager and its role in identity management and identity administration. In this part, we discuss about the Oracle Identity Manager System Administration console.
Oracle Identity System Administration
Logging into the Oracle Identity Self Service Console:
After starting the OIM server, follow the steps below to log in to the Oracle Identity Manager System Administration console:
-
Open a browser and enter the following address to go to the Oracle Identity Self Service page:
http://identity.oracleads.com:14000/sysadmin (or) http://<local host>:14000/sysadmin -
On the Oracle Identity System Administration page, log in using your User ID and Password by clicking on the Sign In button.
-
Once you have logged in, you will be taken to the Oracle Identity System Administration home page. Here, there will be a list of tasks on the left (shown in the screenshot below). These tasks are not user-specific, rather, they are system-specific tasks that can be performed by only the system administrator.
-
To view a task, click on the name of the required task. In this example, we shall look into the Scheduler task.
-
Search for a scheduled job in the Search Scheduled Jobs section. You can use the asterisk, ‘*’, as a wildcard. From the search results, click on the name of the required scheduled job.
-
The details of the job will be shown on a tab on the right. As shown in this example, the Catalog Synchronization job is responsible for syncing all the organisations, users, and roles that get added to the catalog whenever they are created. The Job Periodic Settings specify the periodicity of the job.
-
To create a new scheduled job, click on the New icon from the tab on the left, below the Search Scheduled Jobs section.
Installing a Connector:
To install a connector in the system, follow the steps below:
Extracting the Connector Bundle
First, we need to extract the connector bundle. To do so, enter the commands from the steps below:
-
Open the Oracle Identity Manager command window using the OIM icon (circled in the screenshot below) from the Oracle VM VirtualBox Desktop.
-
Enter the following command to navigate to the software directory:
-
Enter the command to list the files in the directory:
Note down the name of the ZIP file of the required connector bundle (circled in the screenshot below). In this example, we will be installing the OID connector bundle, which is used with a variety of products, including OID, OUD,ODSEE, Novell eDirectory etc. -
Enter the commands below to navigate to the required directory:
-
Now, unzip the OID connector bundle in this location by using the following command:
-
Once the ZIP file has been extracted, open the browser window.

Fig. 1 - The OID connector bundle ZIP file is circled

Fig. 2 - Use the ‘ls’ command to view the list of files to locate the required one

Fig. 3 - Locating the default connector directory using the ‘ls’ command
Installing the Connector
Once the connector bundle has been extracted to the ConnectorDefaultDirectory, follow the steps below to install the connector:
-
Log in to the Oracle Identity Manager System Administration console.
-
From the task list on the left, click on Manage Connector under System Management.
-
On the Connector Management page, click on the Install button.
-
From the dropdown, select the required connector from the connector list (which will show up only after extracting the connector bundle using the steps detailed above). Then click on the Load button.
-
Once the connector has been loaded, click on the Continue button.
-
The connector will then start getting installed, which will take around five minutes. Once the Installation Status says Successful, click on the Exit button
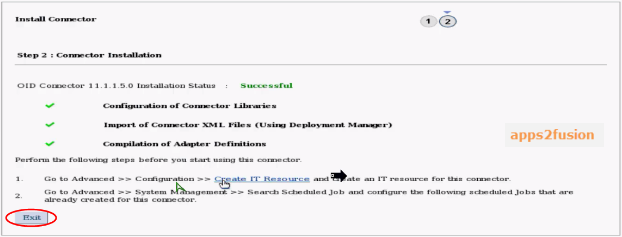
Fig. 4 - After successful installation of the connector


