This tutorial deals with the Oracle Identity Manager and its role in identity management and identity administration. In this part, we discuss the Oracle Identity Self Service console.
Oracle Identity Self Service
Creating a User
To create a user in the Identity Management System, follow the steps below:
-
Click on Administration -> Users from the Administration menu on the Oracle Identity Self Service console, after logging in as an administrator.
-
Scroll down and click on the Create button
-
Enter the reason and explanation for the creation of the user under the Justification field.
The Effective Date specifies the date from which the user will be active; meaning that the user would be able to log in and access their account from that data onwards. -
Enter the Basic Information for the user. You can search and select the Manager and Organization fields by using the respective magnifying glass icon.
-
Enter the Account Settings, Contact Information, Preferences, and other information for the user.
-
Click on the Submit button located on the top right-hand corner of the tab. A pop-up message will appear, saying User created successfully.

To log in to the user account that was just created:
-
Log in to the Oracle Identity Self Service console by using the credentials of the user that was just created in the above steps.
-
Upon logging in for the first time, you will be asked to reset your password and choose three security questions. After entering them, click on the Submit button.
-
Click on My Profile -> My Access to view the access that the user has.
-
You can view the privileges and access allowed to the account by clicking on the relevant tab: Roles, Entitlements, Accounts, or Admin Roles.
Creating Roles for a User
To create roles for a user in the Identity Management System, follow the steps below:
-
Click on Administration -> Roles from the Administration menu on the Oracle Identity Self Service console, after logging in as an administrator.
-
Scroll down and click on the Create button (circled in the screenshot below). Note that this button will not be highlighted or clickable if you are logged in as a user other than an administrator.
-
Enter the details of the role. Use the magnifying glass icons to search and select the Role Category and Owned By fields. By default, the administrator will be the role owner.
-
Click on the Save button on the top right-hand corner of the tab. A pop-up message will appear, saying Role <rolename> was successfully created.
-
You can click on the Access Policy button to add any mandatory resources to the role, if required.
Adding a Role to a User
To add a role to a user in the Identity Management System, follow the steps below:
-
Click on Administration -> Users from the Administration menu on the Oracle Identity Self Service console after logging in.
-
Search for the required user and scroll down to the search results.
-
Click on the user’s ID under the User Login field.
-
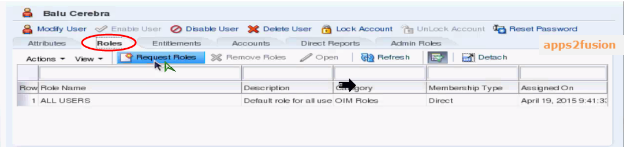
Click on the Roles tab, followed by the Request Roles button.
-
Search for the required role from the catalog (you can use ‘*’ as a wildcard) and click on the arrow button.
-
Scroll down the search results and click on the Add to Cart button corresponding to the required role.
-
After adding all the required roles to the cart, scroll to the right and click on the Checkout button in the Cart section.
-
The items in the cart and the target users will be displayed. Click on the Submit button to submit the cart.
-
If you are logged in as an administrator (and thus requesting the role(s) on behalf of a user), this will bypass the approval process, and the role(s) will be assigned to the target users.
If you are logged in as any other user, it will be passed on to the administrator for their approval. -
When clicking on the Roles tab for the user, the newly added role will be shown in the list.