
Introduction
Logical Table source (LTS) is one of the important and new feature introduced in OBIEE 11g which provides the way to dynamically select the LTS for a particular dimension or fact based on the user.
This chapter comprises following topics:
Managing Logical Table Source (LTS)
The LTS is nothing but reference to the physical table. In the BMM layer, you will have logical table and logical fact table. A logical table have multiple LTS and each logical table have one or many physical tables.
-
Describe normalized and de-normalized table structures in database designs
-
Add multiple sources to a LTS for a dimension in the business model
-
Add a second LTS to a dimension in the business model
Business Challenge
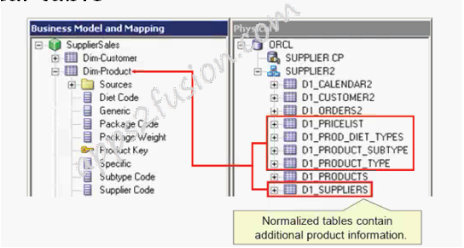
Data may spread across several physical tables and needs to be mapped to a single logical table.
Fig 1
Solution
-
Add multiple sources to LTS if the data in not duplicated across tables
-
Add new LTS if data is not duplicated and snowflake schema is used
Fig 2:
1.1. Import Additional tables
Import Additional product tables that store product code, product type, pricing, and supplier information.
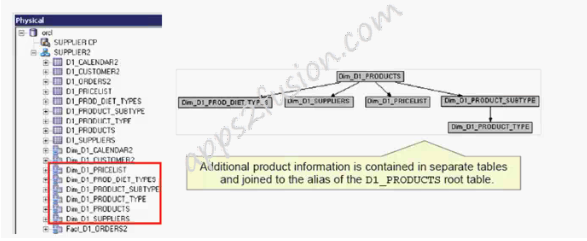
Writers such as Ralph Kimball sometimes call this structure “snowflaking a dimension”.
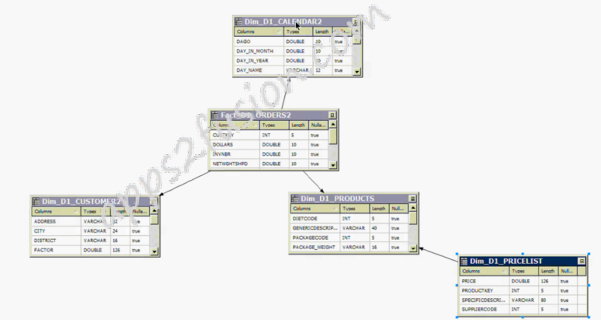
The physical diagram after snowflaking is shown below:
Fig 3:
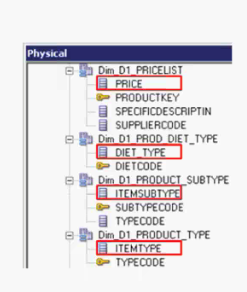
1.2. Identify extra columns
The extra columns are identified and brought into the BMM layer.
Fig 4:
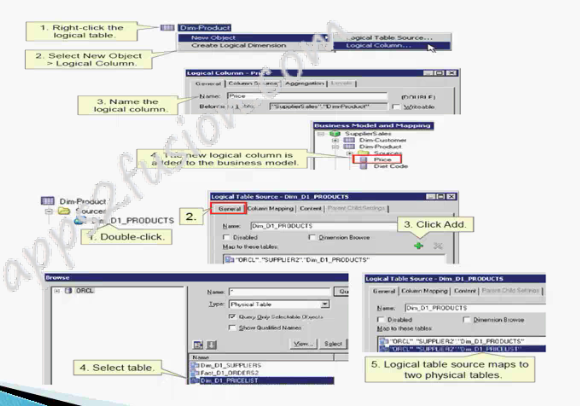
1.3. Add column and bridge LTS
Fig 5:

1.4. Map Column
The logical column can be mapped to two tables as described below:
Fig 6:
Drag and Drop Method
Sometimes the columns cannot be mapped automatically and so drag and drop method is used.
Fig 7:

After mapping the columns manually by drag and drop method, the results are shown below
Fig 8:
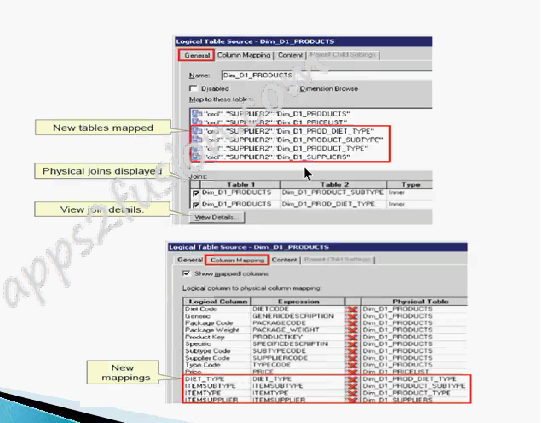
1.5. Define keys and joins
Fig 9:

1.6. Rename Logical Columns and add to Presentation Layer
You have to rename the columns in BMM layer since renaming columns in presentation layer will result in error. OBIEE do not create aliases automatically for presentation columns. We need to create aliases manually.
After renaming the Logical Columns, aliases will be created which are references to old names. You can check the aliases in Column Name->alias in presentation layer.
Fig 10:

1.7. Add a new LTS
-
In the BMM layer, expand SupplierSales -> Dim-Product -> Sources. Note that the Dim-Product has LTS named Dim D1_PRODUCTS.
-
Double-Click Dim D1_PRODUCTS to open the Logical Table Source dialog box
-
Click the Column Mapping tab and note that all logical columns map to the physical columns in the same physical table.
-
Click ok to close the Logical Table Source dialog box.
-
Drag Dim_D1_Product_Type to the Dim-Product logical table in the BMM layer. Note that this creates a LTS named Type for the Dim-Product logical table.
- Fig 11:

Define content of LTS
There are new two Logical table sources for the Dim-Product logical table: Dim_D1_Products and Type. The Type Code logical column is mapped in both logical table sources and therefore maps to both Dim_D1_PRODUCT_TYPE and the Dim_D1_PRODUCTS tables
Now you need to specify the aggregation content for the logical table sources. To use source correctly, Oracle BI Server has to know what each source contains in terms of the business model.
-
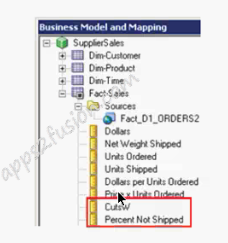
Adding Calculations to Fact
-
Calculation measures can be created based on logical columns and physical columns.
-
Calculation measures can also be created by using the Calculation Wizard.
-
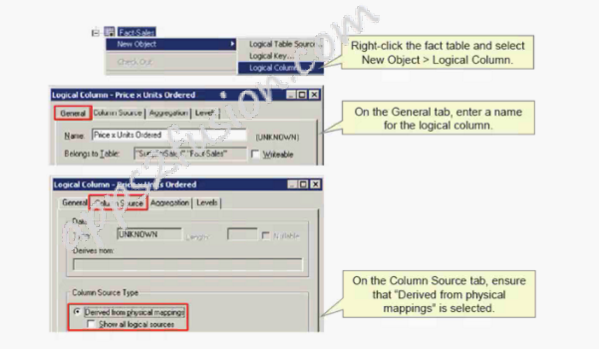
Create Calculations using existing Logical columns
-
Right-click the fact table and select new Object->Logical Column
Fig 12:

Create Calculations using Existing physical columns
Fig 13:
Use the Column Mapping tab of the Logical Table Source dialog box to open the Expression builder for the new column.
Fig 14:
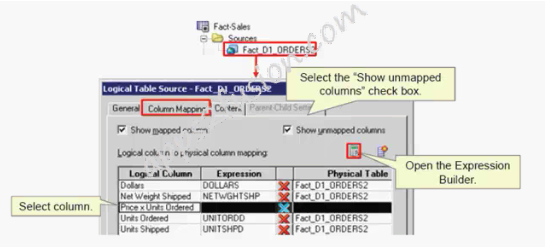
Build the calculation formula by using physical columns.
Fig 15:

Using Calculation Wizard
-
Open the calculation wizard
-
Choose the columns for comparison and select the calculations.
-
Confirm the calculation measures and new calculation measures are automatically added.
-
Right click the logical column to be included in the calculation and then select calculation wizard.
New calculation measures are automatically added to the business model.
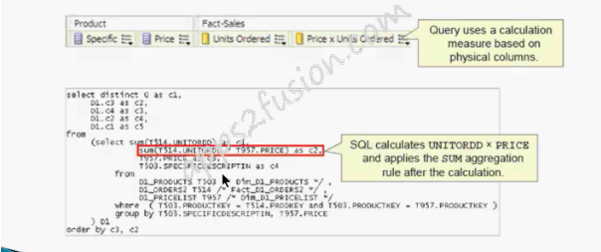
Examining a query using physical columns
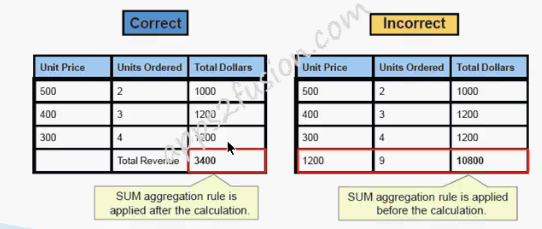
Use physical columns for calculations that require an aggregation rule to be applied after the calculation.
Fig 16:
The differentiation of when a physical column or logical column used in the calculation is shown below:
|
Physical column for calculation |
Logical column for calculation |
|
Physical column is used for calculations that require that an aggregation rule to be applied after the calculation E.g. Here the calculation is expressed as Sum(U NITORDD*PRICE) where the Sum aggregation rule is applied after the calculation |
Logical Column is used when the aggregation rule is applied after the calculation |
Table 1
Examining a query using physical columns
Use physical columns for calculations that require an aggregation rule to be applied after the calculation
Fig 17:

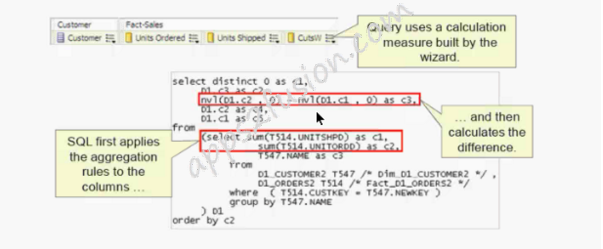
Examining a query using logical columns
Use logical columns for calculation formulas that require an aggregation rule that is applied before the calculation.
A Query uses the Dollars per Units Measured calculation measure, was built using existing logical columns in the formula.
In this example, the SQL applies the SUM aggregation rule to Units Ordered (UNITORDD) and Dollars (DOLLARS) first and then calculates the division.
Fig 18:
Examining a query using calculation wizard
When you use the calculation wizard to model the calculation measures, it is important to note that the wizard uses logical columns as objects in the calculation formulation. Therefore, an aggregation rule is applied before the calculation.
Fig 19:
Create Rank Measure
Use the Provided functions to build expressions in the expression builder.
Fig 20:


