
Introduction
This topic explains the ways to configure and manage analyses and dashboards. It Provides users of a dashboard page or an analysis with the ability to modify the data they see in table view.
Table 1:

Steps to Configure Write Back
-
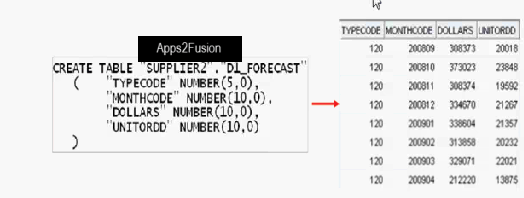
Create Physical Table with Write Back columns
Create a physical table in the database that has a column for each needed write back field.
For optimum security, store write back database tables in a unique database instance.
Table 2:
-
Import Write Back Table
Using the Admin Tool, import the write back table into the physical layer of the repository.

Disable the Cacheable property for the physical table. This ensures that data written back to the database is displayed to the user and is not a cached value.
In this example, the Cacheable object is deselected for D1_FORECAST table in the physical layer of the repository.
-
Enable Write Back on Connection Pool
In the physical layer, double-click the connection pool to open the Connection pool dialog box. Click Write Back tab. If you are using an Oracle data source, you can accept the defaults as shown in the figure below:
Prefix: When the Oracle BI Server creates a temporary table, TT is the default temporary table name.
Owner: Table owner name that is used to qualify a temporary table name in a SQL statement. If this field is blank, the username specified in the writeable connection pool is used to qualify the table name, and the Shared Logon field on the General tab should also be set.
DatabaseName: Database where the temporary table is created. This property is applied only to IBM OS/300 because IBM OS/390 requires the database name qualifier to be part of the CREATE TABLE statement.
TablespaceName: Tablespace where the temporary table is created. This property applies only to OS/390 because OS/390 requires the tablespace name qualifier to be part of the CREATE TABLE statement.
BufferSize (KB): Used for limiting the number of bytes each time data is inserted in a database table. For optimum performance, set this parameter to 128.
Transactionboundary: Controls the batch size for an insert in a database table. For optimum performance, set this parameter to 1000.
Unicodedatabasetype: Select this option when working with columns of an explicit Unicode data type (such as NCHAR) in a Unicode database. This ensures that the binding is correct and data is inserted correctly.
-
Enable Write Back for Logical Columns
In the BMM layer, enable write back for logical columns that will be used for write back in an analysis.
Double-click on the column “DOLLARS” and select the Writeable check box.
-
Set Write Back in Presentation Layer
Select Read/Write permission for any application roles or users who have write back permission for an object in the presentation layer.

-
Enable Write Back in instanceconfig.xml
Navigate to the following location:
<ORACLE_INSTANCE>\config\OracleBIPresentationServicesComponent\coreapplication_obips1
Open instanceconfig.xml in editor.
In the ServiceInstance section, set the LightWriteBack parameter to true, by entering <LightWriteBack>true</LightWriteBack>. By default the value is false.
-
Create Write Back Template
You can create multiple write back templates, customizing each one for the fields used in each specific analysis. In the analysis properties, you specify the name of the write back template to use. If a user has the “Write Back to Database” privilege, the write back fields in their analyses appear as editable fields. If the user does not have privilege, the write back fields appear as normal fields.
-
Requirement for the Write Back Template
Note that the WebMessage name element is SetForecast. To ensure that write back works correctly, in the WebMessage element of the file you must include the name of the SQL template that you will specify when you want to create the write back table. The name is arbitrary.
To meet security requirements, you must specify the connection pool along with the SQL commands to insert and update records. In this example the connection pool is set to SUPPLIER CP.
Note: If a parameter’s data type is not an integer or real number, add single quotes around it.
-
Store Write Back Template
The system can have multiple customMessages folders, such as ORACLE_HOME\Web\msgdb\customMessages. This is primarily to persist these files during upgrades.
Although XML message files that affect a language-specific user interface must be localized, in most cases the XML file that is used for configuring a write back template in not translated, since it is language independent.
To ensure that write back words correctly, include in the WebMessage element of the file the SQL template name that you specify when you create the write back table.
You can have multiple WebMessage elements in one file, with each element specifying one SQL template.
-
Grant Write Back Privileges
Use the Oracle BI Presentation Services Administration screen to set the “Write Back to Database” privilege that needs users for modifying value in analyses.
-
Enable Write Back in Column
Create an analysis that contains a table view with the columns configured for write back.
For each write back column, select the Enable Write Back check box on the Write Back tab in column properties.
-
Override Default Data Format
Override the default data format on the Data Format tab to remove values that will not write back to the database.
-
Enable Write Back in table View
On the Results tab, click the edit button (pencil icon) for the table view. Then click the Table View Properties button to open the Table Properties dialog box.
On the Write Back tab, enter the template name. In this example, the template name is SetForecast. Recall that this is the Web message name in the template. Enable Write Back should be enabled by default.
At this point, you can modify the names of the Apply, Revert, and Done buttons, and you can change button positions. Toggle Table mode enables you to switch between write back mode and the default table view.
1. Click the edit button for table view
2. Click table view properties
3. Enter the template name.
-
Verify Results
Verify that you can enter data in the expected fields and that data is written back to the database.


