
Introduction
This chapter facilitates the checking out and publishing changes to projects, and merging metadata. It also explains the implementation of Oracle BI MUD features such as versioning, version history viewing, and version comparison.
-
To Make Changes in an Oracle BI MUD
Before checking out projects, each developer must set up the Administrator Tool to point to the MUD strategy.
-
Select Tools->Options and then click the Multiuser tab.
-
The “Multiuser development directory” field is mandatory. It must be completed by any user who wants to use the MUD feature and must be set to the directory on the network shared with other MUD developers.
-
Use the Browse button to navigate to the directory or enter the directory path. The Administrator Tool stores this path in a hidden windows registry setting on the developer’s workstation and uses it during check out and checks in.
-
The Full name field is optional. If a user enters a name here, the value is used by default in the “Full Name” field of the repository Lock information dialog box.
Note: For convenience and tracking, each MUD developer should enter a full name. The value is stored in the HKEY_CURRENT_USER part of the registry and is, therefore, unique for each login.
-
Check out projects
Select File->Multiuser->Checkout and select the desired project or projects.
Fig 1:
-
After setting up a pointer to the MUD default directory, a developer can check out the desired projects.
-
To check out projects, select File->Multiuser->Checkout. The checkout option is available only when there is a MUD directory defined on the Multiuser tab of the Options dialog box.
-
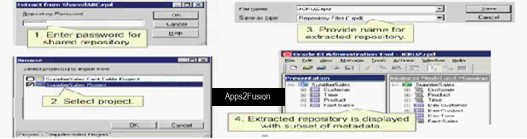
The developer is presented with a dialog box asking for the repository password.
-
After entering the password, the developer is presented with a dialog box to select the project or projects to import. If there is only one project in the master repository, it is chosen by default and no dialog box is presented to the user. In this example there are two projects.
-
After selecting a project or projects, the user must enter the name of the new, extracted repository, which is stored in the user’s local directory.
-
The extracted repository is displayed with the subset of metadata from the SupplierSales project. Note that it contains only the SupplierSales subject area and business model. The other ABC subject areas and business models are not shown. Note also that the SupplierSales Subject area and business model contain only the Fact-Sales fact table.
-
Admin Tool Tasks during Checkout
During checkout, the Administration Tool performs the following tasks:
Fig 2:
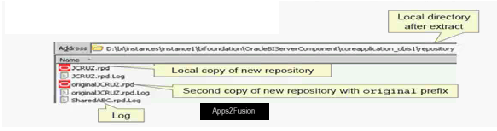
In the developer’s local \coreapplication_obis1\repository directory, the Administration tool saves a local copy of the selected projects in a new repository. In the example shown above, the new repository is named as JCRUZ.rpd. The developer makes metadata changes in this file.
In the developer’s local \coreapplication_obis1\repository directory, the Administration Tool saves a second local copy of the new repository, adding original as the prefix, to enable changed projects to be compared with original projects locally. In this example, the local copy is named originalJCRUZ.rpd.
All changes are tracked in the log, which is SharedABC.rpd.Log in the example shownabove.
-
To change Metadata
Most changes that can be made to standard repository files are also supported for local repository files.
Developer can add new logical columns, logical tables, change table definitions, logical table sources, and so on. In this example, the Customer presentation table is deleted.
Physical connection settings should not be modified in a local repository. To prevent developers from overwriting passwords and other important objects in the master repository, the physical connection settings, security settings, and database feature table changes are not retained in MUD merge.
After making changes to a local repository, the developer can load the modified repository and test the edited metadata.
-
Options during MUD
The following options are enabled, when the local, extracted repository is open:
Compare with Original option launches a dialog box that compares the local version of the original repository with the subset repository.
Discard Local Changes option discards changes to the local repository without checking in.
Merge Local Changes launches a dialog box to merge local changes with the master repository.
Fig 3:

-
Make merge decisions
If there are conflicts when a developer selects File->Multiuser->Merge Local Changes, the developer has to make decisions about what to do with the changes.
Fig 4:

In the above example, the Modified repository is selected where from the customer table is deleted.
After making the merge decisions, click Finish to publish the master repository to the network.
-
Publish to Network
Select File->Multiuser->”Publish to Network” to commit changes to the master repository.
The local copy of the master repository closes and the master repository in the MUD is overwritten with the copy of the repository containing the developer’s changes.
Note: You also have the option to discard local changes or undo merge at this point.
-
To Track Project History
-
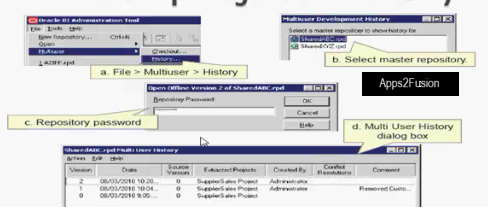
The viewer is accessed by selecting File->Multiuser->History. This menu is available only when the Oracle BI Administration tool is open with no repository file open.
Fig 5:
-
When this menu is selected, the user will see the MUD history dialog box. This dialog box lists all master repositories in the shared MUD directory specified in the Options dialog box.
-
If no directory is specified in the Options dialog box, the History menu item is disabled.
-
After the repository has been selected, the user is prompted to fill in the user ID and the password for the latest version of the master repository.
-
After successful login, the Multi User History dialog box is displayed with the different versions of the project listed.
-
History Menu Options
View->Repository loads the selected master version of the repository to the Administration Tool in read-only mode.
View->Prior to Merge->Projects loads the selected version of the modified subset repository to the Administration tool in read-only mode.
View->Prior to Merge->Changes compares the modified subset repository of a selected version with the original subset repository. It opens the modified subset of the shared repository and displays the Compare Repositories dialog box with all changes made by the user in the selected version.
View->Detail displays the detail log for the selected version/versions, or all details if no version is selected.
View->Conflict Resolution loads all necessary repositories of the selected version and shows the Merge dialog box in read-only mode.


