
SSL Certificate
1. What is SSL? SSL is an acronym for Secure Socket Layer , an encryption technology that was created by Netscape. SSL creates an encrpted connection between your web server and your bisitor's web browser allowing for private information
to be transmitted without the problems of eavesdropping , data tampering or message forgery .SSL Certificates are small data files that digitally bind a cryptographic key to an organization’s details.When installed on a web server, it activates the padlock and the https protocol (over port 443) and allows secure connections from a web server to a browser. Typically, SSL is used to secure credit card transactions, data transfer and logins, and more recently is becoming the norm when securing browsing of social media sites.
SSL Certificates bind together:
->A domain name, server name or hostname.
->An organizational identity (i.e. company name) and location.
2. In cryptography , a public key certificate ( also known as digital certificate or identity certificate )
is an electronic document used to prove owbership of a public key . The ecrtifcate includes information about the key , information about its owner's identity,
and the digital signature of an entity that has verified that the certificate's contents are correct. If
the signature is valid , and the person examining the certificates trusts the signer , then they
know they can use that key to communicate with its owner
- SSL_RSA_WITH_3DES_EDE_CBC_SHA
Fields in SSL certificate
1. Serial Number . Used to uniquely identify the certificate
2. Subject : The person or entity identified .
3. Signature Algorithm : The algorithm used to create the signature.
4. Signature: The actual signature to verify that it comes from the issuer .
5. Issuer : The entity that verified the information and issued the certificate .
6. Valid-From : The date the certifcate is valid from.
7. Valid-To : The expiration date .
8. Key-Usage : Purpose of the public key (e.g. encipherment , signature, certificate signing..).
9. Public Key : Purpose of the public key (e.g. encipherment , signature , certificate signing ...).
10. Public Key : The Public key
11. Thumbprint Algorithm : The Algorithm used to hash the public key certifcate .
12. Thumbprint : The has itseld , used as an abbreviated form of the public key certifcate.
Below screen shot shows how to view the SSL certificate for any web site .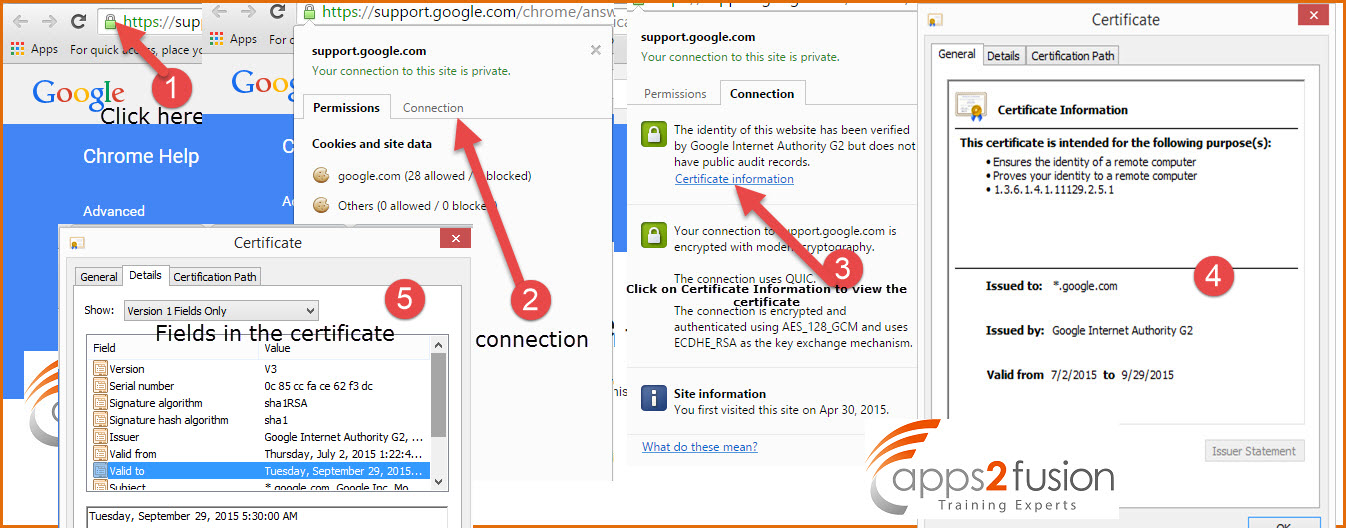
Steps to configure SSL in WebLogic Server :
1. Create Java KeyStore (JKS) and generate key
2. Generate Certificate Signing Request (CSR)
3. Send this certificate request file to CA to issue certificate
4. Import Root CAs certificate
5. Import intermediate CAs certificate (If any)
6. Import certificate issued by CA
7. List content of keystore
8. Configure SSL in WebLogic Server
—8.1 Change KeyStore type in WebLogic Server
—8.2 Specify path of Identity KeyStore and Trust KeyStore
—8.3 Specify Private Key Alias in WebLogic Server
—8.4 Enable SSL in WebLogic Server
9. Test SSL in WebLogic Server
1. Create Java KeyStore and generate key: First step is to create KeyStore and private key (If you already have a keyStore then you can use that to generate key)
keytool -genkey -alias myAlias -keyalg RSA -keysize 2048 -dname “CN=serverName, OU=MyOrganizationUnit, O=myOrganization,L=myLocation, ST=myState, C=myCountry” -keypass [privat_key_password] -keystore [keystore_name].jks -storepass [keystore_password]
Note:
a) This step will create Keystore [keystore_name].jks
b) keytool utility is a Key and Certificate Management Tool and is available in $JAVA_HOME/bin
c) -genkey option signifies that we are generating private keys
d) -alias myAlias : Each entry in KeyStore (JKS) is represented by Alias. When you import signed certificate (issued by CA) in KeyStore then you should use same alias (used during key generation)
e) -keyalg RSA : is algorithm used to generate keyPair (default algorithm is DSA)
f) -keysize 2048 : is size of key used to generate private key
g) -dname : represents name of server to which certificate key is created. If you are generating keys for server innowave21.focusthread.com then use CN=innowave21.focusthread.com, OU=………
2. Generate Certificate Signing Request: Next step it so generate Certificate Signing Request (CSR) for Key (with alias innowave21) generated in previous step
keytool -certreq -alias myAlias -keystore [keystore_name].jks -storepass [keystore_password] -file [certificate_request].csr
a) This step will create certificate signing request file
b) -certreq signifies that we are generating certificate signing request file
c) -alias myAlias must be same as one used during key generation in previous step
3. Send this certificate request file to Certifying Authority (CA) to issue certificate
4. Import Root CA certificate.
Once you receive certificate for your server then you must import certificate of Authority issued the certificate (before importing certificate issued by CA)
keytool -import -trustcacerts -alias rootcacert -keystore [keystore_name].jks -file rootCA.cer -storepass [keyStorePassword]
a) This step will import certificate of Certifying Authority (CA) with alias as rootcacert in KeyStore
b) -import signifies that we are importing certificate in keystore
c) -trustcacerts signifies that we are importing trusted certificates (In this case KeyStore is acting as trust Store, remember trust store and identity store discussed in part I ??). If you don’t use option -trustcacerts then it will try to import certificate as Identity Certificate
d) -alias must be different from one used during key generation
e) -file rootCA.cer is file that contains certificate of Root Certifying Authority
5. Import intermediate CA (If Any) certificate
If there are more than one Certifying Authority (CA) then you must import any intermediate CA
keytool -import -trustcacerts -alias intermediatecacert -keystore [keystore_name].jks -file intermediateCA.cer -storepass [keyStorePassword]
a) -import signifies that we are importing certificate in keystore
b) -trustcacerts signifies that we are importing trusted certificates (In this case KeyStore is acting as trust Store, remember trust store and identity store discussed in part I ??). If you don’t use option -trustcacerts then it will try to import certificate as Identity Certificate
c) -alias must be different from one used during key generation or while importing root CA
d) -file intermediateCA.cer is file that contains certificate of Intermediate Certifying Authority
6. Import Server Certifucate
Next step is to import Server Certifictae
keytool -import -alias myAlias -keystore [keystore_name].jks -file servercert.cer -keypass [keyPassword] -storepass [keyStorePassword]
a) -import signifies that we are importing certificate in keystore
b) -alias myAlias should match with Alias used during generation of Key
c) -file servercert.cer is file that contains certificate of server issue by CA
7. List content of keystore
If you want to view certificate stored in KeyStore then you can use option -list like below
keytool -list -v -keystore [keystore_name].jks -storepass [keyStorePassword]
8. Configure SSL in WebLogic Server
In steps above Trust Store (store containing Root and Intermediate CA) and Identity Store (store containing Server Certificate) are same i.e. [keystore_name].jks .
8.1 Change KeyStore type from “Demo Identity and Demo Trust” to “Custom Identity and Custom Trust”
WebLogic Server Console -> Name of Server (for which you wish to configure SSL) -> Configuration -> KeyStores -> change (next to Key Stores)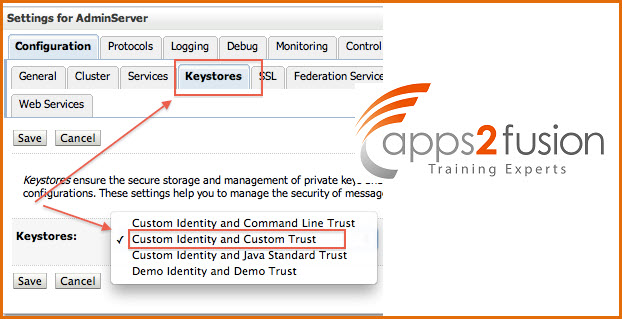
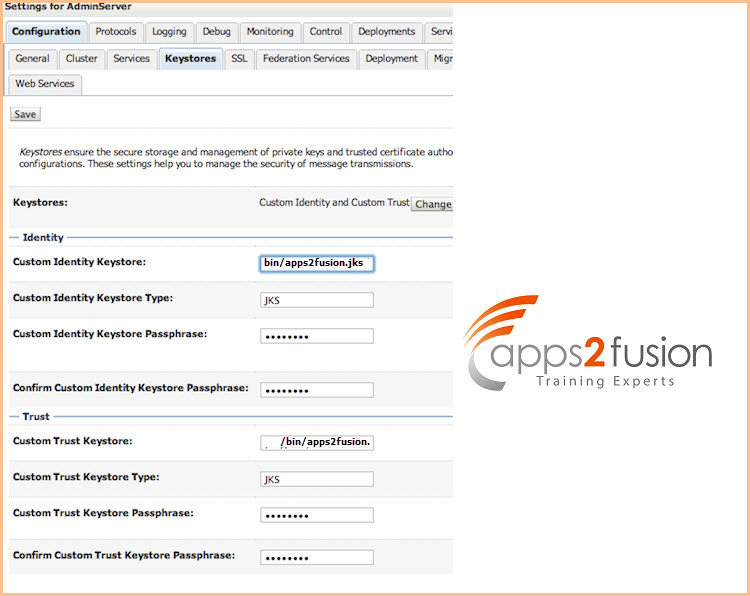
8.2 Specify path of Identity KeyStore and Trust KeyStore
8.3 Specify Private Key Alias in WebLogic Server
Enter the Alias you used during creation of certificate request and password of KeyStore
WebLogic Server Console -> Name of Server (for which you wish to configure SSL) -> Configuration -> SSL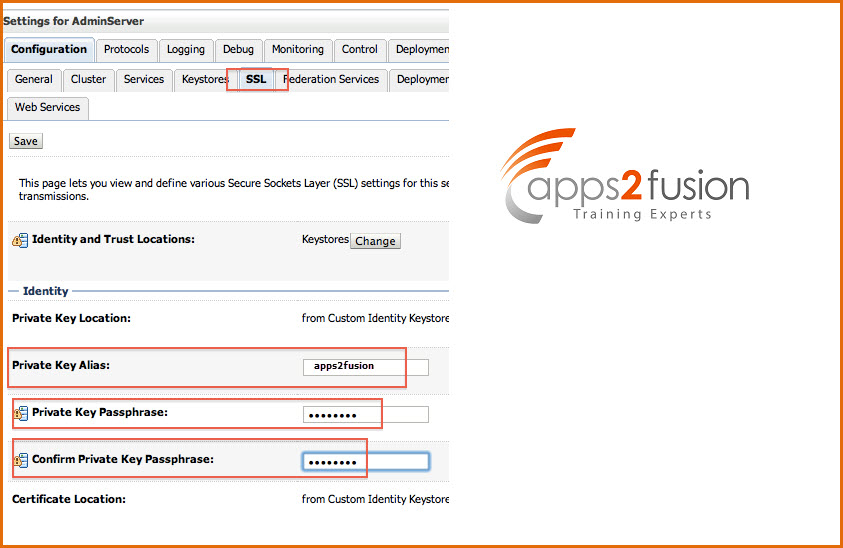
8.4 Enable SSL in WebLogic Server
Finally enable SSL in WebLogic Server ; WebLogic Server Console -> Name of Server (for which you wish to configure SSL) -> Configuration -> General
9. Test SSL in WebLogic Server
https://<hostName_of_WebLogic_Server>:<SSL_ListenPort>


