
Oracle Fusion Financial Reporting Center: Part 3
In Part 1 and 2 we understood what is Fusion Financial Reporting Center, why this is required, key benefits to user and how to Install and configure Financial Reporting Studio Client for Users. In Part 3, we will try to understand how to create simple report by using Financial Reporting Studio.
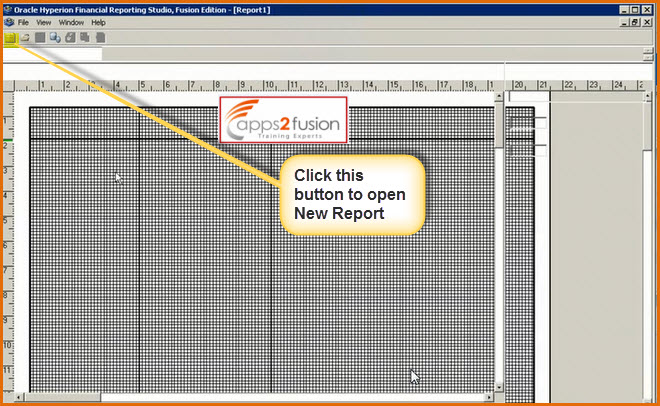
When you successfully install Financial Reporting Studio on your machine (As mentioned in Part-2), you can see in your Program Menu, Financial Reporting Studio Icon. Click on the FRS Icon to start this program
Vey commonly User may get below error when you click on Financial Reporting Studio (Oracle menu under All Program)
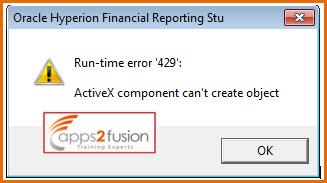
As per below Metalink note
Financial Reporting (FR) Studio Error "Run-time error 429: Active-X component can't create object" on Windows 7 or Vista (Doc ID 1328952.1)
Cause of this problem - The FR Studio is not installed as an Administrator and some files were missing during installation.
Solution- Run the HRRunAnt.cmd file which is located in the following location: C:\Program Files\Oracle\FinancialReportingStudio\products\financialreporting\install\bin
After running that command, restart the system.
Refer to Metalink if you face any other issue while running FRS.
Starting Reporting Studio- To start the Reporting Studio follows below steps:
Perform an action:
- Double-click the Reporting Studio icon on your desktop.
- From the Windows Start menu, select Programs then, Hyperion then, Reporting & Analysis then, and Financial Reporting Studio.
- When the Hyperion Login dialog box is displayed, type your User ID, Password, and select a report server. Click OK.
On clicking FRS (Financial Reporting Studio), you will get a login page. Log in with your credentials.
The URL you will get from your DBA or from Oracle if you are using oracle Cloud environment. This is internal BI server URL. Sometimes this is not accessible through VPN to connect to FRS Studio. After entering details, click OK and this will open Reporting tool.
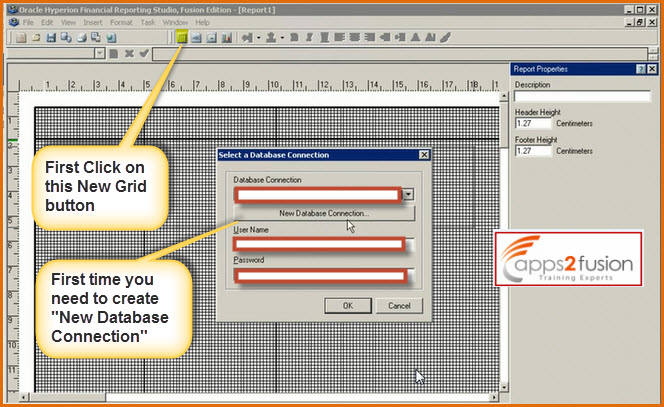
First time you need to create Database connection, next time do not need to create this connection.
Enter required details to create New connection. Provide any name in connection.
Under application, select your Chart of Accounts.
On Clicking OK, you will be directed to Dimension Layout window.
Under this Dimension layout, you will see Point of View option. Point of View acts as a variable that employs the POV to specify the member of a dimension when the report is run. User Point of View can be selected as a member on the book POV.
How to set Point of View
A current POV enables the designer to obtain a member for a row, column, or page from the User POV. The parameters can be modified by the end user. To set up a current POV, follow below steps-:
- Open a report and double-click a member selection for which you want to set up a current POV.
- On the Members tab, select Current Point of View for the dimension, then click the Add button, to add the Current Point of View for the dimension to the selected area.
- Click OK.
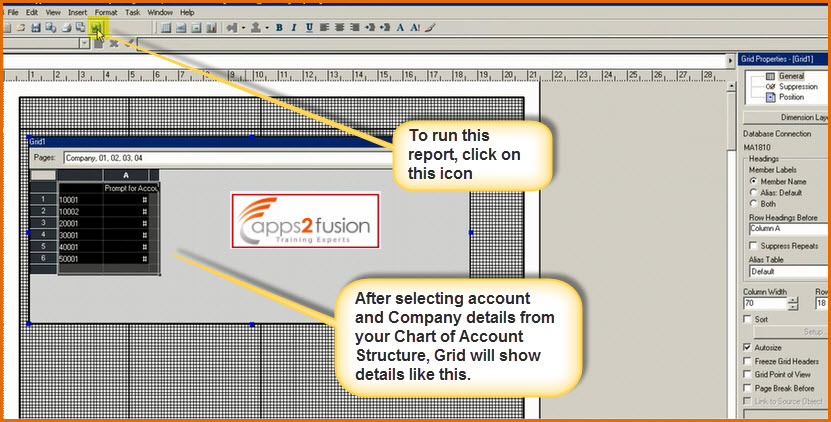
Based on the Dimensions, just drag and Drop Point Of View to Pages or Column or Rows to create report. You can create lists of reusable members, and use functions that retrieve members dynamically. Before we begin to define members, we must insert a grid in the report and define its dimension layout.
We can save this report on desktop to run in future.
Opening Existing Reports- To open an existing report in the Designer, follow below steps-
- Select File, and then Open.
- Double-click a folder from the Open dialog box or highlight the folder name and click Open.
- A list of all reports contained in the folder is displayed.
- Select reports to open, then click Open.
Financial Reporting Components- Financial Reporting is composed of multiple components that can be accessed in Reporting Studio, Workspace, or both. These are-
- Report Designer—In Reporting Studio enables to create, edit, or delete report objects, reports or snapshot reports.
- Explore Book Editor—In Financial Reporting Workspace - Provides the capability of creating a book of reports, which can be saved as a book or a snapshot book.
- In Reporting Studio - Enables you to create, open, save, and delete folders and store report objects, reports, and snapshot reports.
- In Financial Reporting Workspace - Enables you to open stored files, create folders, export and import files, and set up e-mail links to folders, reports, and snapshot books.
- Scheduler—In Financial Reporting Workspace-Enables you to schedule a batch and view the status of batches that are scheduled for future processing.
- Batch Editor—In Financial Reporting Workspace-Enables you to add objects to a batch job, remove objects from a batch job, schedule a batch, and indicate whether or not you want the batch deleted after it runs.
- Workspace—this tasks are based on user rights.
- In Reporting Studio - If you are Report Designer or Global Administrator, you can create, edit, or delete report objects, reports or snapshot reports in the designer Studio workspace or work with reports and report objects in Studio Explore.
In Workspace - you can create a book of reports, schedule batches, view batches, and edit batches. If you are a user with viewer rights you can view reports and export documents to Word, Excel, and PowerPoint.


